
Installation Instructions


7004808, 7004809, 7004810, 7004811, 7004812, 7004813, 7012623, 7012624
(Instructions for Dual Grille Kits Listed Above)
7010064 / Rev C / March, 2011
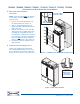
F. Join Units Together at Bottom
1. All-Refrigerator and All-Freezer Models
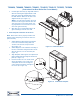
i. Using a 1/2'' wrench, loosen the four bolts (2 each
unit) at bottom adjoining corners of the appliances,
leaving a 1/8'' (3mm) to 1/4” (6mm) gap between bolt
heads and unit shell bottom (See Figure 7).
ii. Align the four notches of the Dual Installation Bottom
Bracket with the four bolts at bottom adjoining corners
of the appliances, push the bracket into position, then
tighten the bolts (See Figure 8).
2. Over/Under Models
i. Using a 1/2'' wrench, install four 5/16” x 3/4” Thread-
Forming Screws (2 each unit) at bottom adjoining cor-
ners of the appliances, but DO NOT tighten them,
instead leave a 1/8'' (3mm) to 1/4” (6mm) gap
between bolt heads and unit shell bottom (See
Figures 8).
ii. Align the four notches of the Dual Installation bottom
Bracket with the four bolts at bottom adjoining corners
of the appliances, push the bracket into position, then
tighten the bolts (See Figures 8).
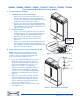
G. Install Threaded Inserts at Top of Over/Under Models
NOTE: If working with all-refrigerator and/or all-
freezer models the threaded inserts are already
installed at the top. Skip instructions below and
move onto Join Units Together at Top.
1. Locate the hexagonal shaped holes at the top
adjoining corners of the units, two each unit.
Then, use a small screwdriver or similar tool to
remove foam insulation from each hole, to a
depth of no more than ½” (13mm) deep.
2. Screw the Thread Insert Installation Tool into a
Threaded Insert, then position the Threaded
Insert over one of the hexagonal shaped holes
and tap the Threaded Insert into the hole (See
Figure 9).
3. Using a 1/2'' wrench at the tool bolt top and a
9/16” open-end wrench at the collar, spin the
tool bolt clockwise while holding the collar sta-
tionary. Stop when it will spin no further and
remove the tool from the insert.
4. Repeat steps 1-3 above for each of the hexago-
nal shaped holes.
Figure 8. Join Units Together at bottom
1/8”-1/4”
Figure 9. Threaded Insert Installation
Tool Bolt
Tool Collar
Insert
Hexagonal Hole
Bottom View
of Bolts &
Bracket
Page 5 of 7