D UAL F UEL R ANGES I NSTALLATION I NSTRUCTIONS
As you follow these instructions, you will notice WARNING and CAUTION symbols. This blocked information is important for the safe and efficient installation of Wolf equipment. There are two types of potential hazards that may occur during installation. signals a situation where minor injury or product damage may occur if you do not follow instructions. states a hazard that may cause serious injury or death if precautions are not followed.
W O L F D UA L F U E L R A N G E S I N S TA L L AT I O N R E Q U I R E M E N T S IMPORTANT NOTE: This installation must be completed by a qualified installer, service agency or gas supplier. IMPORTANT NOTE: Save these Installation Instructions for the local inspector’s use. Please read the entire Installation Instructions prior to installation. Installer: please retain these instructions for local inspector’s reference, then leave them with the homeowner.
W O L F D UA L F U E L R A N G E S B E F O R E Y O U S TA R T Proper installation is your responsibility. Installations must be performed by a qualified or licensed contractor, plumber or gas fitter, qualified or licensed by the state, province or region where this appliance is being installed. You must also ensure that electrical installation is adequate and conforms with all local codes and ordinances. Wolf dual fuel ranges are manufactured for use with natural gas or LP gas.
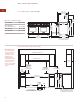
I N S TA L L AT I O N I N S T R U C T I O N S V E N T I L AT I O N O P T I O N S I N S TA L L AT I O N S P E C I F I C A T I O N S IMPORTANT NOTE: It is recommended that you operate the Wolf dual fuel range with a Pro ventilation hood. Contact your Wolf dealer for details. Wolf dual fuel ranges come in 30" (762), 36" (914), 48" (1219) and 60" (1524) widths. Illustrations on pages 7–10 provide the overall dimensions and installation specifications for each width of dual fuel range.
W O L F D UA L F U E L R A N G E S I N S TA L L AT I O N S P E C I F I C A T I O N S MINIMUM CLEARANCES I S L A N D | P E N I N S U L A I N S T A L L AT I O N S IMPORTANT NOTE: Caution must be used in planning the proper installation of the Wolf dual fuel range to avoid fire or damage to adjacent cabinetry or kitchen equipment. Be sure to follow the minimum clearances established in the finished rough opening dimensions.
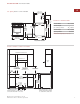
I N S TA L L AT I O N I N S T R U C T I O N S 30" (762) D UA L F U E L R A N G E 29 1/2" (749) OVERALL DEPTH 27 1/2" (699) 9 1/4" (235) 56 7/8" (1445) WITH 20" RISER 36 7/8" 35 7/8" (937) OVERALL HEIGHT TO COOKING SURFACE (911) 24 1/4" 46 7/8" (616) (1191) WITH 10" RISER OVERALL DIMENSIONS Overall Width 29 7/8" (759) Overall Height (to cooking surface) 36 7/8" (937) Overall Depth 29 1/2" (749) 41 7/8" (1064) WITH 5" RISER Opening Width Dimensions may vary to 29 7/8" (759) OVERALL WIDTH
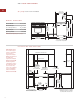
W O L F D UA L F U E L R A N G E S 36" (914) D UA L F U E L R A N G E S 29 1/2" (749) OVERALL DEPTH 27 1/2" (699) 9 1/4" (235) 56 7/8" OVERALL DIMENSIONS (1445) WITH 20" RISER 35 7/8" (911) Overall Width 46 7/8" (1191) WITH 10" RISER 24 1/4" (616) Overall Height (to cooking surface) 36 7/8" (937) Overall Depth 29 1/2" (749) Opening Width 36 7/8" 35 7/8" (937) OVERALL HEIGHT TO COOKING SURFACE (911) 41 7/8" (1064) WITH 5" RISER 36" (914) Dimensions may vary to ± 1/ 8" (3).
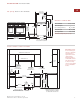
I N S TA L L AT I O N I N S T R U C T I O N S 48" (1219) D UA L F U E L R A N G E S 29 1/2" (749) OVERALL DEPTH 27 1/2" (699) 9 1/4" (235) 56 7/8" (1445) WITH 20" RISER 36 7/8" 35 7/8" (937) OVERALL HEIGHT TO COOKING SURFACE (911) 24 1/4" 46 7/8" (616) (1191) WITH 10" RISER 41 7/8" (1064) WITH 5" RISER OVERALL DIMENSIONS 47 7/8" (1216) Overall Width Overall Height (to cooking surface) 36 7/8" (937) Overall Depth 29 1/2" (749) Opening Width 48" (1219) Dimensions may vary to 47 7/8" (121
W O L F D UA L F U E L R A N G E S 60" (1524) D UA L F U E L R A N G E S 29 1/2" (749) OVERALL DEPTH 27 1/2" (699) 9 1/4" (235) 56 7/8" OVERALL DIMENSIONS Overall Width 60 1/8" (1527) Overall Height (to cooking surface) 36 7/8" (937) Overall Depth 29 1/2" (749) Opening Width (1445) WITH 20" RISER 36 7/8" 35 7/8" (937) OVERALL HEIGHT TO COOKING SURFACE (911) 24 1/4" 46 7/8" (616) (1191) WITH 10" RISER 41 7/8" (1064) WITH 5" RISER 60 1/4" (1530) Dimensions may vary to ± 1/8" (3).
I N S TA L L AT I O N I N S T R U C T I O N S U N PAC K T H E R A N G E Remove and discard all packing materials, including cardboard and tape on the outside of the range and inside the oven cavity. Remove the box containing the oven racks, oven rack guides and broiler pan from inside the oven cavity. Be sure to do this for both oven cavities on the 60" (1524) range. Remove the burner grates and styrofoam off the top cooking surface.
W O L F D UA L F U E L R A N G E S OV E N D O O R R E M O V A L Failure to insert the hinge pin in the appropriate hinge arm will cause damage to the range. Minor injuries may occur. IMPORTANT NOTE: The oven door(s) should not be removed unless it is necessary to fit the range through a tight doorway. Door removal should only be done by a qualified service technician or installer. Door removal and reinstallation may cause damage to the oven porcelain interior.
I N S TA L L AT I O N I N S T R U C T I O N S G A S S U P P LY R E Q U I R E M E N T S EXPLOSION HAZARD — Use a new CSA approved gas supply line and install a gas shut-off valve. Securely tighten all gas connections. For LP gas, have a qualified technician make sure the gas pressure does not exceed 14" (34.9 mb) WC (water column). Failure to do so can result in explosion, fire or death. IMPORTANT NOTE: The dual fuel range must be connected to a regulated gas supply.
W O L F D UA L F U E L R A N G E S G A S S U P P LY R E Q U I R E M E N T S G A S S U P P LY C O N N E C T I O N The gas pressure regulator must be checked at a minimum 1" (2.5 mb) WC (water column) above the set pressure. The inlet pressure to the regulator should be as follows for operation and checking the regulator setting: IMPORTANT NOTE: All connections to the gas piping must be wrench-tightened. Do not make connections too tight, this may crack the gas pressure regulator and cause a gas leak.
I N S TA L L AT I O N I N S T R U C T I O N S ELECTRICAL R E Q U I R E M E N T S FOUR-WIRE ELECTRICAL SYSTEM Verify that power is disconnected from electrical box before proceeding. Maximum connected load: 5.2 kW for 30" (762) and 36" (914) ranges; 10.2 kW for 48" (1219) and 60" (1524) ranges. Required power supply: 240V / 208V / 30A / 60Hz for 30" (762) and 36" (914) ranges; 240V / 208V / 50A / 60Hz for 48" (1219) and 60" (1524) ranges.
W O L F D UA L F U E L R A N G E S A N T I - T I P B R AC K E T I N S T A L L A T I O N OV E N D O O R R E I N S T A L L A T I O N IMPORTANT NOTE: The oven door(s) should not be removed unless it is necessary to fit the range through a tight doorway. Door removal should only be done by a qualified service technician or installer. Door removal and reinstallation may cause damage to the oven porcelain interior. This range can tip. Injury to persons could result.
I N S TA L L AT I O N I N S T R U C T I O N S S U R FAC E B U R N E R S IMPORTANT NOTE: Fully extend the hinge claw which is opposite the hinge pin location and insert into the hinge pocket prior to inserting opposite side. This will ease the installation of the oven door. Do not lift or carry the oven door by the door handle. INITIAL LIGHTING The surface burners use electronic igniters in place of standing pilots.
W O L F D UA L F U E L R A N G E S V E R I F Y R A N G E O P E R AT I O N R E M OV I N G T H E R A N G E IMPORTANT NOTE: Prior to operating the range, be sure to read the entire Wolf Dual Fuel Ranges Use & Care Information included with the range for important safety, service and warranty information. If removing the dual fuel range is necessary for cleaning or service, shut off the gas supply. Disconnect the gas supply and electrical connections to the unit, then remove the range.
I N S TA L L AT I O N I N S T R U C T I O N S TROUBLES H O OT I N G IMPORTANT NOTE: If the dual fuel range does not operate properly, follow these troubleshooting steps: Verify that power is being supplied to the range. Check the gas supply and electrical connections to ensure that the installation has been completed correctly. Check that gas valves are turned to the ON position. Follow troubleshooting procedures as described in the Wolf Dual Fuel Ranges Use & Care Information.
W O L F A P P L I A N C E C O M PA N Y, L L C 807560 9 / 2005 P. O. B OX 4 4 8 4 8 MADISON, WI 53744 800-332-9513 W O L FA P P L I A N C E .