GAS RANGES U SE & C ARE I NFORMATION
CONTENTS Wolf Gas Range 3 Safety Instructions and Precautions 4 Wolf Gas Range Features 8 Wolf Gas Range Surface Operation 10 Wolf Gas Range Oven Operation 20 Wolf Gas Range Care 25 Wolf Cooking Guide 29 Wolf Service Information 34 Wolf Warranty 35 As you read this Use & Care Information, take particular note of the CAUTION and WARNING symbols when they appear. This information is important for safe and efficient use of the Wolf equipment.
WO L F GAS RANGE T H A N K YO U Your purchase of a Wolf gas range attests to the importance you place upon the quality and performance of your cooking equipment. We understand this importance and have designed and built your gas range with quality materials and workmanship to give you years of dependable service. We know you are eager to start cooking, but before you do, please take some time to read this Use & Care Information.
S A F E T Y INSTRUCTIONS AND PREC AUTIONS W H AT TO D O IMPORTANT NOTE: Read all instructions before using this appliance. Read this Use & Care Information carefully before using your new gas range to reduce the risk of fire, electric shock or injury to persons. Ensure proper installation and servicing. This appliance must be properly installed and grounded by a qualified technician. Have installer show you where the gas supply shut-off valve is located in your home.
W H A T TO D O Always check the positions of the control knobs to make certain the range is off when you are finished cooking. W H AT N OT TO D O Do not repair or replace any part of the range unless specifically recommended in literature accompanying this appliance. All service should be referred to a qualified technician. Always light each burner prior to placing a pan on the burner grate. Also, turn the control knob to the OFF position before removing a pan from the burner grate.
S A F E T Y INSTRUCTIONS AND PREC AUTIONS W H AT N OT TO D O Do not leave children alone or unattended in the area where the range is in use. Never allow children to sit or stand on the appliance. Do not let children play with the range. Do not store items of interest to children above or at the back of the range, as they could climb on the appliance to reach items and be injured. Do not use water on grease fires. Smother the flame or use a dry chemical or foam-type extinguisher.
SAFETY P R E C A U T I O N S CALIFORNIA PROPOSITION 65 TO REDUCE THE RISK OF INJURY TO PERSONS IN THE EVENT OF A RANGE GREASE FIRE, OBSERVE THE FOLLOWING: Smother flames with a closefitting lid, baking sheet or other metal tray; then turn off the gas burner. Be careful to prevent burns. If the flames do not go out immediately, evacuate and call the fire department. Burning gas cooking fuel generates some by-products that are on the list of substances known to cause cancer or reproductive harm.
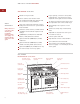
W O L F G A S R A N G E F E AT U R E S G A S R A N G E F E AT U R E S Natural or LP gas models Classic stainless steel exterior finish Fits standard 24" (610) deep cabinets with zero clearance for easy installation WOLF WA R R A N T Y Wolf products are covered by a two and five year residential warranty (exclusions apply). See warranty details at the end of this guide.
W O L F G A S R A N G E F E AT U R E S GAS RANGE AC C E S S O R I E S V E N T I L AT I O N O P T I O N S These optional accessories are available through your Wolf dealer. To obtain local dealer information, visit the Locator section of our website, wolfappliance.com. It is recommended that you operate the Wolf gas range with one of the following Pro ventilation hoods. Contact your Wolf dealer for details.
W O L F G A S R A N G E S U R FAC E O P E R AT I O N S U R FAC E B U R N E R S A spark electrode ignites each surface burner. This control eliminates the need for continuous open flame pilots. For added safety and convenience, each burner is designed with an electronic reignition system. This feature enables any burner to relight automatically in the event it is accidentally extinguished. B U R N E R A S S E M B LY Each surface burner provides a rating of 16,000 Btu/hr (4.7 kW) on HIGH with 500 Btu/hr (.
W O L F G A S R A N G E S U R FAC E O P E R AT I O N CONTROL K N O B S The control knobs are positioned to correspond to the surface burners they regulate. Each knob is designed to be a ”push-to-turn” knob. Although this is a child-safe design, children should never be left unattended in the kitchen when the range is in use. To light a surface burner, push in and turn the corresponding control knob counterclockwise to HIGH. You will hear a clicking sound. This is the electronic igniter.
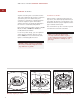
W O L F G A S R A N G E S U R FAC E O P E R AT I O N FLAME HEIGHT A N D A P P E A R A N C E BEFORE USING YO U R R A N G E Select a flame that is just high enough to maintain the desired cooking speed and is sized to fit the base diameter of the pan. Refer to the illustrations below. Never extend the flame beyond the base of the pan. Before using for the first time, you should clean your gas range thoroughly with hot water and a mild detergent. Rinse and dry with a soft cloth.
W O L F G A S R A N G E S U R FAC E O P E R AT I O N I N F R A R E D CHARBROILER This optional feature is designed with an infrared burner to give the highest quality and most efficient method of gas grilling. The burner becomes an orange-red color at the surface of the ceramic tile, and when it glows, it transfers an intense heat to the food. This sears the outside of the food, leaving the inside tender and juicy. The infrared burner is designed to operate at 16,000 Btu/hr (4.
W O L F G A S R A N G E S U R FAC E O P E R AT I O N I N F R A R E D CHARBROILER C H A R B R O I L E R O P E R AT I O N IMPORTANT NOTE: The stainless steel cover must be removed prior to operation of the charbroiler. C H A R B RO I L I N G T I P S Turn on the ventilation hood five minutes prior to using the charbroiler. Turn the control knob counterclockwise to the HIGH setting. You will hear the clicking sound of the igniter lighting the burner.
W O L F G A S R A N G E S U R FAC E O P E R AT I O N I N F R A R E D CHARBROILER C H A R B RO I L E R C A R E To keep the charbroiler looking its best, it is recommended that you clean it after every use. Charbroiler Grate (stainless steel): When cool, lift off and set in the sink. Pour very hot water over the cooked-on residue. Cover with wet dish towels and pour more hot water over it. Allow the hot, moist conditions to help loosen the residue. Remove remaining food soil with a soapfilled scouring pad.
W O L F G A S R A N G E S U R FAC E O P E R AT I O N I N F R A R E D GRIDDLE The steel griddle plate operates at 18,000 Btu/hr (5.3 kW). It is thermostatically controlled, which means once the set temperature is reached, the heat cycles to hold that temperature. To prevent food from sticking and to protect the surface from moisture, it is necessary to ”season” the griddle prior to use. This seasoning process as well as general use will change the appearance of the griddle.
W O L F G A S R A N G E S U R FAC E O P E R AT I O N I N F R A R E D GRIDDLE CARE GRIDDLE C O O K I N G G U I D E Using a metal spatula, scrape grease into the grease collection tray. When the surface has cooled, wipe it with a paper towel to remove excess grease or oil. Scrape the griddle clean. Pour 1/2 cup (118 ml) warm water and 1 teaspoon (5 ml) griddle cleaner onto the griddle and scrape the grease into the grease collection tray.
W O L F G A S R A N G E S U R FAC E O P E R AT I O N FRENCH TO P The 15,000 Btu/hr (4.4 kW) French Top is an optional feature that provides a 22" (559) cooking surface with the hottest temperature under the center plate and the lowest temperature near the edges. This design makes it possible to use several pans at once for a variety of cooking tasks. For example, fry chicken toward the center, while simmering a sauce in one corner and keeping vegetables warm in a different corner.
W O L F G A S R A N G E S U R FAC E O P E R AT I O N FRENCH TO P F R E N C H T O P O P E R AT I O N IMPORTANT NOTE: The stainless steel cover must be removed prior to operating the French Top. Turn on the ventilation hood five minutes prior to using the French Top. To use the French Top, push and turn the control knob counterclockwise to the HIGH setting. You will hear the clicking sound of the igniter lighting the burner. Preheat for 25 to 30 minutes before cooking on the French Top.
W O L F G A S R A N G E OV E N O P E R AT I O N OV E N O P E R A T I O N OV E N O P E R A T I O N C O N V E C T I O N V S S TA N D A R D OV E N C O N T RO L S In the Wolf convection oven, a motorized fan positioned in the rear of the oven circulates heat from the bake burner below the oven floor. This provides more even heat distribution throughout the oven cavity. Convection cooking is preferred for tender cuts of meat and poultry, air-leavened baked foods, breads, cakes and cookies.
W O L F G A S R A N G E OV E N O P E R AT I O N OV E N O P E R A T I O N BEFORE USING FOR THE FIRST TIME O V E N P R E H E AT Before using the oven of your gas range for the first time, set the oven thermostat at 250˚F (120˚C) and operate for one hour. At the end of the hour, reset the oven to 500˚F (260˚C) and heat for a second hour. Turn off the oven at the conclusion of the second hour. Allow oven to cool gradually with the door(s) closed.
W O L F G A S R A N G E OV E N O P E R AT I O N O V E N R AC K S Each large oven of the gas range has three heavy-duty racks. The small, non-convection oven on 48" (1219) models has two oven racks. Each oven rack has a rack stop that prevents it from accidentally sliding completely out of the oven. One of the factors affecting optimum cooking results is the level of rack placement in the oven. Oven rack position 1 is closest to the bottom and position 5 is closest to the top.
W O L F G A S R A N G E OV E N O P E R AT I O N R OA S T I N G T I P S Refer to the Convection Roasting Guide on page 31. The suggested cooking times are based on using a preheated oven. Convection roasting is recommended for most meats because of the beautiful browning on the outside while the juices are retained on the inside. Roast tender cuts of meat using the convection setting. Always use a roasting rack in an open, low-sided pan.
W O L F G A S R A N G E OV E N O P E R AT I O N O V E N BROILER All Wolf gas range ovens have an infrared broiler, except for the small oven on the 48" (1219) gas range models. The 18,000 Btu/hr (5.3 kW) broiler is located inside the oven. The broil burner heats a metal screen at the top of the oven cavity. When the screen reaches a reddish glow, it creates enough infrared heat to broil food by searing the exterior and sealing in the juices.
WO L F G A S R A N G E CARE C O O K WA R E S E L E C T I O N B A K E WA R E S E L E C T I O N For best results, we recommend medium- to heavy-weight pans that have a flat base, metal handle and a good-fitting cover. For best results, we recommend commercial or good-quality cookware. Always use flat-bottom pans. Warped pans may cause uneven baking results. Select the size of the pan recommended in the recipe. Pans that are too small or too large for the quantity of food affect the cooking results.
WO L F G A S R A N G E CARE OV E N L I G H T B U L B R E P L A C E M E N T RANGE CLEANING TIPS Turn off electrical power to the oven before replacing light bulb. ACCESSORIES IMPORTANT NOTE: Allow the oven to cool sufficiently before replacing the light bulb. Optional accessories are available through your Wolf dealer. To obtain local dealer information, visit the Locator section of our website, wolfappliance.com. The oven(s) of the gas range contain a standard 40-watt light bulb (part #3030030).
WO L F G A S R A N G E CARE C A R E R E C O M M E N D AT I O N S COMPONENT C A R E R E C O M M E N D AT I O N Exterior Finish Bull-Nose Riser Stainless steel Do not use abrasive cleaners; they will permanently scratch the surface. Salt and some cooking liquids may pit and stain the surface. Always remove these spills immediately. Use a spray degreaser to remove fingerprints and greasy spatters. Spray on a cloth and wipe surface. Buff dry immediately to avoid streaking.
WO L F G A S R A N G E CARE C A R E R E C O M M E N D AT I O N S COMPONENT C A R E R E C O M M E N D AT I O N Oven Cavity Interior Door Porcelain enamel Never wipe a warm or hot porcelain surface with a damp sponge; it may cause chipping or crazing (tiny hairlike cracks). When cool, clean splatters and spills immediately. Do not allow food with a high sugar or acid content, such as milk, tomatoes, sauerkraut, fruit juices or pie filling, to remain on any porcelain enamel surface.
WO L F COOKING GUIDE WO L F BAKING GUIDE Food Rack Position Convection Setting Standard Setting 3 2 and 4 400˚F (205˚C) for 11–12 min 400˚F (205˚C) for 11–12 min 450˚F (230˚C) for 12 min Cornbread, 8" (203) square pan 3 375˚F (190˚C) for 15–20 min 400˚F (205˚C) for 20–25 min Muffins, muffin pans (multiple racks not recommended) 3 400˚F (205˚C) for 15–18 min 425˚F (220˚C) for 15–18 min Quickbread, 9" x 5" (229 x 127) loaf pan 3 325˚F (165˚C) for 45–60 min 350˚F (175˚C) for 50–55 min 3 3
WO L F COOKING GUIDE WO L F BAKING GUIDE Food Rack Position Convection Setting Standard Setting Brownies, 13" x 9" (330 x 229) pan multiple pans 3 2 and 4 325˚F (165˚C) for 20–25 min 325˚F (165˚C) for 20–25 min 350˚F (175˚C) for 20–25 min 350˚F (175˚C) for 20–25 min Chocolate chip, cookie sheet multiple cookie sheets 3 2 and 4 325˚F (165˚C) for 8–10 min 325˚F (165˚C) for 8–10 min 350˚F (175˚C) for 10–12 min 350˚F (175˚C) for 10–12 min Rolled or sliced, cookie sheet multiple cookie sheets 3 2
WO L F COOKING GUIDE W O L F C O N V E C T I O N R OA S T I N G G U I D E Food Doneness Temperature (End Temp / Carving Temp) Rack Position Convection Setting Meatloaf, 2–3 lbs (.9–1.4 kg) 3 325˚F (165˚C) for 50–60 min 140˚F (60˚C) / 150˚F (65˚C) Med 160˚F (70˚C) / 170˚F (75˚C) Well Roast, 3–5 lbs (1.4–2.3 kg) 3 325˚F (165˚C) for 20–25 min/lb* 135˚F (60˚C) / 145˚F (65˚C) Rare 140˚F (60˚C) / 150˚F (65˚C) Med 160˚F (70˚C) / 170˚F (75˚C) Well Tenderloin, 2–3 lbs (.9–1.
WO L F COOKING GUIDE W O L F BROILING GUIDE Food Rack Position Doneness Total Broil Time 5 5 160˚F (70˚C) Med 170˚F (75˚C) Well 8–9 min 12–13 min Beef steaks, 1/2" (13) thick 3 160˚F (70˚C) Well 10–12 min Beef steaks, 1" (25) thick 3 140˚F (60˚C) Rare / 160˚F (70˚C) Med / 170˚F (75˚C) Well 18–20 min Beef steaks, 1 1/2" (38) thick 3 140˚F (60˚C) Rare / 160˚F (70˚C) Med / 170˚F (75˚C) Well 28–30 min Chicken breasts, boneless 4 175˚F (80˚C) Well 10–12 min Chicken breasts, bone in 3 1
WO L F COOKING GUIDE C O M M O N BAKING PROBLEMS Cakes Are Uneven Cakes Don’t Brown on Top Cakes Have Tunnels Probable cause: Probable cause: Probable cause: Temperature set too low or baking time too short Incorrect rack position Not enough shortening Temperature set too low Too much baking powder Pans touching each other or oven walls Overmixing Overmixing or at too high a speed Too much liquid Temperature set too high Batter uneven in pans Oven not level Pan too large or too little bat
W O L F S E RV I C E I N F O R M A T I O N S E RV I C E I N F O R M A T I O N When requesting information, literature, replacement parts or service, always refer to the model and serial number of your gas range. This information is found on the product rating plate. C O N TA C T I N F O R M AT I O N Wolf Customer Service: 800-332-9513 Website: wolfappliance.com The rating plate is located under the drip pan that supports the cooking grates, on the left inside wall of your range.
WOLF APPLIANCE PRODUCTS LIMITED WARRANTY RESIDENTIAL USE ONLY FULL TWO YEAR WARRANTY* For two years from the date of original installation, your Wolf Appliance product warranty covers all parts and labor to repair or replace any part of the product that proves to be defective in materials or workmanship. All service provided by Wolf Appliance Company under the above warranty must be performed by a Wolf Appliance authorized service center, unless otherwise specified by Wolf Appliance Company.
W O L F A P P L I A N C E C O M PA N Y, I N C. 8 0 7 5 8 3 R E V- B 10 / 2006 P. O. B OX 4 4 8 4 8 MADISON, WI 53744 800-332-9513 W O L FA P P L I A N C E .