U NDERCOUNTER I CE M ACHINE I NSTALLATION & O PERATION
CONTENTS Ice Machine Installation 4 Installation Checklist 16 Ice Machine Features 17 Ice Machine Operation 18 Ice Machine Care 23 Troubleshooting Guide 28 Service Information 30 Sub-Zero Warranty 31 Features and specifications indicated herein and on the website are subject to change at any time without notice. Check our website, subzero.com, for the most up-to-date specifications. As you follow these instructions, you will notice WARNING and CAUTION symbols.
S U B - Z E R O I C E M AC H I N E I N S T A L L A T I O N A N D O P E R AT I O N T H A N K YO U Congratulations on the purchase of your Sub-Zero ice machine. It produces the same high quality clear ice that you would expect from Sub-Zero. The importance of the installation of the ice machine cannot be overemphasized. Installation should be done by a qualified installer. Before you begin the installation process, it is recommended that you read the entire installation instructions.
S U B - Z E R O I C E M AC H I N E I N S TA L L AT I O N I C E M AC H I N E R E Q U I R E M E N T S Models UC-15I and UC-15IO must have open site (gravity) drain available (see page 8). ACCESSORIES Optional accessories are available through your Sub-Zero dealer. To obtain local dealer information, visit the Showroom Locator section of our website, subzero.com. A grounded, polarized electrical power supply on a separate circuit servicing only this appliance is required.
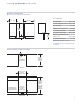
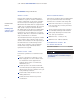
S U B - Z E R O I C E M AC H I N E I N S T A L L A T I O N OVERALL DIMENSIONS Models UC-15I, UC-15IP, UC-15IO & UC-15IPO ALL MODELS 14 3/4" (375) 23" (584) Overall Width 14 3/4" (375) Overall Height (levelers in) 33 5/8" (854) 33 5/8" (854) 18" (457) 4" (102) Overall Depth 23" (584) Minimum Door Clearance 18" (457) Rough Opening Width 15 1/4" (387) Rough Opening Height 34 1/2" (876) Minimum Height Required (levelers in) 33 5/8" (854) Rough Opening Depth 24" (610) Dimensions may vary ± 1
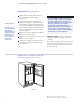
S U B - Z E R O I C E M AC H I N E I N S TA L L AT I O N L O C AT I O N O F I C E M A C H I N E AREA R E Q U I R E M E N T S The location selected for the ice machine must meet the following criteria. If any of these criteria are not met, select another location. Before moving the ice machine in place, be sure the finished opening dimensions, electrical and plumbing locations are accurate. Refer to pages 7–11.
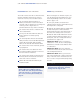
S U B - Z E R O I C E M AC H I N E I N S T A L L A T I O N ELECTRICAL R E Q U I R E M E N T S Prepare electrical circuit before installation of your ice machine. Installation requires a grounded (three-prong), polarized receptacle with a separate fuse/circuit breaker in an electrical service box. V O LTA G E Do not use an extension cord or twoprong adapter. Electrical ground is required on this appliance. Do not remove the power supply cord ground prong.
S U B - Z E R O I C E M AC H I N E I N S TA L L AT I O N PLUMBING R E Q U I R E M E N T S I M P O RTA N T N OT E Plumbing must conform to state and local codes. W A T E R S U P P LY DRAIN CONNECTIONS Prepare water supply line and drain before installation of your ice machine. Installation requires a minimum 1/4" ID copper cold water line and compression fitting (not supplied). Models UC-15I and UC-15IO are supplied with a drain hose for gravity draining.
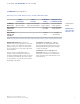
S U B - Z E R O I C E M AC H I N E I N S T A L L A T I O N PLUMBING R E Q U I R E M E N T S W A T E R S U P P LY A N D D R A I N L I N E S I Z I N G / C O N N E C T I O N S Ice Making Water Inlet Water Outlet UC-15I and UC-15IO Water Outlet UC-15IP and UC-15IPO Water Temperature Water Pressure Ice Machine Fitting 50°F (10°C) Min. 80°F (27°C) Max. 20 psi (137.9 kPA) Min. 80 psi (551.5 kPA) Max. 1/4" (6.4) ID Copper Tubing 3/ 4" — — (19) Hose Barb 3/ 8" — — (9.
S U B - Z E R O I C E M AC H I N E I N S TA L L AT I O N I N S TA L L AT I O N I N S TA L L A T I O N P R O C E D U R E 9) Open the shut-off valve on the water line. 1) Prepare the site by following the instructions under Electrical Requirements and Plumbing Requirements on pages 7–9. 10) Check all visible connections for water leakage. Failure to do so could cause flooding. 2) Remove ice machine from carton. 11) Connect electrical plug to grounded (threeprong), polarized outlet.
S U B - Z E R O I C E M AC H I N E I N S T A L L A T I O N I N S TA L L AT I O N 13) Prepare sanitizer solution and sanitize the ice machine according to In Place Cleaning/Sanitizing Steps 6 and 7 on page 25. 14) Put one gallon (4 L) of cold water into a container that will easily pour under the lifted water shutters. Refer to page 17 to identify water shutters. Open shutters and add one gallon (4 L) of cold water. Watch for proper drainage. 15) Press POWER button.
S U B - Z E R O I C E M AC H I N E I N S TA L L AT I O N I N S TA L L AT I O N LEVELING REVERSE THE DOOR SWING 1) Adjust the levelers close to desired height. The hinged side of the door may be reversed to the other side if desired. 2) Move the bin into its final position. 3) Level the ice machine to assure that the bin door closes and seals properly. Use a level on top of the bin. Turn the base of each foot as necessary to level the bin. Refer to the illustration below.
S U B - Z E R O I C E M AC H I N E I N S T A L L A T I O N I N S TA L L AT I O N 3) Remove the upper plastic trim piece (right hand configured) from the door by removing the two screws that secure it to the door. Then replace it with left hand trim piece. Refer to the illustration on page 12. 4) Transfer the hinges to the left side of the door and re-attach. The upper hinge will need to become the lower hinge and the lower hinge will now need to become the upper. Refer to the illustration below.
S U B - Z E R O I C E M AC H I N E I N S TA L L AT I O N I N S TA L L AT I O N D O O R P A N E L I N S T A L L AT I O N PA N E L DESIGN Additional panel design information can be found in the Sub-Zero design guide. Check our website at subzero.com. You should be sure of the door panel size and placement before proceeding with the installation. If you have questions, contact your Sub-Zero dealer or cabinet supplier.
S U B - Z E R O I C E M AC H I N E I N S T A L L A T I O N I N S TA L L AT I O N 9 0 - D E G R E E D O O R S TO P Exercise caution when drilling holes for mounting hardware. This is especially critical with inset panels. The Sub-Zero ice machine has a 90-degree door stop. Follow these steps for installation: 1) Open the door approximately 80 degrees. Install the door panel by engaging the tabbed bracket to the door first and then sliding the hinge side hardware over the positioning screws.
S U B - Z E R O I C E M AC H I N E I N S TA L L AT I O N I N S TA L L AT I O N C H E C K L I S T IMPORTANT NOTE: To ensure a safe and proper installation, the following checklist should be completed by the installer to ensure that no part of the installation has been overlooked. C O N TA C T I N F O R M AT I O N Sub-Zero customer service: 800-222-7820 Website: subzero.
S U B - Z E R O I C E M AC H I N E F E A T U R E S I C E M AC H I N E F E A T U R E S Undercounter ice machine Automatic defrost Models UC-15I and UC-15IO have a gravity drain, while Models UC-15IP and UC-15IPO have a built-in pump to allow greater installation flexibility.
S U B - Z E R O I C E M AC H I N E O P E R AT I O N B E F O R E S TA RT I N G T H E I C E M A C H I N E SANITIZE It is important to clean and sanitize the ice machine prior to use to ensure optimum ice quality. To ensure proper operation, follow the Operational Checks on pages 20–22. Starting the ice machine and completing the Operational Checks are the responsibilities of the owner/operator. Adjustments and maintenance procedures outlined in this manual are not covered by the warranty.
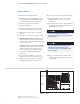
S U B - Z E R O I C E M AC H I N E O P E R A T I O N CONTROL PA N E L FUNCTIONS CLEAN Button (Green) POWER Button (Green) Pressing the CLEAN button will initiate a clean cycle and de-activate the ICE light. The CLEAN light will flash during the clean cycle to indicate the proper time to add ice machine cleaner or sanitizer. Pressing the POWER button once will activate the ice machine and green POWER light. Pressing the POWER button a second time will de-activate the ice machine.
S U B - Z E R O I C E M AC H I N E O P E R AT I O N S E Q U E N C E O F O P E R AT I O N O P E R AT I O N A L C H E C K S Depending on ambient conditions and cold water supply temperature, the ice making process will take approximately 30 minutes. Sub-Zero ice machines are factory-operated and adjusted before shipment. Normally, new installations do not require any adjustment.
S U B - Z E R O I C E M AC H I N E O P E R A T I O N O P E R AT I O N A L C H E C K S TESTING AND ADJUSTING THE B I N T H E R M O S TAT The bin thermostat stops the ice machine when the bin is full. It is preset for normal ambient temperatures and adjustments are usually not required. The thermostat is functioning correctly if, when three ice cubes are placed on the thermostat tube for 5 minutes, the ice machine stops. The ice machine should restart 5 minutes after the cubes are removed.
S U B - Z E R O I C E M AC H I N E O P E R AT I O N O P E R AT I O N A L C H E C K S CUBE WEIGHT ADJUSTMENT Adjusting finishing time: The cube weight can be increased from the factory setting by adjusting the finish time. Adjust in 1 minute increments and allow the ice machine to run several freeze/harvest cycles, then inspect the ice cubes. If a heavier cube weight is desired add another minute of freeze time and repeat the process.
S U B - Z E R O I C E M AC H I N E C A R E CLEANING You are responsible for maintaining the ice machine in accordance with the instructions in this manual. Maintenance procedures are not covered by the warranty. If you do not understand the procedures or the safety precautions that must be followed, call your local Sub-Zero authorized service center to perform the maintenance procedures for you.
S U B - Z E R O I C E M AC H I N E C A R E EXTERIOR C L E A N I N G C L E A N I N G THE CONDENSER S TA I N L E S S S T E E L E X T E R I O R To clean the exterior of a stainless steel model, use a soft, nonabrasive stainless steel cleaner like Signature polish and apply with a soft 100% lint-free cloth. Signature polish is available from Signature Limited Laboratory, P. O. Box 13436, Dayton, Ohio 45413, or call 877-376-5474.
S U B - Z E R O I C E M AC H I N E C A R E INTERIOR C L E A N I N G Perform an in place cleaning/sanitizing procedure monthly and a cleaning/sanitizing procedure every 6 months for efficient operation. If the ice machine requires more frequent cleaning and sanitizing, consult a qualified service company to test the water quality and recommend appropriate water treatment. An extremely dirty ice machine must be taken apart for cleaning and sanitizing.
S U B - Z E R O I C E M AC H I N E C A R E WAT E R F I LT E R R E P L A C E M E N T To replace the water filter incoming water does not need to be turned off. The unit is equipped with an auto bypass feature which bypasses the filter when removed. 1) Turn the filter 1/4 turn counter clockwise and it will pop out. 2) Reverse the process to re-install. IMPORTANT NOTE: Poor water quality may require more frequent cleaning, sanitizing and water filter replacement.
S U B - Z E R O I C E M AC H I N E C A R E I C E M AC H I N E MAINTENANCE R E M O VA L F RO M S E RV I C E , L O N G T E R M S T O R A G E A N D W I N T E R I Z AT I O N Special precautions must be taken if the ice machine is to be removed from service for an extended period of time or exposed to ambient temperatures of 32°F (0°C) or below. Follow the procedure below. 1) Perform a cleaning and sanitizing procedure to prevent mildew growth.
S U B - Z E R O T R O U B L E S H O OT I N G G U I D E T R O U B L E S H O OT I N G G U I D E P RO B L E M POSSIBLE CAUSE POSSIBLE SOLUTION Ice machine will not run No electrical power to the ice machine Replace the fuse, reset the breaker, turn on the main switch or plug in ice machine. POWER button has not been depressed Refer to page 19 and activate the ice machine. Bin thermostat incorrectly adjusted Adjust bin thermostat, refer to page 21.
S U B - Z E R O T R O U B L E S H O OT I N G G U I D E T R O U B L E S H O OT I N G G U I D E P RO B L E M POSSIBLE CAUSE POSSIBLE SOLUTION Freeze cycle is long, low ice production Water temperature is too high Connect a cold water supply, verify check valves in faucets and other equipment are functioning correctly. Dirty condenser Clean condenser, see page 24.
S E RV I C E I N F O R M A T I O N S E RV I C E I N F O R M A T I O N C O N TA C T I N F O R M AT I O N Sub-Zero customer service: 800-222-7820 Website: subzero.com If you do need service, be sure to have the model and serial number of your unit when you call. You’ll find these numbers on the rating plate. Refer to the illustration on page 4. For warranty purposes, you will also need the date of installation and the name of your SubZero dealer. Record this information below for future reference.
Sub-Zero Products Limited Warranty RESIDENTIAL USE ONLY FULL FIVE YEAR SEALED SYSTEM WARRANTY LIMITED SIXTH THROUGH TWELFTH YEAR WARRANTY ON THE SEALED SYSTEM FULL TWO YEAR WARRANTY ON TOTAL PRODUCT* FULL FIVE YEAR SEALED SYSTEM WARRANTY For five years from the date of original installation, your Sub-Zero warranty covers all parts and labor to repair or replace any components that prove to be defective in materials or workmanship in the sealed system.
SUB-ZERO, INC. 7 0 1 2 2 0 6 R E V- B P. O . B O X 4 4 1 3 0 000002628 MADISON, WI 53744-4130 800-222-7820 SU BZ ERO.