P R O I S L A N D V E N T I L AT I O N H O O D S I NSTALLATION I NSTRUCTIONS
C O N TA C T I N F O R M AT I O N Wolf Customer Service: 800-332-9513 Website: wolfappliance.com As you follow these instructions, you will notice WARNING and CAUTION symbols. This blocked information is important for the safe and efficient installation of Wolf equipment. There are two types of potential hazards that may occur during installation. signals a situation where minor injury or product damage may occur if you do not follow instructions.
W O L F P R O I S L A N D V E N T I L AT I O N H O O D S I N S TA L L AT I O N R E Q U I R E M E N T S IMPORTANT NOTE: This installation must be completed by a qualified installer or Wolf authorized service center technician. Installer: Please read the entire Installation Instructions prior to installation. Save these instructions for the local inspector’s reference, then leave them with the homeowner.
W O L F P R O I S L A N D V E N T I L AT I O N H O O D S I N S TA L L AT I O N C O N S I D E R A T I O N S IMPORTANT NOTE: Wolf Pro island ventilation hoods are recommended for use with all Wolf cooking appliances. ACCESSORIES Optional accessories are available through your Wolf dealer. To obtain local dealer information, visit the Locator section of our website, wolfappliance.com. Proper installation is the responsibility of the installer.
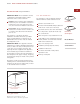
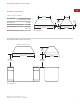
I N S TA L L AT I O N I N S T R U C T I O N S OV E R A L L D I M E N S I O N S P RO I S L A N D H O O D S Overall Widths 36" (914), 42" (1067), 54" (1372) and 66" (1676) Overall Height 18" (457) Overall Depth (excluding rails) 34" (864) Shipping Weight (shell only) 95–168 lbs (43–76 kg) Dimensions may vary to ± 1/8" (3).
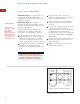
W O L F P R O I S L A N D V E N T I L AT I O N H O O D S I N S TA L L AT I O N S P E C I F I C A T I O N S The illustration and chart below provides dimensions critical for proper installation of the Wolf Pro island ventilation hood. To reduce the risk of fire and electric shock, install this ventilation hood only with a blower manufactured by Wolf. Blower model numbers are listed on page 17.
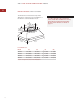
I N S TA L L AT I O N I N S T R U C T I O N S I N S T A L L D U C T WO R K To reduce the risk of fire, use only metal ductwork. DUCTWORK INSTALLATION THROUGH ROOF IMPORTANT NOTE: Wolf recommends that the Pro island ventilation hood be installed 30" (762) to 36" (914) above the countertop. IMPORTANT NOTE: Consult a qualified HVAC Engineer for specific ducting applications. IMPORTANT NOTE: All Wolf Pro ventilation hoods must exhaust to the outdoors. Always use metal ducting. Do not use flex ducting.
W O L F P R O I S L A N D V E N T I L AT I O N H O O D S D U C T C OV E R I N S T A L L A T I O N IMPORTANT NOTE: If an optional duct cover is to be used, it must be installed before installing the island hood. ACCESSORIES Optional accessories are available through your Wolf dealer. To obtain local dealer information, visit the Locator section of our website, wolfappliance.com. Duct covers 6" (152) and 12" (305) high in widths to match all island hoods are available through your Wolf dealer.
I N S TA L L AT I O N I N S T R U C T I O N S H O O D P R E PA R AT I O N Follow these steps to prepare the island hood for installation: Slide the grease cups out from the bottom edges of the front and back of the hood. Remove the filters by pressing up at the angle the filters are placed in, then rotate the bottom of the filter down. Gloves should be worn to provide a proper grip. If you are installing a remote blower, drill a 7/8" (22) hole through the hood framing for the conduit.
W O L F P R O I S L A N D V E N T I L AT I O N H O O D S I N S TA L L T H E I S L A N D H O O D IMPORTANT NOTE: If an optional duct cover is to be used, it must be installed before installing the island hood. Refer to Duct Cover Installation on page 8. ACCESSORIES Optional accessories are available through your Wolf dealer. To obtain local dealer information, visit the Locator section of our website, wolfappliance.com.
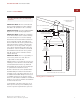
I N S TA L L AT I O N I N S T R U C T I O N S I N S TA L L T H E I S L A N D H O O D When making electrical connections, make sure the electrical power is turned off at the power source or circuit breaker before proceeding. Due to the weight of the island hood, be sure to have adequate manpower for installation. Adjust the positioning of the hood if necessary, and tighten all four lag screws until the hood is flush with the ceiling.
W O L F P R O I S L A N D V E N T I L AT I O N H O O D S I N S TA L L W I R I N G I M P O R TA N T N OT E You must follow all National Electrical Code regulations. In addition, be aware of local codes and ordinances when installing your service. Run a 120 V AC, 15 amp circuit power cable from the service panel to the electrical box at the center of hood. Supply a minimum of 6' (1.8 m) of ROMEX cable. This ventilation hood must be properly grounded.
I N S TA L L AT I O N I N S T R U C T I O N S INTERNAL B L OW E R IMPORTANT NOTE: Refer to the installation instructions provided with the internal blower for additional mounting and wiring instructions. IMPORTANT NOTE: Use wire connectors or wire nuts approved by UL or C/UL. I B L O W E R - 1 2 0 I N T I N S TA L L AT I O N Remove filters and center filter bank from the island hood. Refer to Hood Preparation on page 9. Lift the blower into position inside the hood.
W O L F P R O I S L A N D V E N T I L AT I O N H O O D S I N - L I N E A N D R E M OT E B L O W E R S Be sure that there is enough space for any transitions that may be needed between the blower and the connecting ductwork. For best performance, locate transitions nearest the blower. B L O W E R I N S TA L L AT I O N IMPORTANT NOTE: Refer to the specific installation instructions provided with each blower for additional mounting instructions.
I N S TA L L AT I O N I N S T R U C T I O N S I N - L I N E A N D R E M OT E B L O W E R S BLOWER WIRING IMPORTANT NOTE: Refer to the specific installation instructions provided with each blower for additional wiring instructions. Follow wiring instructions at the blower as outlined in the specific installation instructions provided with each blower. Black (L1) to black, white (neutral) to white, or white to blue, or white to brown (depending on model) and green to grounding screw.
W O L F P R O I S L A N D V E N T I L AT I O N H O O D S I N S T A L L F I LT E R S / G R E A S E C U P S Reinstall the center filter bank. Leave the screws slightly loosened until after the filters are in place. Refer to Hood Preparation on page 9. Remove all packaging material from the filters and grease cups. Slide the grease cups along the bottom edge of the hood so that the lip of the grease cup overhangs slightly. Install the filters. Orient each filter with lines running vertically.
I N S TA L L AT I O N I N S T R U C T I O N S B L OW E R A S S E M B L I E S TROUBLES H O OT I N G Wolf Pro island ventilation hoods are shipped without the blower assembly. Wolf internal, in-line and remote blower assemblies are available as sales accessories through your Wolf dealer. IMPORTANT NOTE: If the Pro island ventilation hood does not operate properly, follow these troubleshooting steps: IMPORTANT NOTE: Blower options vary with the cooking surface.
W O L F P R O I S L A N D V E N T I L AT I O N H O O D S I F Y O U N E E D S E RV I C E Maintain the quality built into your Pro island ventilation hood by calling a Wolf authorized service center. C O N TA C T I N F O R M AT I O N Wolf Customer Service: 800-332-9513 Website: wolfappliance.com For the name and number of the Wolf authorized service center nearest you, check the Locator section of our website, wolfappliance.com, or call Wolf Customer Service at 800-332-9513.
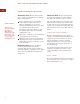
LEFT OUTER EDGE OF HOOD 19 BOTTOM EDGE OF HOOD CUT-OUT FOR LOGO PLACEMENT FOLD LINE FOR LOGO PLACEMENT
W O L F A P P L I A N C E C O M PA N Y, L L C 807573 6 / 2006 P. O. B OX 4 4 8 4 8 MADISON, WI 53744 800-332-9513 W O L FA P P L I A N C E .