
Installation instructions


14
|
Sub-Zero Customer Care 800.222.7820
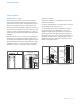
KICKPLATE INSTALLATION
Position the kickplate and install using the two mounting
screws. Refer to the illustration below. The kickplate must
be removable for service. The oor cannot interfere with
removal.
A maximum 6"
(152) decorative kickplate can be attached
to the factory-installed kickplate. The two rows of vented
louvers can be covered if door panel is a minimum 4"
(102)
from nished oor.
To install a decorative kickplate, remove paper backing from
the magnets and attach decorative kickplate to magnets.
Magnets will allow decorative kickplate to be removed, if
necessary.
Turn power on by touching ‘power’ on the control panel.
INSTALLATION
SCREWMAGNET
Kickplate installation.
Completion
DOOR TRIM INSTALLATION
After panels have been adjusted, install the decorative side
trim to the door/drawers. To install, start at the top and
align the trim with the front and rear anges on the bracket,
then snap into place by pushing the trim toward the back
of the panel. Once the top is secure, continue the installa-
tion downward until the remaining trim is completely secure.
Refer to the illustrations below.
DOOR TRIM
FRONT
FLANGE
REAR
FLANGE
Door trim.
Bracket anges.
SIDE TRIM INSTALLATION
Install the decorative trim strip to the handle side of tall
and column models. The side trim snaps over the bracket
attached to the handle side of the unit. Refer to the illustra-
tion below.
Side trim.