S EALED B URNER R ANGETOPS I NSTALLATION I NSTRUCTIONS
As you follow these instructions, you will notice WARNING and CAUTION symbols. This blocked information is important for the safe and efficient installation of Wolf equipment. There are two types of potential hazards that may occur during installation. signals a situation where minor injury or product damage may occur if you do not follow instructions. states a hazard that may cause serious injury or death if precautions are not followed.
W O L F S E A L E D B U R N E R R A N G E TO P I N S TA L L AT I O N R E Q U I R E M E N T S IMPORTANT NOTE: This installation must be completed by a qualified installer, service agency or gas supplier. IMPORTANT NOTE: Save these Installation Instructions for the local inspector’s use. Please read the entire Installation Instructions prior to installation. Installer: please retain these instructions for local inspector’s reference, then leave them with the homeowner.
W O L F S E A L E D B U R N E R R A N G E TO P B E F O R E YO U S TA RT If the information in this book is not followed exactly, a fire or explosion may result, causing property damage, personal injury or death. IMPORTANT NOTE: Installation and service must be performed by a qualified installer, service agency or the gas supplier. Warranty service must be performed by a Wolf authorized service center.
I N S TA L L AT I O N I N S T R U C T I O N S V E N T I L AT I O N O P T I O N S I N S TA L L AT I O N S P E C I F I C A T I O N S IMPORTANT NOTE: It is recommended that you operate the Wolf sealed burner rangetop with a Pro ventilation hood. Contact your Wolf dealer for details. Wolf sealed burner rangetops come in 30" (762), 36" (914) and 48" (1219) widths. Illustrations on pages 7– 9 provide the overall dimensions and installation specifications for each width of sealed burner rangetop.
W O L F S E A L E D B U R N E R R A N G E TO P MINIMUM C L E A R A N C E S IMPORTANT NOTE: Caution must be used in planning the proper installation of the Wolf sealed burner rangetop to avoid fire or damage to adjacent cabinetry or kitchen equipment. Be sure to follow the minimum clearances established in the finished rough opening dimensions. Refer to the Installation Specifications illustration for your model on pages 7– 9 for the exact rough opening dimensions.
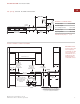
I N S TA L L AT I O N I N S T R U C T I O N S 30" (762) S E A L E D B U R N E R R A N G E TO P 28 1/2" (724) OVERALL DEPTH 9 1/4" 27 1/2" (235) (699) WITH 20" RISER COOKING SURFACE 12 1/2" 8 1/2" (216) OVERALL HEIGHT (191) Overall Width Overall Height (to cooking surface) Overall Depth 29 7/8" (759) OVERALL WIDTH 29 7/8" (759) 17 1/2" (445) (318) WITH 10" WITH 5" RISER RISER 7 1/2" OVERALL DIMENSIONS 24 1/4" Opening Width (616) 8 1/2" (216) 28 1/2" (724) 30" (762) Dimensions may vary t
W O L F S E A L E D B U R N E R R A N G E TO P 36" (914) S E A L E D B U R N E R R A N G E TO P 28 1/2" (724) OVERALL DEPTH OVERALL DIMENSIONS Overall Width Overall Height (to cooking surface) Overall Depth Opening Width 35 7/8" (911) 27 1/2" (235) (699) WITH 20" RISER COOKING SURFACE 8 1/2" (216) 8 1/2" (216) OVERALL HEIGHT 28 1/2" (724) 36" (914) 9 1/4" 12 1/2" 17 1/2" (445) (318) WITH 10" WITH 5" RISER RISER 7 1/2" (191) 35 7/8" (911) OVERALL WIDTH 24 1/4" (616) Dimensions may vary t
I N S TA L L AT I O N I N S T R U C T I O N S 48" (1219) S E A L E D B U R N E R R A N G E TO P 28 1/2" (724) OVERALL DEPTH 9 1/4" 27 1/2" (235) (699) WITH 20" RISER COOKING SURFACE 12 1/2" 8 1/2" (216) (191) Overall Height (to cooking surface) Overall Depth 47 7/8" (1216) OVERALL WIDTH 47 7/8" (1216) Overall Width 17 1/2" (445) (318) WITH 10" WITH 5" RISER RISER 7 1/2" OVERALL HEIGHT OVERALL DIMENSIONS 24 1/4" Opening Width (616) 8 1/2" (216) 28 1/2" (724) 48" (1219) Dimensions may
W O L F S E A L E D B U R N E R R A N G E TO P I N S TA L L T H E R A N G E T O P Prepare the finished rough opening for the rangetop according to the Installation Specifications illustration for your model on pages 7–9. The platform must be 3/4" (19) thick and include a cut-out at the right rear for gas supply and electrical connections. G A S S U P P LY R E Q U I R E M E N T S EXPLOSION HAZARD — Use a certified gas supply line and install a gas shut-off valve. Securely tighten all gas connections.
I N S TA L L AT I O N I N S T R U C T I O N S G A S S U P P LY R E Q U I R E M E N T S If rigid pipe is used as a gas supply line, a combination of pipe fittings must be used to obtain an in-line connection to the rangetop. All strains must be removed from the supply and gas lines so the rangetop will be level and in line. Before connecting the gas supply, make sure all valves are in a closed position. Do not connect the gas supply to an appliance that shows any sign of physical damage.
W O L F S E A L E D B U R N E R R A N G E TO P G A S S U P P LY R E Q U I R E M E N T S GAS MANIFOLD PRESSURE For Natural Gas: Standard orifices are set for 5" (12.5 mb) WC (water column). A natural gas pressure regulator is installed. For Propane (LP) Gas: Standard orifices are set for 10" (25 mb) WC (water column). A propane gas pressure regulator is installed. Gas Supply Pressure: For checking the regulator setting, the maximum line pressure for natural and propane (LP) gas: 14" (34.9 mb) WC; .
I N S TA L L AT I O N I N S T R U C T I O N S ELECTRICAL R E Q U I R E M E N T S R E C O M M E N D E D G RO U N D M E T H O D ELECTRICAL SHOCK HAZARD – Plug into a grounded 3-prong outlet. Do not remove ground prong. Do not use an adapter. Failure to follow these instructions can result in electric shock, fire or death. The Wolf sealed burner rangetop requires a 110/120 V AC electrical supply to operate the electronic ignition system. The 6' (1.
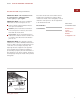
W O L F S E A L E D B U R N E R R A N G E TO P S U R FAC E B U R N E R S R E M OV I N G T H E R A N G E T O P INITIAL LIGHTING The surface burners use electronic igniters in place of standing pilots. When the rangetop control knob is pushed in and turned to the HIGH position, the system creates a spark to light the burner. This sparking continues until the electronic ignition senses a flame.
I N S TA L L AT I O N I N S T R U C T I O N S TROUBLES H O OT I N G I F Y O U N E E D S E RV I C E IMPORTANT NOTE: If the rangetop does not operate properly, follow these troubleshooting steps: If service is necessary, maintain the quality built into your Wolf sealed burner rangetop by calling a Wolf authorized service center. Verify that power is being supplied to the rangetop. To obtain the name and number of a Wolf authorized service center, check the Locator section of our website, wolfappliance.
W O L F A P P L I A N C E C O M PA N Y, L L C 808175 3 / 2006 P. O. B OX 4 4 8 4 8 MADISON, WI 53744 800-332-9513 W O L FA P P L I A N C E .