INSTALLATION INSTRUCTIONS •
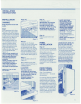
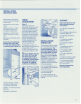
• -~~------------PRE-INSTALLATION INSTRUCTIONS PRE-INSTALLATION SPECIFICATIONS PREPARATION FOR INSTALLATION Te=- 7" .L Step 1 Prepare the finished rough opening to accept the installation of the Sub-Zero. ~ 0 ~ LClCATE ELECTR/CItL OUTlET WITHIN TOP SHADED AREA WE" NOTE: Carefully read the "Pre-Installation Specifications" chart below.
PRE-INSTALLATION INSTRUCTIONS IAWARNINQ] AREA PREPARATION Do not use an extension cord, or two prong adapter. Electrical ground is required on this appliance. Step 2 When units are installed side by side, a separating filler strip is recommended. The filler strip width should be added to the finished rough opening dimension. A filler strip must also be used when units are installed hinge to hinge.
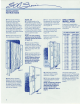
INSTALLATION INSTRUCTIONS I.aWARNINGI To reduce the possibility of the unit tipping forward, you must reposition the front levelers to make contact with the floor. You will have to extend these legs when the unit Is finally positioned. MODELS 501 F AND 501 R To block the unit, using the wood block and hardware provided, follow these steps. 1) Locate and mark two wall studs against the wall where the refrigerator is to be located.
INSTALLATION INSTRUCTIONS INSTALLATION MOOEL590 Step 12 Install grille, step 7. IAWARNING I IMPORTANT: For Models 511, 532, 542, 550, 561 and 590, reverse step 7 procedure. NOTE: If using panelized grille refer to "Grille Panel Installation. " Shut-off power to the wall outlet. Step 9 Unit is equipped with rollers. Plug into 15 amp grounded outlet and roll unit into desired position under the wood block or soffit and connect icemaker water line to unit.
INSTALLATION INSTRUCTIONS B) With standard Phillips MODEL 590 screwdriver, remove door handle on freezer and refrigerator door (the door handles also act as a door trim), The Models 511 and 550 freezer door handle isw on the top of the door and removed in the same manner described above, A) To install panels on the C) Slide panel into frame on door as shown in Figure 17, NOTE: The trim molding will bend out at the center allowing removal as shown in Figure 16.
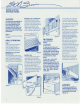
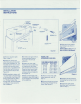
INSTALLATION INSTRUCTIONS Il I II" GRILLE ONLY 532 & 590 1," THRU 1S" GR1LlE ALL OTHER MODELS ADD SCREW GROMMET TO PROPER HOl£ --<'-1<-_ '" 10· GRILLES ". ""IN FOR l,"THRU '5" GRILLES FIlAME ~--~--~ SCREWOROIoIMET p .... • .... 14".0 ~ _ ..... 'i((j-- USE EXISTING QRIU,£ ~~~l~~~ ! SCREW fOR(IlIID£ UPPER QRILU P ....... :O-O'~ S~~: TEMPLATE ElllARGE TO 3,0,," OI.UlE'TER 1: Figure 21 lOWER GRillE SCREW P,,, .j..:ro-o"-II PILOT HOLES DRILL WITH 11.
• INSTALLATION INSTRUCTIONS ~~'I." Anchor the side panel with decorative headed screws (as shown) or finishing nails can be used. The screwsl nails must be obtained from your local hardware supply store. SIDE PANEL INSTALLATION If side panels are being utilized, please check with your installer for installation methods or you may use one of the side panel installation methods shown in Figure 23. Dimensions given for typical wood side panel installation.
INSTALLATION INSTRUCTIONS 2) Using the Loctite on the screws, install all 3 Chicago Screw Posts. 3) Inspect the units for level again. 4) Drill three (3) 3h6" holes (per specs in Figure 24) through both outer trims. 5) Using a '/a" drill bit, drill into the cabinetry for a pilot hole. 6) Install all six (6) Sems to the cabinetry.
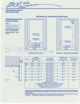
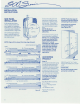
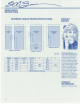
INSTALLATION INSTRUCTIONS STANDARD HANDLE RECESS SPECIFICATIONS I---A---I 1 - - 8 -----1 FREEZER PANEL REFRIGERATOR T PANEL T 1 14-- I 1- ~T c I----A---j T I REFRIGERA10R PANEL PRODUCT SERVICE REFRIGERATOR OR FREEZER PANEL c I -----' 1 E L.......L...-- I E T o f-F----l 1 FREEZER PANEL MODELS 501F AND 501R '-------' MODELS 532,542 AND 561 MODELS 511 AND 550 Figure 28 MODEL A (WIDTH) B (WIDTH) C (HEIGHT) 532 542 561 511 550 501F 501R 590 17 15116- 27 11116- 155/. " 145/.
INSTALLATION INSTRUCTIONS RECOMMENDATIONS FOR RAISED PANELS -----j --f-m= I ----v-- -- -' 1" Optional Extended Handle Because of different door panel designs, routing, recessing, or use of optional extended handles may be necessary for finger clearance when using raised panels greater than '/4" total thickness. (50# per door panel maximum weight limit.) I n I I I I I - 1'1." Panel 1" Panel 'I." Panel 'h" Panel ~ '1.
= THINK SAFETY! If you are storing or disposing of your old refrigerator, please do it safely. Read the enclosed safety booklet from the Association of Home Appliance Manufacturers. '-' CHILD ENTRAPMENT ACCIDENTS CAN BE TRAGIC! SUB-ZERO FREEZER CO., INC. FORM NO. 3-75-216-16 - P.O. BOX 44130, MADISON, WI 53744-4130 PRINTED IN U.S.A.