
Installation Instructions


6
|
Sub-Zero Customer Care 800.222.7820
Anti-Tip Bracket
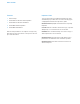
MODEL UW-24FS
The back of the anti-tip bracket must be installed 24
5
/8"
(625)
from the front and centered behind the unit. Refer to
the illustration below. Refer to page 16 for wood and con-
crete oor applications.
MODEL UW-24 / UW-24FS INSTALLATION
ANTI-TIP BRACKET
Anti-tip bracket (UW-24FS).
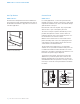
Custom Panel
MODEL UW-24
For overlay applications, a custom door panel must be
installed. Panel size is critical for a proper t. To verify panel
requirements and dimensions, refer to the Sub-Zero design
guide at subzero.com/specs.
Finish all sides of the custom panel. They may be visible
when the door is open or through the glass door.
The custom overlay door panel is attached using screws
provided, through the door frame. Screw locations are
marked on the back of the custom panel using tenon cen-
ters inserted into holes of the door frame.
With the unit secured and door closed, hold the custom
panel in desired position on the door. Lightly tap the front
of the panel to locate mounting positions. Remove tenon
centers. Refer to the illustration below.
The door frame has mounting holes to accommodate
Sub-Zero accessory handles. If handle mounting holes are
not utilized, the handle should be attached to the custom
panel prior to mounting. Screw heads may need to be coun-
tersunk into the panel for proper alignment.
To mount the custom panel, open the door and use pre-
drilled holes to position the panel. Drive screws into the
panel through black tape on the door frame. Screw holes
are hidden behind the door gasket. Use as many screws as
necessary to secure the custom panel. Refer to the illustra-
tion below.
GASKET
GLASS
13
/32" (11)
DIAMETER
1
/4" (6)
DIAMETER
Tenon center.
Door frame cross section.
DOOR
FRAMEPANEL
TENON CENTER