W A R M I N G D R AW E R I NSTALLATION I NSTRUCTIONS
C O N TA C T I N F O R M AT I O N Wolf Customer Service: 800-332-9513 Website: wolfappliance.com As you follow these instructions, you will notice WARNING and CAUTION symbols. This blocked information is important for the safe and efficient installation of Wolf equipment. There are two types of potential hazards that may occur during installation. signals a situation where minor injury or product damage may occur if you do not follow instructions.
W O L F WA R M I N G D R AW E R I N S TA L L AT I O N R E Q U I R E M E N T S IMPORTANT NOTE: This installation must be completed by a qualified installer or Wolf authorized service center technician. Installer: Please read the entire Installation Instructions prior to installation. Save these instructions for the local inspector’s reference, then leave them with the homeowner.
W O L F WA R M I N G D R AW E R B E F O R E YO U S TA RT ACCESSORIES Optional accessories are available through your Wolf dealer. To obtain local dealer information, visit the Locator section of our website, wolfappliance.com. Proper installation is the responsibility of the installer. Product failure due to improper installation is not covered under the Wolf warranty. Refer to the Warming Drawer Use & Care Information for warranty details.
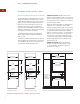
I N S TA L L AT I O N I N S T R U C T I O N S S TA I N L E S S S T E E L D R A W E R F R O N T I N S TA L L A T I O N S P E C I F I C A T I O N S The following illustrations provide the overall dimensions and installation specifications for the Wolf warming drawer with a stainless steel drawer front. Wolf recommends using a 33" (838) wide cabinet for the warming drawer with stainless steel drawer front.
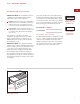
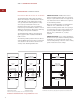
W O L F WA R M I N G D R AW E R S TA I N L E S S S T E E L D R A W E R F R O N T I N S TA L L A T I O N W I T H B U I LT- I N O V E N The Wolf warming drawer with stainless steel drawer front may be installed below or above a Wolf 30" (762) built-in single oven or below a double oven, provided the warming drawer is fully enclosed, top and bottom. Refer to the illustration below. Also refer to installation instructions provided with the built-in oven for additional specifications.
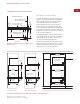
I N S TA L L AT I O N I N S T R U C T I O N S S TA I N L E S S S T E E L D R A W E R F R O N T O P T I O N A L I N S TA L L AT I O N S OVEN ROUGH OPENING OVEN TRIM EXTENDS 1/8" (3) BELOW OVEN PLATFORM 2" x 2" ANTI-TIP 3/4" (19) THICK WALL OVEN BLOCK SUPPORT PLATFORM FACE RAIL 5/8" 10 3/4" WARMING DRAWER 9 1/8" (16) (273) ROUGH OPENING 1 5/8" (41) REVEAL 2 3/8" (60) (232) 10 1/4" (260) 23 5/8" (600) FRONT 5/8" (16) SIDE VIEW The Wolf warming drawer with stainless steel drawer front may be insta
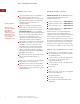
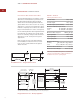
W O L F WA R M I N G D R AW E R I N T E G R AT E D D R A W E R F R O N T MODEL WWD30 I N S TA L L A T I O N S P E C I F I C A T I O N S The following illustrations provide the overall dimensions and installation specifications for the Wolf warming drawer with integrated drawer front. The warming drawer with integrated drawer front can be used in an overlay application or an inset panel application where it will be completely recessed in to the cabinet.
I N S TA L L AT I O N I N S T R U C T I O N S I N T E G R AT E D D R A W E R F R O N T O V E R L AY A P P L I C A T I O N U N D E R C O U N T E R I N S TA L L AT I O N A minimum 33" (838) wide by 24" (610) deep cabinet is required for the warming drawer with integrated drawer front using the overlay application. A minimum base support of 200 lbs (91 kg) is required. Refer to the illustration on page 8.
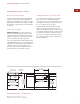
W O L F WA R M I N G D R AW E R I N T E G R AT E D D R A W E R F R O N T I N S TA L L A T I O N W I T H B U I LT- I N O V E N The Wolf warming drawer with integrated drawer front may be installed below or above a Wolf 30" (762) or 36" (914) built-in single oven, provided the warming drawer is fully enclosed, top and bottom. Refer to the illustration below. Also refer to installation instructions provided with the built-in oven for additional specifications.
I N S TA L L AT I O N I N S T R U C T I O N S I N T E G R AT E D D R A W E R F R O N T I N S TA L L A T I O N O P T I O N S The Wolf warming drawer with integrated drawer front may be installed in combination with a 30" (762) single built-in oven and microwave with 30" (762) trim, provided the warming drawer is fully enclosed, top and bottom. Refer to the illustration below.
W O L F WA R M I N G D R AW E R ELECTRICAL R E Q U I R E M E N T S I M P O R TA N T N OT E You must follow all National Electrical Code regulations. In addition, be aware of local codes and ordinances when installing your service. The Wolf warming drawer requires a separate, grounded 120 V AC, 50/60 Hz power supply and must be connected to an individual properly grounded branch circuit and protected by a 15 or 20 amp circuit breaker or time delay fuse.
I N S TA L L AT I O N I N S T R U C T I O N S CABINET S U P P O RT S U N PAC K T H E W A R M I N G D R A W E R IMPORTANT NOTE: When the warming drawer is installed with a built-in oven, additional clearance between openings may be required. Check that oven supports do not obstruct the interior dimensions required for the warming drawer. Unpack the warming drawer on a flat surface. Remove all packaging materials and tape from inside the warming drawer and discard.
W O L F WA R M I N G D R AW E R S TA I N L E S S S T E E L F R O N T P A N E L I N S TA L L A N T I - T I P B L O C K I N G An anti-tip block or platform must be installed to prevent the warming drawer from tipping forward while opened when loaded. Failure to do so could result in personal injury and damage to the cabinet. Install a 2" (51) x 2" (51) or 2" (51) x 4" (102) anti-tip block against the rear cabinet wall.
I N S TA L L AT I O N I N S T R U C T I O N S S TA I N L E S S S T E E L F R O N T P A N E L I N S TA L L F R O N T P A N E L I N S TA L L WA R M I N G D R AW E R Remove all packaging materials from the handle and front panel. Gently remove the protective covering from the stainless steel front panel. The adhesive covering should peel away from the surface cleanly, but any remaining residue should be cleaned off with a mild detergent. Slide the left corner of the warming drawer into the opening.
W O L F WA R M I N G D R AW E R I N T E G R AT E D F R O N T P A N E L I N S TA L L C L E A T S A N D P L A T F O R M For an overlay or inset application, you will need to install a recessed platform and cleats of the following dimensions into the opening. IMPORTANT NOTE: Be sure to finish the inside lip of the opening and the front face of the shelf and cleats. Some of these areas will be visible when the drawer is open.
I N S TA L L AT I O N I N S T R U C T I O N S I N T E G R AT E D F R O N T P A N E L I N S TA L L A N T I - T I P B L O C K I N G I N S TA L L WA R M I N G D R AW E R Install a 2" (51) x 2" (51) or 2" (51) x 4" (102) anti-tip block against the rear cabinet wall as shown in the installation illustration for your specific installation on pages 9–11. Turn power off to the electrical outlet. Slide the left corner of the warming drawer into the opening.
W O L F WA R M I N G D R AW E R I N T E G R AT E D F R O N T P A N E L I N S TA L L F R O N T P A N E L T O D R A W E R Remove the front panel that came attached to the warming drawer. Save the six screws used to attach the panel. Using the six screws, install the metal panel from the integrated drawer front kit onto the warming drawer front. Make sure the brushed side of the metal panel is facing the warming drawer interior.
I N S TA L L AT I O N I N S T R U C T I O N S TROUBLES H O OT I N G IMPORTANT NOTE: If the warming drawer does not operate properly, follow these troubleshooting steps: Verify that power is being supplied to the warming drawer. Check electrical connections to ensure that the installation has been completed correctly. Refer to the Troubleshooting Guide in the Wolf Warming Drawer Use & Care Information. If the warming drawer still does not work, contact a Wolf authorized service center.
W O L F A P P L I A N C E C O M PA N Y, L L C 808212 4 / 2006 P. O. B OX 4 4 8 4 8 MADISON, WI 53744 800-332-9513 W O L FA P P L I A N C E .