
Instructions / Assembly


2
CAUTION
If possible, do not install the water heater so the vent can be covered or obstructed
when any door on the trailer is opened. If this is not possible, then the travel of the
door must be restricted in order to provide a 6” minimum clearance between the water
heater vent and any door whenever the door is opened.
Due to the dierences in vinyl siding, this appliance should not be installed on vinyl
siding without rst consulting with the manufacturer of the siding or cutting the
siding away from the area around the appliance vent.
In any installation in which the vent of this appliance can be covered due to the
construction of the RV or some special feature of the RV such as slide out, pop-
up etc., always insure that the appliance cannot be operated by shutting o all
electrical and gas supply to the appliance.
Do not install this appliance so the vent terminates below a slide-out. This appliance
is not to be installed under any overhang. It must be free and clear of any type
overhang.
WARNING
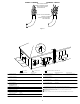
Do not install the water heater with the door facing toward the forward end
of the coach. See gure 1.
Exhaust products at high temperature exit from the screen on the water
heater door. The temperatures can damage or degrade some materials.
Ensure all nearby materials are suitably rated for high temperatures.
Insure adequate clearance of any access or connection point above the
water heater to insure no damage to the material. Also insure that the
intended use of any access or connection points does not allow material in
the path of this exhaust or on the surface of the exhaust screen.
This installation must conform with the requirements of the authority having jurisdiction
or in the absence of such requirements with the latest edition of the National Fuel Gas
Code ANSI Z223.1/NFPA 54; and the latest edition of the American National Standard
for Recreational Vehicles NFPA 1192. In Canada the installation should conform with
the following standards:
A. For installation in Recreational Vehicle
1. Gas - CSA standard CSA Z240.4.2-08 Installation Requirements for
Propane Appliances and Equipment in Recreations Vehicles.
2. Electrical - CSA standard C22.2 No. 148/Z240.6.2-08/C22.2 No. 148-08
Electrical Requirements for Recreational Vehicles.
3. Plumbing - CSA standard CSA Z240.3.2 Plumbing Requirements for
Recreational Vehicles.
B. For installation in Mobile Housing
1. Gas - CSA standard CSA Z240.4.1 Installation Requirements for Gas
Burning Appliances and Equipment in Mobile Homes.
2. Electrical - CSA standard CSA C22.1 Canadian Electrical Code Part 1.
3. Plumbing - CSA standard CSA Z240.3.1 Plumbing Requirements for
Mobile Homes. For installation in mobile housing, refer to Figure 14 for
Direct Vent Terminal Clearances.
C. The appliance shall be disconnected from the gas supply piping system during
any pressure testing of the system.
D. The appliance and its gas connections shall be leak tested before placing the
appliance in operation.
E. All air for combustion must be supplied from outside the structure. Air for
combustion must not be supplied from occupied spaces.
CUTOUT INSTRUCTIONS
Minimum clearance from combustible construction on sides, top, oor and rear = 0
inches. Provide room for access to rear of water heater for servicing.
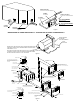
For all the water heater models of this installation manual, the installer must provide
an opening ush with oor in outer wall of coach and the wall of the coach should be
framed as shown in Figure 2.
The inside dimensions A and B will depend on your model and must be maintained.
i. For all SW4 and SW6 gallon models, dimensions A and B =
12 ¾” +1/8” – 0.
ii. For all SW10, SW12, and SW16 gallon models, dimensions A and B =
16 3/8” +/- 1/16’.
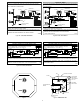
INSTALLATION USING RADIUS CORNER DOOR
(See Figure 4)
A. Position heater into framed opening as illustrated.
B. On mesa or yoder type sidewalls, atten the wall area around the opening.
C. Caulk around framed opening (trailer skin) as illustrated.
D. Lay a bead of silicone caulking (or suitable caulking) around the inner edge of the
control housing (top, bottom and sides). See detail “B” in illustration. This will seal
frame to control housing.
E. Apply a bead of silicone caulking (or suitable caulking) around back side of door
frame. See detail “B” in illustration. This will seal frame to coach skin.
F. Fit the door frame into control housing (over the caulking already applied) and pull frame
tight to control housing using the No. 8-15 x 3 1/2” screws provided.
G. Push water heater into framed opening until back side of door frame (now attached to
control housing) is against the side of the coach and rmly attach with screws around
the perimeter of the frame.
NOTE: The two (2) holes in bottom of frame identied as “A” in Figure 4 are also used to
mount door hinge to the frame.
SAFETY WARNINGS
It is imperative that the water heater tank be lled with water before
operating the water heater. Operation of the water heater without water
in the tank may result in damage to the tank and/or controls. This type of
damage is not covered by the limited warranty.
Hydrogen gas may result if you have not used this heater for two weeks
or more. HYDROGEN GAS IS EXTREMELY FLAMMABLE. To reduce
the risk of injury under these conditions, open the hot water faucet
for several minutes at the kitchen sink before you use any electrical
appliance connected to the hot water system. If hydrogen is present, you
probably will hear an unusual sound such as air escaping through the
pipe as the water begins to ow.
Hydrogen gas may be present even after water has been drained from
the tank. Open faucet at sink and allow system to vent for several minutes
(5-10 minutes).
Do not smoke or have any open ame near the open faucet. Do not
attempt to light pilot or main burner. On DSI models, be sure the switch
is “OFF”.
Should overheating occur, or the gas supply fail to shut o, shut o the
manual gas valve to the appliance before shutting o the electrical supply.
Do not use this appliance if any part has been submerged under water.
Immediately call a qualied service technician to inspect the appliance
and to replace any part of the control system and any gas control that has
been submerged under water.
Do not alter the operation of your water heater nor change the design/
construction of your water heater. Accessories are being marketed for RV
products which we do not recommend. For your safety, only factory authorized
parts are to be used on your water heater.
Periodically inspect the vent for obstructions or presence of soot. Soot is
formed whenever combustion is incomplete. This is your visual warning
that the water heater is operating in an unsafe manner. If soot is present,
immediately shut the water heater down and contact your dealer or a
qualied service person.
When considering add-on rooms, porch or patio, attention must be given
to the venting of your water heater. For your safety, do not terminate the
vent on your water heater inside add-on rooms, screen porch or onto
patios. Doing so will result in products of combustion being vented into
the rooms or occupied areas.
Never operate the appliance if you smell gas. Do not assume that the
smell of gas in your RV is normal. Any time you detect the odor of gas, it
is to be considered life threatening and corrected immediately. Extinguish
any open ames including cigarettes and evacuate all persons from the
vehicle. Shut o gas supply at LP gas bottle. (See Safety notice on front
cover of this manual.)
NOTE: Always open both the cold and hot water faucets when lling vehicle
water tank to allow air pockets to be forced out of the water heater. When
water ows from the faucets, close both faucets.
WARNING
Do not store or use combustible materials or liquids near or adjacent to
this water heater. The appliance shall not be installed in any location where
ammable liquids or vapors are likely to be present.
Be sure the power is “OFF” to the water heater ignition system during any type
of refueling and while vehicle is in motion or being towed.
The thermostat on your water heater is not adjustable. It is a temperature
sensing limit designed to maintain a water temperature of 135°F (57°C).
Water temperatures over 125°F (52°C) can cause severe burns instantly
or death from scalds; therefore, be careful when using hot water. Children,
disabled and elderly are at highest risk of being scalded. Always feel water
before bathing or showering.
INSTALLATION REQUIREMENTS
WARNING
Installation of this appliance must be made in accordance with the written
instructions provided in this manual. No agent, representative or employee
of Suburban or other person has the authority to change, modify or waive
any provision of the instructions contained in this manual.