
Instructions / Assembly


4
OPERATING SAFETY INFORMATION
FOR YOUR SAFETY, READ BEFORE LIGHTING
WARNING
If the user of this appliance fails to maintain it in the condition in which is was
shipped from the factory or if the appliance is not used solely for its intended
purpose or if appliance is not maintained in accordance with the instruction in
this manual, then the risk of a re and/or the production of carbon monoxide
exists which can cause personal injury, property damage or loss of life.
If you do not follow these instructions exactly, a re or explosion may result
causing property damage, personal injury or loss of life.
A. This appliance does not have a pilot. It is equipped with an ignition device which
automatically lights the burner. Do not try to light the burner by hand.
B. BEFORE LIGHTING smell all around the appliance area for gas. Be sure to smell
next to the oor because some gas is heavier than air and will settle on the oor.
WHAT TO DO IF YOU SMELL GAS
• Evacuate all persons from the vehicle.
• Shut o the gas supply at the gas container or source.
• Do not touch any electrical switch, or use any phone or radio in the vehicle.
• Do not start the vehicle’s engine or electric generator.
• Contact the nearest gas supplier or qualied service technician for repairs.
• If you cannot reach a gas supplier or qualied service technician, contact the
nearest re department.
• Do not turn on the gas supply until the gas leak(s) has been repaired.
C. This is an automatic gas valve, no adjustments are necessary. Do not attempt to
repair the gas valve. This may result in a re or explosion.
D. Do not use this appliance if any part has been under water. Immediately call a
qualied service technician to inspect the appliance and to replace any part of the
control system and any gas control which has been under water.
E. Before operating water heater, check the location of the vent to make sure it will
not be blocked by the opening of any door on the trailer. If it can be blocked, do
not operate the water heater with the door open.
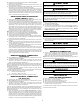
OPERATING INSTRUCTIONS
1. STOP! Read the safety information provided.
2. Turn o all electric power to the appliance.
3. Turn “OFF” gas supply.
4. Wait ve minutes for gas to clear the area. If you smell gas then STOP! Follow
instructions in item B of the SAFETY INFORMATION. If you don’t smell gas, go
to next step.
5. Turn “ON” gas supply.
6. Turn on electrical power to the appliance.
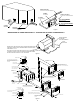
7. Locate the switch plate that operates the water heater which is somewhere inside
the RV and may be similar to the ones shown in Figure 11A and 11B. Your
switch may have a dierent appearance.
8. Once the switch is located and depending on which switch plate; Press the rocker
switch marked “GAS”, or the plain rocker switch, or your switch so that it is in the
“ON” position. If the burner does not light, the system will automatically attempt
ignition two more times before going into lock-out.
NOTE: Each ignition cycle will have a 15 second purge before spark cycle, the red
“RESET” light on the switch plate will be illuminated during the 15 second purge and
turn o during the spark cycle. If the red “RESET” light remains illuminated after the
15 second purge AND the system has attempted ignition three times, the system is
in lockout.
9. If lockout occurs before main burner lights, the red “RESET” light on the switch
plate remains illuminated to indicate ignition did not occur. To reset the system
and attempt ignition again, press the rocker switch marked “GAS”, or the plain
rocker switch, or your switch so that it is in the “OFF” position and wait ve
seconds before returning the switch to the “ON” position. The rst start-up of the
water heater may require several ignition cycles before all the air is purged from
the gas lines.
10. If the burner will not ignite and remain on, the following items should be checked
before calling a service person:
A. Conrm if the switch marked “GAS”, or the plain rocker switch, or your
switch is in the “OFF” position.
B. Conrm if the Gas supply to the water heater is turned o or empty.
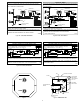
C. Conrm if the Reset button on ECO is tripped. (see Figure 12)
The reset button(s) are not visible as they are behind the cover that indicates “PUSH
TO RESET”. The 12V DC ECO Switch & T-Stat is under the rubber grommet identied
as “A” in the gure and the 120V electric element ECO Switch & T-Stat is under the
rubber grommet identied as “B". These are the reset button(s) that would be visible
if the cover from Figure 12 were removed.
11. If burner fails to light, call a Suburban Service Center or a local RV service agency.
OPERATING INSTRUCTIONS
FOR UNITS WITH ELECTRIC ELEMENT
Electric water heaters are designed to operate with a minimum amount of service
problems; however, proper operation and care is essential.
By far the most common trouble with electric water heaters results from energizing the
water heater before it is lled with water. Even brief operation of the electric element
without water in the tank will burn-out the electric heating element.
To energize the electric heating element, turn the switch to “on”. The switch is located
behind the water heater door in the lower left corner of the control housing. (See
Figure 12). The water temperature will be regulated by the thermostat.
THERMOSTAT AND MANUAL RESET
ALL "D" Models (See Figure 12)
The model water heaters listed above are equipped with a high temperature limit as a cut-
o device located behind the rubber grommet identied as “A” in Figure 15. Temperatures
above 180°F will cause manual reset button to trip shutting down main burner.
To activate burner, the water temperature must be below 110°F, push on the rubber
grommet which pushes the reset button to re-activate burner.
THERMOSTAT AND MANUAL RESET
ALL "DE, DEM, DEC, DELC" Models (See Figure 12)
The model water heaters listed above are equipped with two high temperature limits
as cut-o devices located behind the cover that indicates “PUSH TO RESET”. The
12V DC ECO Switch & T-Stat is under the rubber grommet identied as “A” in Figure
12 and the 120V electric element ECO Switch & T-Stat is under the rubber grommet
identied as “B” in Figure 12.
When operating the water heater using gas, temperatures above 180°F will cause
manual reset button to trip shutting down main burner.
To activate burner, the water temperature must be below 110°F, push on the rubber
grommet which pushes the reset button to re-activate burner.
When operating the water heater using the electric element, temperatures above
180°F will cause manual reset button to trip shutting down the electric element.
To activate electric element, the water temperature must be below 110°F, push on the
rubber grommet to re-activate electric element.
HIGH ALTITUDE DERATION
Suburban water heaters are certied by nationally recognized testing laboratories for
operation without modications at altitudes up to 4,500 feet. Operation above this
elevation may require derating by 4 percent for every 1,000 feet above sea level. For
example, at 8,000 feet, the water heater should be derated approximately 32 percent.
If the unit is not properly derated, lack of sucient oxygen for combustion may produce
improper burner operation. Pilot outage caused by burner lift-o or sooting from a yellow
burner may occur indicating the possibility of carbon monoxide. You may also notice a
lack of eciency in heating the water because of incomplete combustion of the burner
at these higher altitudes.
Consult with the local gas company, your dealer, an RV service agency or Suburban
Manufacturing Company for proper derating of the unit. Change-out of the orice
(derating) should be done by the dealer or a qualied service agency.
NOTE: It is important that once the unit has returned to lower elevation (below 4,500
feet), this high altitude deration and pilot adjustments (if equipped) be reversed for
proper operation of the unit.
TO TURN OFF WATER HEATER
Locate the switch plate that operates the water heater which is somewhere inside the
RV and may be similar to the ones shown in Figures 11A and 11B. Your switch may
have a dierent appearance.
Once the switch is located and depending on the switch plate; Press the rocker switch
marked “GAS”, or the plain rocker switch, or your switch so that it is in the “OFF”
position.
1. Turn o electrical power to the appliance.
2. Turn o gas supply.
3. If vehicle is to be stored or heater is going to be turned o while subject to freezing
temperature, drain water heater. (See “Draining and Storage Instructions.”)
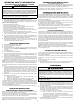
MAINTENANCE
WARNING
If the user of this appliance fails to maintain it in the condition in which it
was shipped from the factory or if the appliance is not used solely for its
intended purpose or if appliance is not maintained in accordance with the
instructions in this manual, then the risk of a re and/or the production of
carbon monoxide exists which can cause personal injury, property damage
or loss of life.
For your safety, all repairs should be performed by your dealer or a
qualied service person.
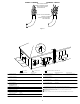
A. Main Burner: Do not allow the burner to burn with a yellow ame, because sooting
will occur. (See Safety Warnings). If the burner ame is yellow and has an erratic
pattern, shut unit down and contact a qualied service agency. Do not continue
operating unit with improper burner ame. (See Figure 13 for correct and incorrect
burner ame appearance.)
B. Periodically inspect unit for soot. If soot is present anywhere on water heater,
immediately shut unit down and contact your dealer or a qualied service person.
Soot is a sign of incomplete combustion and must be corrected before operating
water heater. Areas to check would include:
1. Check for an obstruction in burner or the ue box.
2. Check the screen in the door to see that no foreign material has
accumulated to prevent ow of combustion and ventilating air.
3. Check to be sure there is no ame present at burner orice or burner
whenever main gas valve is closed. This can be checked by turning the
OFF/ON switch to the “OFF” position.
C. Frequent checks should be made of the grommet on the gas inlet to assure tight
seal. (See “Making Gas Connections”).