
User Manual


45
FR
GB
DE
Réglages Easydrill / Easydrill Settings / Einstellungen Easydrill
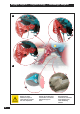
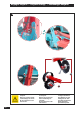
Traceurs latéraux
Les traceurs sont conçus pour un marquage au centre
du tracteur, ils sont préréglés à l’usine.
-
Toutefois si vous désirez ajuster ce réglage,
déplacer le support du disque sur le tube.
La distance de la dernière ligne de semis au disque
de traceur est égale à une 1/2 largeur de travail
plus un 1/2 écartement.
-
Vérifier que le vérin hydraulique est bien en
pression.
-
Retirer la goupille à droite et à gauche.
-
Avant d’agir sur l’hydraulique, vérifier qu’il n’y ait
personne à côté des traceurs.
-
Pendant l’utilisation, le distributeur qui commande
les traceurs doit être en position flottante.
Il est possible de régler l’angle d’attaque du disque
Desserrer les 2 vis et faire une légère rotation à
l’axe du disque.
Un méplat sur l’axe du disque, vous permet de
l’orienter à l’aide d’une clef.
-
Resserrer les vis.
Un boulon de sécurité placé sur l’articulation du
traceur permet son dégagement en cas de rencontre
avec un obstacle.
4
4
3
3
2
2
1
1
G
1
3
Side markers
The markers are designed to mark a line along the
tractor’s centre line; they are preset in the factory.
- However if you wish to adjust this setting, move the
disc support on the tube.
The distance of the last seed row to the marker disk
is equal to half of the working width plus half a row
width.
- Make sure that the hydraulic ram is under pressure.
- Remove the right and left-hand pins .
- Before operating the hydraulics, check that no-one
is standing next to the markers.
- During use, the spool valve that controls the markers
must be in the “float” position.
It is possible to adjust the disk’s angle of attack.
Unscrew the 2 screws and slightly rotate the disk
pin.
A flat edge on the disc pin enables it to be positioned
using a spanner.
- Tighten the screws up again.
A shear pin on the marker’s hinge enables it to be
released if it hits an obstacle.
4
4
2
2
1
1
3
3
G
Seitliche Spurreißer
Die Spurreißer sollen die Mitte des Schleppers
markieren.
-
Wenn Sie diese Einstellung jedoch verändern wollen,
verstellen Sie den Radhalter an dem Rohr.
Der Abstand der letzten Saatlinie zum Spurreißerrad
ist gleich1/2 Arbeitsbreite plus 1/2 Reihenabstand.
-
Sicherstellen, dass der Hydraulikzylinder unter Druck
steht.
-
Riegel rechts und links abnehmen.
-
Bevor Sie an der Hydraulik arbeiten, sicherstellen,
dass sich niemand im neben den Spurreißern
befindet.
- Während der Arbeit muss der Hydraulikverteiler,
der die Spurreißer steuert, in loser Stellung sein.
Der Angriffswinkel der Scheibe kann eingestellt
werden. Die 2 Schrauben lockern und Radachse
leicht drehen.
Über die Abflachung an der Radachse kann diese
mit Hilfe eines Schlüssels ausgerichtet werden.
- Schrauben anziehen.
Ein Sicherheitsbolzen am Spurreißergelenk sorgt
beim Auftreten eines Hindernisses dafür, dass
diesem ausgewichen werden kann.
4
4
3
3
1
1
2
2
G