
Instruction Manual


31
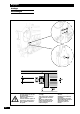
Spurreißer
a) In Arbeitsstellung bringen
Die Spurreißer dienen der Markierung am Vorderrad des
Traktors.
• Splint
herausziehen und den Stift freilegen, wobei
der Arm des Spurreiflers mit der anderen Hand festgehal
ten werden muss.
• Den Splint wieder so einsetzen
, dass er den Stift
festklemmt.
• Den Arm absenken und den Lauf des Kabels überprüfen.
• Das Nebenrohr in liegende und vertikale Stellung bringen.
• Nach dem Einsetzen des Rohres (bis zum Anschlag
gegen den Bolzen
), die beiden Schrauben blockieren.
• Zur Einstellung der Scheibe im Verh‰ltnis zur Spur die
Achse auf dem Arm versetzen.
Gleichzeitig können Sie auch die Scheibenneigung einstellen,
um eine mehr oder weniger starke Einstellung am Boden zu
erzielen.
b) Sonderausrüstungen Spurreißer mit hydrauli-
scher Schaltautomatik
• Hydraulikanschluß
- Hydraulikflexschlauch auf dem einfachwirkenden
Schlepperventil mit freiem Rücklauf anschließen.
Ein Drosselventil auf der Hydraulikleitung verhindert das
heftige Heben der Spurreißer.
GB
Markers
a) Setting to working position
The markers put a mark by the front wheel of the tractor.
• Remove the small pin
and pull out the spindle while
holding the marker arm with the other hand.
• Put the pin back into position
to secure the spindle.
•Lower the arm and check cable routing.
• Set the secondary tube in extended and vertical position.
• After setting the tube in position (stopped against the
bolt
), tighten both screws.
•To adjust the disc in relation to the track, slide the shaft
along the arm.
You can adjust the disc angle simultaneously to reduce mar-
king depth.
b) Optional hydraulically-controlled markers with
automatic reverser
• Hydraulic connection
- connect the hydraulic line to the tractor's single-acting
valve with free return.
A flow control system is incorporated into the hydraulic
circuit to avoid sudden lifting of the markers.
Traceurs latéraux
a) Mise en position travail
Les traceurs sont conçus pour un marquage à la roue avant
du tracteur
• Retirer la goupille
et dégager la broche en tenant le
bras de traceur avec l'autre main.
• Remettre la goupille en position
pour bloquer la broche.
• Baisser le bras et vérifier le passage du câble.
• Pour le réglage du disque par rapport à la voie, déplacer
l'axe sur le bras.
Vous pouvez aussi en même temps régler l'inclinaison du
disque pour avoir un réglage au sol plus ou moins important.
b) Options Traceurs à inverseur automatique à com-
mande hydraulique
• Branchement hydraulique
- brancher le flexible hydraulique sur la prise simple effet
du tracteur avec retour libre.
Afin d'éviter la montée brutale des traceurs, un limiteur de
débit est fixé sur le circuit hydraulique.
Réglages
Settings
Einstellungen
F
D
B
B
B