
Product Manual


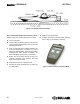
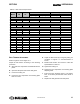

Table Of Contents
- Safety
- Description
- 2.1 Introduction
- 2.2 Compressor Component Description
- 2.3 Compressor Cooling And Lubrication System — Functional Description
- 2.4 Compressor Discharge System—Functional Description
- 2.5 Control System — Functional Description
- 2.6 Air Inlet System, Functional Description
- 2.7 Controller/Keypad
- 2.8 LCD Display
- 2.9 LED LIGHTS
- Specifications
- Installation
- Operation
- Maintenance
- 6.1 General
- 6.2 Maintenance After Initial 50 Hours of Operation
- 6.3 Maintenance Every 2000 Hours
- 6.4 Fluid Maintenance
- 6.5 Filter Maintenance
- 6.6 Air Filter Maintenance
- 6.7 Separator Maintenance
- 6.8 Belt Maintenance
- 6.9 Replacement and Alignment of Belt Pulleys
- 6.10 Hose Maintenance
- 6.11 TANK MOUNT PACKAGE MAINTENANCE
- 6.12 Troubleshooting – Introduction

SHOPTEK
™
USER MANUAL SECTION 6
62
02250180-090 R00
BELT TENSION MEASUREMENT WITH FREQUENCY METER
Refer to Figure 6-9. Follow instructions as follows:
A. Turn on the meter.
B. Hold the meter so that the probe is >10mm (3/8”)
away from the belt being tested. Do not touch the
belt with tester probe.
C. Pluck a single belt at the midpoint between the
motor and compressor unit pulleys. Try not to
disturb any adjacent belts, as this will give a false
reading.As the probe detects a vibration, the
meter will display the frequency. Record data.
D. Rotate the motor pulley through at least one
complete revolution and measure the belts
again, recording the results.
E. Repeat D for a total of 3 measurements.
F. Average the three measurements to obtain the
true belt tension.
G. Repeat for remaining belts.
H. Compare the resuls to the belt tension specifica-
tion in Table 6-1 and adjust if necessary.
Figure 6-8: Optikrik Belt Tension Meter
Figure 6-9: Belt Tension Frequency Meter