OWNER’S MANUAL SUMMER WAVES® SKIMMERPLUS® FILTER PUMP FOR ABOVE GROUND SWIMMING POOLS SFX600 / SFX1000 / SFX1500 models READ AND KEEP THESE INSTRUCTIONS FOR FUTURE REFERENCE For answers to common questions, setup videos and troubleshooting tips, please visit support.polygroupstore.com or call Customer Service: (888) 919-0070 DO NOT RETURN PRODUCT TO STORE To order parts and accessories, please visit www.polygroupstore.
TABLE OF CONTENTS 2 Warnings 3 ~6 Preliminary Steps, Important Notes & Pump Power Info 7 Parts List 7~8 Setup Instructions, Use of Pump 9 ~ 10 Motor Care, Pump Maintenance 11 Filter Cartridge Use & Care 11 Pool Water Care 12 Pump Disassembly & Storage 12 ~ 13 Pump Servicing Instructions 13 ~ 16 Troubleshooting Guide 17 Replacement Parts Ordering Info 18 Should you encounter any problems, contact Customer Service at (888) 919-0070 from 8AM to 5PM MST, Monday-Friday.
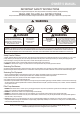
OWNER’S MANUAL IMPORTANT SAFETY INSTRUCTIONS When installing and using this electrical equipment, basic safety precautions should always be followed, including the following: READ AND FOLLOW ALL INSTRUCTIONS Keep for Future Reference. Failure to follow these warnings and instructions can result in serious injury or death to users, especially children. WARNING DANGER PREVENT DROWNING! CLOSELY WATCH CHILDREN WHO ARE IN OR NEAR THIS POOL. CHILDREN UNDER 5 ARE AT HIGHEST RISK FOR DROWNING.
6. CAUTION: For continued protection against possible electric shock, this unit is to be mounted to the base in accordance with the installation instructions. 7. Do not bury cord. Locate cord to minimize abuse from lawn mowers, hedge trimmers, and other equipment. 8. The unit is provided with a ground-fault circuit-interrupter (GFCI). To test the GFCI, push the test button. The GFCI should interrupt power. Push the reset button. Power should be restored.
OWNER’S MANUAL First Aid 1. Keep a working phone and a list of emergency numbers near the pool. 2. Become certified in cardiopulmonary resuscitation (CPR). In the event of an emergency, immediate use of CPR can make a lifesaving difference. Special Warning 1. Local building codes may require obtaining a building or electrical permit. Installer shall follow regulations on setback, barriers, devices, and other conditions. 2. Safety signs shall comply with requirements of ANSI-Z535 and use signal wording.
ASME American Society of Mechanical Engineers Two Park Avenue, New York NY 10016-5990 Contact: 800-843-2763 (U.S. & Canada) 973-882-1170 (outside North America) www.asme.org NSPI National Spa and Pool Institute (see APSP) UL Underwriters Laboratories 333 Pfingsten Road,Northbrook IL 60062-2096 Contact: 877-854-3577 or 847-272-8800 www.ul.com NSF NSF International P.O. Box 130140 789 N. Dixboro Road Ann Arbor MI 48105 Contact: 800-673-6275 or 734-769-8010 www.nsf.
OWNER’S MANUAL PRELIMINARY STEPS 1. READ ALL INSTRUCTIONS CAREFULLY and get a thorough understanding of what is required to assemble your Filter Pump. 2. It is recommended to have some petroleum jelly (not included) on hand for lubricating the gaskets and o-rings. FILTER PUMP IMPORTANT NOTES 1. The installer shall follow the written instructions provided for the operation of the filter pump system. 2.
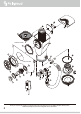
6 7 5 8 Outside Pool Wall 9 4 Inside Pool Wall 3 2 1 8 Should you encounter any problems, contact Customer Service at (888) 919-0070 from 8AM to 5PM MST, Monday-Friday. Extended operating days and hours during peak season requirements.
OWNER’S MANUAL SETUP INSTRUCTIONS Before assembly, take a few minutes to identify and become familiar with all the parts. WARNING: CLIMBING HAZARD! PLEASE PREVENT CHILDREN FROM CLIMBING ON THE FILTER CANISTER TO GAIN ACCESS TO THE POOL. Skimmer Installation 1. Set up your pool following the pool Owner’s Manual instructions. Do NOT fill water until the Filter Pump is properly installed. Locate the Skimmer Opening on the pool wall. 2. Slide open the Top Cover 5 and take out the parts inside.
Pump Installation 7. From inside the Skimmer Canister 9, snap the pins of the Weir 8 into the pivot slots, one after another. The Weir should now stand upright but not stuck. 8. Slide close the Top Cover 5 onto the Skimmer Canister 9. 9 a) Insert one Weir pin into one hole. Push-in Push here 5 Inside Pool Wall b) Push to secure the connection. c) Repeat for another pin. Weir installation finished. 9.
OWNER’S MANUAL PUMP MOTOR CARE IMPORTANT! This Skimmer Filter Pump is protected by a thermal switch, a safety device that stops the pump from running when it's overheated, to prevent pump damage and prolong service life. If your pump turns off automatically, it’s likely the pool water temperature is too high or the water flow through the pump is insufficient for cooling the pump down.
POOL WATER CARE 1. The following items are required to get your pool ready for use. They are available at polygroupstore.com or your local pool supplies stores: a. Test Kit – for checking the chlorine and pH levels of the pool water. Use it daily and adjust with the required chemicals. b. 1” (2.54 cm) Chlorine Tablets – for water disinfection and prevention of the growth of algae c. pH Control Chemicals – for adjusting the pH level up (soda ash) or down (acid) d. Algaecides – to eliminate algae e.
OWNER’S MANUAL the parts, and liberally lubricate the Skimmer Gasket Rubber Seal 25 with petroleum jelly. Then reassemble them back onto the Skimmer Canister 9 . b. Remove the Motor Assembly 3 by turning open the Motor Seal Nut 1 . Clean and dry completely the Pump. Then see STEP 3: Pump Reassembly/Replacement (p. 15-16) to reassemble the Motor into the Canister. 4. Store all the parts in a dry place that remains above 32°F (0°C) at all times.
5. Slowly take out the Motor Assembly 3 . Be careful not to lose the Rubber Nozzle 2 or Canister Gasket 4 . You may need to reach inside the Canister to free the Pump Motor. 4 2 3 STEP 2: Rotor Inspection/Replacement The Pump 3 is consisted of a Rotor Assembly 27 and its related parts. If the Rotor and/or its parts is/are broken, or the Rotor, even in perfect condition, is not seated in place between the Volute Cover 28 and Pump Body 31 , the Pump will not function properly. 1.
OWNER’S MANUAL STEP 3: Pump Reassembly/Replacement 1. Lubricate the Canister Gasket 4 , then insert it back into the groove (inner groove for SFX600/SFX1000) at the bottom of the Skimmer Canister 9 . IMPORTANT: make sure that the cord of the Motor Assembly 3 is placed through the Motor Seal Nut 1 BEFORE replacing the Pump. 9 4 4 3 2 1 2a. If your Pump is removed from the pool, slowly insert the Motor Assembly back into the upside-down Canister.
OWNER’S MANUAL 3. Once the Motor is correctly aligned, match the threads of the Motor Seal Nut 1 to that of the Canister, and tighten by twisting the Nut counterclockwise. IMPORTANT: make sure the Nut and Canister are not cross-threaded; otherwise leaks may occur. 1 16 Should you encounter any problems, contact Customer Service at (888) 919-0070 from 8AM to 5PM MST, Monday-Friday. Extended operating days and hours during peak season requirements.
OWNER’S MANUAL TROUBLESHOOTING GUIDE WARNING: UNPLUG THE POWER CORD BEFORE TROUBLESHOOTING THE FILTER PUMP. Problem 1. Pump Motor 3 doesn’t start, or kicks on and off 2. No or slow water flow from the Return Fitting 18 Cause Solution B GFCI Power Cord Set 26 and/or circuit breaker tripped A Plug the GFCI Power Cord Set 26 to a grounded power outlet. Then press the RESET button to start the Pump. B Reset your circuit breaker on the electrical panel.
OWNER’S MANUAL REPLACEMENT PARTS ORDERING INFO Key Description 1 Motor Seal Nut 2 3 4 Rubber Nozzle Canister Gasket / Motor Seal 5 Top Cover 6 Weir Foam 7 Pump Motor Assembly Type D Filter Cartridge Type A/C Filter Cartridge 8 Weir 9 Skimmer Canister 10 Hose Connection O-Ring 11 Hose Clamp 12 Return Hose 13 90° Elbow 14 RF Nut 15 RF Thrust Washer (white) 16 17 Pool Wall (for reference only) RF Gasket (black) 18 Return Fitting (RF), threaded 19 RF Diverter, threaded 20 RF
MANUAL DEL USUARIO BOMBA SUMMER WAVES® CON FILTRO SKIMMERPLUS® PARA PISCINAS SOBRE SUELO Modelos SFX600 / SFX1000 / SFX1500 LEA ESTAS INSTRUCCIONES Y CONSÉRVELAS PARA FUTURAS CONSULTAS Para dudas sobre la instalación o resolución de problemas, visite support.polygroupstore.com Servicio de atención al cliente: (888)919-0070 NO DEVUELVA EL PRODUCTO A LA TIENDA Para pedir piezas y accesorios, visite www.polygroupstore.
ÍNDICE 2 Advertencias 3~6 Pasos Preliminares Y Notas Importantes Acerca De La Bomba De Filtración Y Potencia De La Bomba 7 Lista De Piezas 7~8 Instrucciones De Montaje Y Uso De La Bomba 9 ~ 10 Cuidado Del Motor De La Bomba Y Mantenimiento De La Piscina 11 Uso Y Cuidado Del Cartucho De Filtro 11 Cuidado Del Agua De La Piscina 12 Desmontaje Y Almacenamiento De La Bomba De La Piscina 12 ~ 13 Instrucciones De Mantenimiento De La Bomba 13 ~ 16 Guía De Resolución De Problemas 17 Información
MANUAL DEL USUARIO INSTRUCCIONES IMPORTANTES DE SEGURIDAD Al instalar y usar este equipo electrónico, deben seguirse siempre ciertas instrucciones básicas de seguridad, incluidas las siguientes: LEA Y SIGA TODAS LAS INSTRUCCIONES Consérvelas para futuras consultas. El incumplimiento de estas advertencias e instrucciones puede provocar lesiones graves o la muerte de los usuarios, especialmente los niños.
5. ATENCIÓN: Esta bomba ha sido diseñada para usarla únicamente con piscinas almacenables. No debe utilizarla con piscinas de instalación permanente. Una piscina almacenable ha sido fabricada de modo que puede desmontarse fácilmente para guardarla y volver a montarse íntegramente como al principio. Una piscina de instalación permanente se construye sobre o debajo del suelo, o de forma que no puede ser desmontada para guardarse. 6.
MANUAL DEL USUARIO filtro de la bomba debe colocarse de manera que no pueda ser usado por los niños pequeños como medio de acceso a la piscina. No deje juguetes dentro de la piscina al terminar de usarla, ya que los juguetes y objetos similares podrían atraer a los niños a la piscina. 3. Coloque los muebles (por ejemplo, mesas o sillas) lejos de la piscina para que los niños no puedan subirse a ellos para acceder a la piscina. Riesgo de electrocución 1.
APSP Association of Pool & Spa Professionals (formerly National Spa and Pool Institute) 2111 Eisenhower Avenue, Suite 500 Alexandria VA 22314-4679 Contacto: 703-838-0083 www.apsp.org ASME American Society of Mechanical Engineers Two Park Avenue, New York NY 10016-5990 Contacto: 800-843-2763 (U.S. & Canada) 973-882-1170 (outside North America) www.asme.
MANUAL DEL USUARIO PASOS PRELIMINARES 1. LEA ATENTAMENTE TODAS LAS INSTRUCCIONES y comprenda bien lo que hace falta para montar la bomba de filtración de la serie SFX. 2. Se recomienda tener algo de vaselina (no incluida) a la mano para lubricar los empaques y los anillos negros. NOTAS IMPORTANTES ACERCA DE LA BOMBA DE FILTRACIÓN 1. El instalador deberá seguir las instrucciones suministradas por escrito sobre el funcionamiento de los sistemas de bombas de filtración. 2.
6 7 5 8 Parte Fuera de La Piscina 9 4 Parte Interior de La Piscina 3 2 1 8 Si tuviera algún problema, llame al Servicio al cliente al número (888) 919-0070 de 8:00 a 17:00 (MST) Lun, Jue, Vie. Días y horas ampliables durante la temporada alta.
MANUAL DEL USUARIO INSTRUCCIONES DE MONTAJE Antes de montar el producto, dedique unos minutos a comprobar el contenido y familiarícese con todas las piezas. ADVERTENCIA: COLOQUE ESTE PRODUCTO APARTADO DE LA PISCINA A FIN DE EVITAR QUE LOS NIÑOS SE SUBAN A ÉL Y ACCEDAN A LA PISCINA. Instalación del skimmer (rebosador) 1. Instale su piscina conforme a las Instrucciones del Manual del usuario de la piscina. No la llene de agua hasta que haya instalado correctamente la bomba de filtración.
Instalación de la bomba 7. Desde dentro de la caja del skimmer 9, enganche los pines de la Compuerta 8 en las ranuras de los pivotes, uno después de otro. La Compuerta ahora debe estar de pie, pero no atascada. 8. Deslice y cierre la Cubierta superior 5 sobre la Caja del skimmer 9. a) Inserte un pin de Compuerta en un orificio. 5 Parte Interior de La Piscina Presionar Presione aquí 9 b) Empuje para asegurar la conexión. Instalación de la retención finalizada. c) Repita para el otro pin. 9.
MANUAL DEL USUARIO CUIDADO DEL MOTOR DE LA BOMBA ¡IMPORTANTE! Esta Bomba de filtración de skimmer está protegida por un interruptor térmico, un dispositivo de seguridad que detiene y evita que la bomba siga funcionando en caso de sobrecalentamiento, para evitar daños a la bomba y una prolongada vida útil. Si su bomba se apaga automáticamente, es probable que la temperatura del agua de la piscina esté demasiado alta o que el flujo del agua a través de la bomba sea insuficiente para enfriar la bomba.
CUIDADO DEL AGUA DE LA PISCINA 1. Se requieren los siguientes artículos para que su piscina esté lista para usarse. Se encuentran disponibles en polygroupstore.com o en sus tiendas locales de suministros de piscina: a. Kit de prueba - para verificar los niveles de cloro y de pH del agua de la piscina. Úselo diariamente y ajuste con las sustancias químicas requeridas. b. Pastillas de cloro de 2.54 cm - para la desinfección del agua y la prevención del crecimiento de algas c.
MANUAL DEL USUARIO 3. Desmonte la Bomba: a. Deslice y abra la Cubierta superior 5 , retire el Cesto del colador 24 , el Cartucho de filtro 7 y cualquier pastilla de cloro que haya quedado dentro, y desenganche la Compuerta 8 . Limpie y seque todas las partes, y lubrique el Sello de goma del empaque del skimmer 25 abundantemente con vaselina. Luego vuelva a ensamblarlas de regreso a la Caja del skimmer 9 . b. Retire el Conjunto del motor 3 abriendo la Tuerca del sello del motor 1 .
5. Saque lentamente el ensamblaje del motor 3 . Tenga cuidado de no perder la Boquilla de goma 2 o el Empaque de la caja 4 . Podría tener que alcanzar dentro de la caja para liberar el motor de la bomba. 4 2 3 PASO 2: Inspección/Reemplazo del rotor La Bomba 3 consiste de un Ensamblaje del rotor 27 y sus partes relacionadas.
MANUAL DEL USUARIO PASO 3: Reemplazo/Reensamblaje de la Bomba 1. Lubrique el Empaque de la caja 4 , luego insértelo de regreso en la ranura (ranura interna para SFX600/SFX1000) en la parte inferior de la Caja del skimmer 9 . IMPORTANTE: asegúrese que el cable del Conjunto del motor 3 esté colocado hasta la Tuerca del sello del motor 1 ANTES de reemplazar la Bomba. 9 4 4 3 2 1 2a. Si su Bomba se retira de la piscina, inserte lentamente el Conjunto del motor de regreso a la Caja volteada.
3. Una vez que el motor esté correctamente alineado, aparee las roscas de la Tuerca del sello del motor 1 a las de la Caja y luego ajuste la Tuerca hacia la izquierda. IMPORTANTE: asegúrese que la Tuerca y la Caja no tengan las roscas cruzadas; de lo contrario, pueden producirse fugas. 1 16 Si tuviera algún problema, llame al Servicio al cliente al número (888) 919-0070 de 8:00 a 17:00 (MST) Lun, Jue, Vie. Días y horas ampliables durante la temporada alta.
MANUAL DEL USUARIO GUÍA DE RESOLUCIÓN DE PROBLEMAS ADVERTENCIA: DESENCHUFE EL CABLE DE ALIMENTACIÓN ANTES DE SOLUCIONAR CUALQUIER PROBLEMA EN LA BOMBA DE FILTRACIÓN. Problema 1. El Motor de la Bomba 3 no arranca, o se enciende y apaga. Causa Solución A La Bomba no está enchufada A Enchufe el set de cable de alimentación GFCI 26 a un tomacorriente correctamente puesto a tierra. Luego presione el botón RESET para iniciar la Bomba.
MANUAL DEL USUARIO OWNER’S MANUAL INFORMACIÓN SOBRE EL PEDIDO DE PIEZAS DE REPUESTO Llave Descripción 1 Tuerca de sellado del motor 2 3 4 Boquilla Conjunto del motor 5 Cubierta superior 6 Espuma de retención 7 Junta del cartucho Cartucho de filtro tipo D (solo SFX600) Cartucho de filtro tipo A/C (SFX1000 o SFX1500) 8 Rebosadero 9 Caja del skimmer 10 Anillo negro de la conexión de la manguera 11 Abrazadera de la manguera 12 Manguera de retorno 13 Codo de 90° 14 Tuerca de la RF 15
OWNER′S MANUAL SUMMER WAVES® POOL LADDER FOR ABOVE GROUND SWIMMING POOLS 36" / 42" / 48" / 52" Models CHILDREN TO PREVENT ENTRAPMENT OR DROWNING NO TO USE THIS REMOVE AND DO NOT SWIM SECURE DIVING / NO JUMPING PRODUCT THROUGH, LADDER UNLESS WHEN POOL FROM LADDER BEHIND, THEY ARE OR AROUND - SHALLOW IS NOT CLOSELY LADDER. WATER! SUPERVISEDOCCUPIED. TO AT ALL TIMES. REDUCE THE RISK LADDER WEIGHT OF INJURY, LIMIT IS 150KG. POIDS SUPPORTÉ PAR L’ÉCHELLE DO NOT PERMIT LA LIMITE DU EST DE 150 KG.
TABLE OF CONTENTS Warnings ......................................................................................................................................................... 3 ~ 5 Parts List ........................................................................................................................................................... 6 ~7 Setup Instructions ......................................................................................................................................
OWNER′S MANUAL IMPORTANT SAFETY INSTRUCTIONS When installing and using this electrical equipment, basic safety precautions should always be followed, including the following : READ AND FOLLOW ALL INSTRUCTIONS Keep for Future Reference. Failure to follow these warnings and instructions can result in serious injury or death to users, especially children WARNING DANGER PREVENT DROWNING! CLOSELY WATCH CHILDREN WHO ARE IN OR NEAR THIS POOL. CHILDREN UNDER 5 ARE AT HIGHEST RISK FOR DROWNING.
9. Keep your pool clean and clear. The deepest part of pool must be visible at all times from the outside barrier of the pool. 10. Pool shall be located at a minimum distance of 6ft (1.83m) from any receptacle, and all 125-volt 15- and 20-ampere receptacles located within 20ft (6.
OWNER′S MANUAL 3. Layers of Protection. 4. Pool and Spa Emergency Procedures for Infants and Children. 5. Be Safety Aware Copies of the above brochures are available free from the APSP. Go to: www.APSP.org Safety Education Programs and Materials Educational programs and materials (i.e., seminars, workshops, brochures, videos, instructional guides) are available from the APSP, other aquatic safety groups, and by private firms.
PARTS LIST • THIS LADDER IS DESIGNED AND MANUFACTURED FOR THE SPECIFIC POOL WALL HEIGHT. • REMOVE AND SECURE THE LADDER WHEN POOL IS NOT OCCUPIED! • CHECK THE COLOR CODES INDICATED ON THE LADDER WARNING BRACKETS 11 FOR REPLACEMENT PARTS ORDERING.
OWNER′S MANUAL Key Description 9 Lock Washer 10 Cap Nut 11 Ladder Warning Bracket Color Code Color A Color B Color C Color D Color E Color F Color G Color A Color B Color C Color D Color E Color F Color G Color A Color B Color C Color D Color E Color F Color G 36” Pool Wall Height 42” Pool Wall Height 48” Pool Wall Height 52” Pool Wall Height Part # Qty. Part # Qty. Part # Qty. Part # Qty.
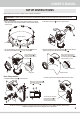
3. Continue until the top Tread 4 is installed. 4. Repeat the above for another pair of legs. 4 6 2 1 2 4 1 6 FIG. 3 5. Insert the Ladder Handrails 3 into the top of the legs. Now step back and check if all the ladder treads are level (parallel to the ground). If not, lift the handrails, repeat the above for fixing that tread, and reinstall the handrails. 10 9 8 7 3 3 FIG. 4 8 Should you encounter any problems, contact Customer Service at (888) 919-0070 from 8AM to 5PM MST, Monday-Friday.
OWNER′S MANUAL 6. Secure the handrails: insert a Machine Screw 7 (with Washer 8) from the inside of the ladder, and fasten with a Lock Washer 9 and lastly a Cap Nut 10 . Repeat with another handrail. The ladder should now look like an inverted “V” from the side. IMPORTANT: make sure that all the screws are firmly tightened. THIS PREVENTS THE HANDRAILS FROM SEPARATING FROM THE LEGS. LADDER FAILURE WILL RESULT IF SCREWS ARE NOT PROPERLY INSTALLED! 7.
MANUAL DEL USUARIO ESCALERA PARA PISCINA SUMMER WAVES® PARA PISCINAS SOBRE SUELO Modelos 91 cm / 1,07 m / 1,22 m / 1,32 m CHILDREN TO PREVENT ENTRAPMENT OR DROWNING NO TO USE THIS REMOVE AND DO NOT SWIM SECURE DIVING / NO JUMPING PRODUCT THROUGH, LADDER UNLESS WHEN POOL FROM LADDER BEHIND, THEY ARE OR AROUND - SHALLOW IS NOT CLOSELY LADDER. WATER! SUPERVISEDOCCUPIED. TO AT ALL TIMES. REDUCE THE RISK LADDER WEIGHT OF INJURY, LIMIT IS 150KG.
ÍNDICE Advertencias ..................................................................................................................................................... 3 ~ 5 Lista de piezas .................................................................................................................................................. 6 ~ 7 Instrucciones de montaje ..................................................................................................................................
MANUAL DEL USUARIO INSTRUCCIONES IMPORTANTES DE SEGURIDAD Al instalar y usar este equipo electrónico, deben seguirse siempre ciertas instrucciones básicas de seguridad, incluidas las siguientes: LEA Y SIGA TODAS LAS INSTRUCCIONES Consérvelas para futuras consultas. El incumplimiento de estas advertencias e instrucciones puede provocar lesiones graves o la muerte de los usuarios, especialmente los niños.
9. Mantenga la piscina limpia. La parte más profunda de la piscina debe ser visible en todo momento desde la valla exterior de la piscina. 10.
MANUAL DEL USUARIO Existen programas educativos y materiales Sobre los programas educativos (es decir, seminarios, talleres, folletos, vídeos, guías) del APSP, otros grupos de seguridad acuática y empresas privadas.
LISTA DE PIEZAS • ESTA ESCALERA ESTÁ DISEÑADA Y FABRICADA PARA LA ALTURA ESPECÍFICA DE LA PARED DE LA PISCINA. • RETIRE Y ASEGURE LA ESCALERA CUANDO LA PISCINA ESTÉ VACÍA. • VERIFIQUE LOS CÓDIGOS DE COLOR INDICADOS EN LOS SOPORTES DE ADVERTENCIA DE LA ESCALERA 11 PARA PEDIR PIEZAS DE REPUESTO.
MANUAL DEL USUARIO Key Description 9 Arandela de cierre 10 Tuerca 11 Soporte de advertencia de la escalera Color Code Color A Color B Color C Color D Color E Color F Color G Color A Color B Color C Color D Color E Color F Color G Color A Color B Color C Color D Color E Color F Color G 36” Pool Wall Height 42” Pool Wall Height 48” Pool Wall Height 52” Pool Wall Height Part # Qty. Part # Qty. Part # Qty. Part # Qty.
3. Continúe hasta que haya instalado el escalón superior 4. 4. Repita el procedimiento anterior con otro par de patas. 4 6 2 1 2 4 1 6 FIG. 3 5. Inserte los mango de la escalera 3 en la parte superior de las patas. Ahora, de un paso atrás y observe si los escalones de la escalera están nivelados (paralelos al suelo). Si no lo están, levante los pasamanos, repita los pasos anteriores para fijar el escalón y vuelva a instalar los pasamanos. 10 9 8 7 3 3 FIG.
MANUAL DEL USUARIO 6. Fijación de los pasamanos: Inserte un tornillo de máquina 7 (con la arandela 8) desde la parte interna de la escalera y apriételo con una arandela de cierre 9 y, por último, una tuerca de tapón 10 . Repita el mismo procedimiento con el otro pasamanos. La escalera deberá parecer ahora una "V" invertida al mirarla desde el costado. IMPORTANTE: Compruebe que todos los tornillos están bien apretados. ESTO EVITARÁ QUE LOS PASAMANOS SE SEPAREN DE LAS PATAS.
OWNER′S MANUAL SUMMER WAVES® POOL MAINTENANCE KIT READ AND KEEP THESE INSTRUCTIONS FOR FUTURE REFERENCE For answers to common questions, setup videos and troubleshooting tips, please visit support.polygroupstore.com or call Customer Service: (888) 919-0070 To order parts and accessories, please visit www.polygroupstore.com Should you encounter a problem with your Polygroup® Product, please DO NOT return the product to the place of purchase.
OWNER′S MANUAL OPERATION INSTRUCTIONS To Use The Leaf Net 1. Extend the telescopic pole to the desired length. 2. Attach the leaf net to the open end of the telescopic pole. 3. Scoop out leaves and other debris from the pool. Spring Latch IMPORTANT NOTE: For vacuuming with other Polygroup® Filter Pump Systems; Models: CP2000-C, RP, RX and Sand Filtration Systems; Please follow the directions on page 4 of this manual. Directions for Vacuuming With Polygroup® Summer Waves Skimmer Pump Models SFX Only. 1.
OWNER′S MANUAL 8. Remove the canister top cover of the SFX Series Skimmer pump. 9. For Summer Waves SFX Skimmer Pump, remove the weir from the canister. 10. Put the vacuum adapter over the strainer and press downward. A vacuum will be generated that will keep the vacuum adapter in place. 11. Place the open end of the flexible hose up to the return fitting and start to fill the hose with water. Keep filling the hose until there is no more air inside the hose. 12.
OWNER′S MANUAL To Vacuum With A 5/8” Garden Hose (Not Included) 1. Extend the telescopic pole to its fullest length. 2. Attach the vacuum head to the open end of the telescopic pole. 3. Attach the vacuum bag to the vacuum head, tighten the drawing string and tie a simple shoelace knot. 4. Twist off the water hose cap. 5. Hand tighten a 5/8” garden hose to the vacuum head. 6. Secure the hose into the hose clip. 7. Place the vacuum under water. 5/8” hose Hose Clip 8.
MANUAL DEL USUARIO SUMMER WAVES® KIT DE MANTENIMIENTO DE PISCINA LEA ESTAS INSTRUCCIONES Y CONSÉRVELAS PARA FUTURAS CONSULTAS Para dudas sobre la instalación o resolución de problemas, visite support.polygroupstore.com Servicio de atención al cliente: (888)919-0070 Para pedir piezas y accesorios, visite www.polygroupstore.com Si le surge algún problema con su producto Polygroup®, no devuelva el producto al establecimiento de compra.
MANUAL DEL USUARIO INSTRUCCIONES DE FUNCIONAMIENTO Como Usar el Recoge Hojas 1. Extienda la barra telescópica a la longitud máxima. 2. Encaje el recoge hojas al extremo abierto del tubo telescópico. 3. Retire las hojas y los residuos de la piscina. Pasador elástico NOTA IMPORTANTE: Para aspirar con otros sistemas de Polygroup; Modelos: CP2000-C, RP, RX y Sistema de Filtración de Arena; Por favor siga las instrucciones en página 4 de este manual.
MANUAL DEL USUARIO 8. Retire la tapa superior de la caja de filtro de la bomba del Skimmer Serie SFX. 9. En el caso que la Bomba Skimmer Summer Waves sea SFX, retire el azud de la caja de filtro. 10. Ponga el adaptador de la aspiradora por encima del filtro y presione hacia abajo. Se generará un vacío y mantendrá el adaptador de la aspiradora en su lugar. 11. Coloque el extremo abierto de la manguera flexible a la boquilla de retorno y empiece a llenar la manguera con agua.
MANUAL DEL USUARIO Para aspirar con una manguera de jardín de 5/8" (no incluida) 1. Extienda la barra telescópica a la longitud máxima. 2. Encaje el cabezal de la aspiradora a la punta abierta del tubo tetelescópico. 3. Enganche la bolsa al cabezal la aspiradora, apriete la cuerda para cerrar y ate con un nudo sencillo. 4. Gire y remueva el tapón de la manguera. 5. Apriete manualmente la manguera de jardín de 5/8" o la aspiradora. 6. Deslice la manguera hacia el interior de la abrazadera de manguera.