
Installation Guide


10
Should you encounter any problems, contact Customer Service at (888) 919-0070 from 8AM to 5PM MST, Monday-Friday.
Extended operating days and hours during peak season requirements.
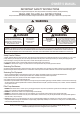
IMPORTANT: Do NOT connect to a timer device!
Press
"RESET"
Button
To Start
Pump
Operation
How to use the GFCI plug
*Do not connect
to a timer device
Pump Installation
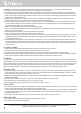
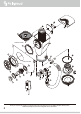
7. From inside the Skimmer Canister 9, snap the pins of the Weir 8 into the
pivot slots, one after another. The Weir should now stand upright but not stuck.
8. Slide close the Top Cover
5 onto the Skimmer Canister 9.
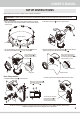
USE OF PUMP
1. Plug the GFCI Power Cord Set 26 to a properly grounded receptacle at least 15 feet (4.5m) away from the pool.
2. To turn on the Pump, press the RESET button of the GFCI Plug.
3. From inside the pool, check if the water flow from the RF Diverter 19 is correct. It should feel like a solid stream of water
returning to the pool. If not, or if you feel a reduction in flow, clean or replace the Filter Cartridge 7 . For details, see
FILTER CARTRIDGE USE & CARE (p. 11) as well as Symptom 2 of TROUBLESHOOTING GUIDE (p. 17).
4. To turn the Pump off, press the TEST button of the GFCI Plug, and unplug it from the power outlet.
5. VERY IMPORTANT: Check and adjust the pH and chlorine levels daily. FILTER PUMP ALONE
WILL NOT PREVENT ALGAE FROM GROWING IN POOL WATER; THIS CAN ONLY BE DONE
BY MAINTAINING PROPER CHLORINE AND pH LEVELS AT ALL TIMES. For details,
see POOL WATER CARE (p. 12).
5
9
Inside Pool Wall
Weir installation
finished.
a) Insert one Weir
pin into one hole.
b) Push to secure
the connection.
c) Repeat for another pin.
Push here
Push-in
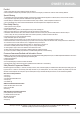
9. You can now fill the pool with water up to between the MIN and MAX markings on the inside of Skimmer Seal Ring 22 .
Max. Level
Min. Level
Inside Pool Wall
The water level should be
between the min and max
markers located inside the
Skimmer Seal Ring.