INSTALLATION & OPERATION MANUAL Wood Stove MODELS 30-NC / 50-SNC30 / 50-TNC30 Manufactured By: England’s Stove Works, Inc. PO Box 206 Monroe, VA 24574 Rev.
WELCOME! Introduction • Precautionary Statements ........... 3 • Thank You! ………….…………............ 4 Installation • Before Installation ………….…......... 5 • Correct Flue Size ………..................... 6 • Flue System Guidelines ................ 7 • Floor & Wall Protection .............. 10 • Side Heat Shields ........................ 12 • Brick Layout ................................ 12 • Room Air Blowers ………………….... 13 • Installation .................................. 14 • Mobile Home Installation ...........
INSTALLATION & OPERATION MANUAL MODEL NUMBERS: 30-NCP 30-NCL 30-NCG 50-SNC30P 50-SNC30L 50-SNC30G 50-TNC30P 50-TNC30L 50-TNC30G Thank you for purchasing this product from a fine line of heating equipment. We wish you many years of safe heating pleasure with your new heating appliance. Save These Instructions. NOTE: IF YOU HAVE A PROBLEM WITH THIS UNIT DO NOT RETURN IT TO THE DEALER. CONTACT CUSTOMER SERVICE @ 1-800-245-6489. Questions? Need Parts or Options? www.heatredefined.
Thank you for purchasing this fine product from England’s Stove Works! England's Stove Works was started, and is still owned by, a family that believes strongly in a "Do It Yourself" spirit – that’s one reason you found this product at your favorite “Do It Yourself” store. We intentionally design and build our stoves so that any homeowner can maintain his or her unit with basic tools, and we're always more than happy to show you how to do the job as easily and as inexpensively as possible.
CAUTION If you have any doubt concerning your ability to complete your installation in a professional-like manner after reading these instructions, you should obtain the services of an installer who is versed in all aspects as to the correct and safe installation. Do not use temporary, makeshift compromises during installation. BEFORE INSTALLATION OF YOUR APPLIANCE 1. HOT WHILE IN OPERATION. KEEP CHILDREN, CLOTHING AND FURNITURE AWAY. CONTACT MAY CAUSE SKIN BURNS. 2.
WHY THE CORRECT FLUE SIZE IS IMPORTANT: 6” “Draft” is the force that moves air from the appliance up through the chimney. The amount of draft in your chimney depends on the length of the chimney, local geography, nearby obstructions, and other factors. Too much draft may cause excessive temperatures in the appliance. An uncontrolled burn or a glowing red part or chimney connector can indicate excessive draft.
FLUE SYSTEM 1. Existing Flue System If you have chosen a freestanding unit, this stove is designed to connect to an existing flue system, such as masonry or a pre-manufactured Class A flue system. If you have a masonry flue system, the inner liner should be inspected carefully for cracks; if there is no liner in your chimney, we recommend you install a steel liner or have one installed. If you have an existing pre-manufactured system the inner liner should be inspected for warping or buckling.
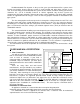
Follow all venting system manufacturer’s installation requirements AND their required clearances. INSTALLATION APPLICATIONS Illustration 1 NOTE: 1. Horizontal run not to exceed 6’. 2. Total flue length should not exceed 25’. (Exterior) Wall Supported 3. Floor protection required: Min. size 39” x 52.5”. 4. Always check local codes for clearances, installation, etc. Lined with clay tile or other liner 18.0” Min. 18.0” Min. Masonry Chimney Single Wall Chimney Connector 18.0” Min. 18” Min.
INSTALLATION APPLICATIONS, Cont’d. Illustration 1b (In Canada, the installation must conform to CAN/CSA‐B365 when passing through combustible construction.
Pre-Manufactured Flue System: In the past few years pre-manufactured flue systems have become very popular, because this type system is easily installed and, when done correctly, is very safe. There are many pre-manufactured flue systems on the market, and when making your choice it should be U.L., (U.L.C. if Canada), B.O.C.A. or I.C.B.O. approved. Any of these systems are constructed of the proper materials and meet the proper safety standards.
Installation on a Combustible Floor If the appliance is to be installed on a combustible floor or a combustible floor covering, it must be installed on a 1” thick non-combustible millboard floor protector or a durable equivalent, with a “R” factor of at least “1.5” (English units) or equivalent. The pad must be installed beneath the unit, extending 16” (U.S., 450 mm Canada) on the side equipped with a door, and 8” on all other sides (200 mm Canada).
3. Side Heat Shields Side Heat Shield This accessory item comes with the hardware (six (6) mounting screws) necessary to install it on the rear of the stove. This is a two-piece heat shield, but is installed one piece at a time. There are prepunched holes on each side of the Rear Heat Shield; while holding each piece of the Side Heat Shield in place, align the pre-punched holes in the Side Heat Shield with the existing holes in the Rear Heat Shield, and fasten with the screws provided.
STANDARD (AC-16) BLOWER Install AC-16 Blower here, using the (4) supplied mounting screws ROOM AIR BLOWER: MODEL AC-16 120 VOLTS, 60Hz, 0.75 AMPS, 2900 RPM DANGER: RISK OF ELECTRIC SHOCK. DISCONNECT POWER BEFORE SERVICING UNIT. ALWAYS FOLLOW ALL CODES AND OWNER’S MANUALS! BLOWER MOTOR OPERATING INSTRUCTIONS: This unit is set up for installation of an optional 2-speed blower motor. The fan speed should be run on “Low” when the unit is operating at lower burn settings, and set to “High” for high burns.
FREESTANDING PLACEMENT AND INSTALLATION The first problem you may encounter is getting your stove into your home -- all of our stove products are well constructed, which makes them rather heavy. Three to four adults can normally handle a unit, but we still recommend using a handcart. Never attempt to handle a heating product alone!!! The door and brick can be temporarily removed to lighten the unit (refer to Brick Layout).
CHIMNEY REFER TO CHIMNEY AND CHIMNEY CONNECTOR MANUFACTURER’S INSTRUCTIONS WARNING: INSTALL VENT AT CLEARANCES SPECIFIED BY THE VENT MANUFACTURER CONTACT YOUR LOCAL BUILDING AUTHORITY FOR APPROVED METHODS OF INSTALLATION 1. This appliance requires a masonry or premanufactured chimney listed to UL103HT sized correctly (ULC S629 if Canada). 2. If a masonry chimney is used, it is advisable to have your chimney inspected for cracks, and check the general condition before installing your unit.
OPERATION Do not use a grate or elevate the fire. Build the wood fire directly on the bricks. When the stove is used for the first time, solvents in the paint will smoke off as the stove “cures.” WOOD – This heater is designed to burn natural wood only. Higher efficiency and lower emissions generally result when burning air-dried seasoned hardwood, as compared to softwood or to green or freshly-cut hardwood. Use only dry, seasoned wood.
GLASS CARE REPLACE GLASS ONLY WITH HIGH-TEMPERATURE ROBAX PYROCERAM OF THE PROPER SIZE AND THICKNESS. The following use and safety tips should be observed: 1. Inspect the glass regularly for cracks or breaks. If you detect a crack or a break, extinguish the fire immediately, and contact your dealer or Customer Service at (800) 245-6489 for replacement (or log on to www.heatredefined.com ). 2. Do not slam the door or otherwise impact the glass.
The following steps should be followed for replacement of the door gasket: 1. Ensure the appliance is not in operation and is thoroughly cooled. 2. Remove the old door gasket and clean the gasket channel. 3. Using an approved high-temperature gasket cement, apply a thin coat in the bottom of the channel. 4. Starting at the hinge side of the door, work into the channel around the door unit, trim to length and butt the ends together. 5.
Placement of Stainless Steel Burner Tubes for all 30-NC, 50-SNC30 and 50-TNC30 stove models.
CREOSOTE When wood is burned slowly, it produces tar and other organic vapors. These combine with moisture to form creosote. Creosote vapors condense in the relatively cool chimney flue of a slow-burning fire – as a result, creosote residue accumulates on the lining of the flue. If ignited, this creosote makes an extremely hot fire. The chimney should be inspected on a regular basis during the heating season, to determine if a creosote build-up has accumulated.
IMPORTANT: HELPFUL HINTS AND TIPS WORTH REVIEWING 1. What is the correct way to start a fire? You will need small pieces of dry wood (kindling) and paper. Use only newspaper or paper that has not been coated or that has had materials glued or applied to it. Never use coated or colored paper (such as advertising flyers). Open the door of the wood stove. Crumple several pieces of paper, and place them in the center of the firebox, directly on the firebricks of the stove.
6. Why is there always a large quantity of thick black smoke in the firebox? A large quantity of thick black smoke in the firebox is a possible indication that you have poor draft. 7. Is it normal for soot to cover the glass at the beginning of a fire? This stove has been built with an air wash system that will help keep the glass clear when the firebox has reached a good operating temperature, and also has a good draft. Cold firebox temperature and poor draft cause soot to form on the glass.
PARTS, ACCESSORIES AND OPTIONS LIST (Options and trim (i.e. brass and nickel) interchange for variety. Gold door and legs may also be ordered to replace existing door and pedestal or regular cast legs.) REPLACEMENT PARTS AC-G30 AC-GGK AC-DGKNC AC-SB AC-SB2 AC-SB2.
DIRECTIONS FOR INSTALLATION OF LEGS OR PEDESTAL: (Stove must be cooled and all ashes cleaned out) * Remove bricks, disconnect flue, and turn stove on its back. * If you are replacing existing legs or pedestal, disconnect the existing legs or pedestal. To install legs: 1. Each leg will fit into a pre-made slot on each corner of the bottom of the unit. 2. A 3/8” x 1-1/2” Carriage Bolt and matching nut is supplied with each leg. Fit a leg into a slot, and match the hole on the leg with the hole in the slot.
USA Canada You may write your unit’s Manufacture Date and Serial Number in the space beside this sample tag, for future reference. This sample tag also shows the safety info. such as UL/ULC testing standard, etc. for your local officials, or anyone else who may need reference information.
Have this information on hand if you phone the factory or your dealer regarding this product. Retain for your files: Model Number __________________________ Date of Purchase ________________________ Date of Manufacture _________________ Serial #_____________________ LIMITED 5 YEAR WARRANTY FROM THE DATE OF PURCHASE TO THE ORIGINAL OWNER The manufacturer extends the following warranties: Five Year Period: 1. Carbon steel and welded seams in the firebox are covered for 5 years against splitting. 2.
WARRANTY REGISTRATION for England’s Stove Works Purchased by (Name) ______________________________________________ Address _________________________________________________________ City ________________________ State __________ Zip _________________ Telephone _______________________________________________________ Email Address ___________________________________________________ DEALER INFORMATION Purchased From (Dealer) ___________________________________________ Address ___________________________________
WOOD - Meets the 2015 U.S. Environmental Protection Agency’s crib wood PLEASE NOTE: emission limits for wood heaters sold after May 15, 2015 EPA INFORMATION The following additions to your owner’s manual will enable you to achieve optimal emissions performance from your stove. Important safety tips are also included. ‐ Proper Installation – Please refer to the Installation section of your owner’s manual and follow the guidelines listed therein for safety and for optimal emissions performance.
Venting Guidelines: ALWAYS install vent pipe in strict adherence to the instructions and clearances included with your venting system. • DO NOT connect this wood stove to a chimney flue which also serves another appliance. • DO NOT install a flue pipe damper or any other restrictive device in the exhaust venting system of this unit. • USE an approved wall thimble when passing through a wall and a ceiling support/fire stop when passing through a ceiling.
Season wood outdoors through the summer for at least 6 months before burning it. Properly seasoned wood is darker, has cracks in the end grain, and sounds hollow when smacked against another piece of wood. Store wood outdoors, stacked neatly off the ground with the top covered. Burn only dry, well‐seasoned wood that has been split properly. Start fires with newspaper and dry kindling as discussed earlier in the manual. Burn hot fires.
‐ WHAT FUELS NOT TO USE: CAUTION NEVER USE GASOLINE, GASOLINE‐TYPE LANTERN FUEL, KEROSENE, CHARCOAL LIGHTER FLUID, OR SIMILAR LIQUIDS TO START OR “FRESHEN UP” A FIRE IN THIS HEATER. KEEP ALL SUCH LIQUIDS WELL AWAY FROM THE HEATER WHILE IN USE. ADDITIONALLY, NEVER APPLY FIRE‐STARTER TO ANY HOT SURFACE OR EMBERS IN THE STOVE. DO NOT USE CHEMICALS OR FLUIDS TO START THE FIRE. DO NOT BURN FLAMMABLE FLUIDS SUCH AS GASOLINE, NAPHTHA OR ENGINE OIL.
Remember: “This wood heater needs periodic inspection and repair for proper operation. It is against federal regulations to operate this wood heater in a manner inconsistent with operating instructions in this manual.” More: Burner Tubes – To replace a tube, first be sure that you order the correct tube you need to replace. Then using a 5/16” socket or open end wrench, remove the screw located on the left side of the tube. Be sure to keep the screw.
MANUEL D’INSTALLATION & DE FONCTIONNEMENT NUMÉROS DE MODÈLES: 30-NCP 30-NCL 30-NCG 50-SNC30P 50-SNC30L 50-SNC30G 50-TNC30P 50-TNC30L 50-TNC30G Merci d’avoir acheté de produit qui fait partie d’une excellente gamme d’équipements de chauffage. Nous vous souhaitons de nombreuses années de confort en sécurité avec votre nouvel appareil de chauffage. Conservez ces instructions. IMPORTANT : EN CAS DE PROBLÈME AVEC CET APPAREIL, NE LE RAPPORTEZ PAS AU CONCESSIONNAIRE.
Lettre de notre service d’aide technique : Merci d’avoir acheté cet excellent produit d’England’s Stove Works ! England’s Stove Works a été créé par une famille, à qui l’entreprise appartient encore, qui croit très fort à l’esprit du « faites-le vous-même » c’est une raison pour laquelle vous avez trouvé ce produit dans votre magasin de bricolage favori.
MISE EN GARDE Si vous avez le moindre doute à propos de votre capacité à effectuer votre installation professionnellement après avoir lu ces instructions, nous vous recommandons d’obtenir les services d’un installateur compétent dans tous les domaines d’une installation correcte et sure. N’utilisez pas de compromis temporaires ou improvisés pendant l’installation. AVANT L’INSTALLATION DE VOTRE POÊLE 1. CHAUD PENDANT LE FONCTIONNEMENT. TENEZ LES ENFANTS, LES VÊTEMENTS ET LES MEUBLES À L’ÉCART.
POURQUOI LA TAILLE CORRECTE DU CONDUIT DE FUMÉE EST IMPORTANTE : 6 po Le « tirage » est la force qui fait monter dans la cheminée l’air provenant de l’appareil de chauffage. La quantité de tirage dans votre cheminée dépend de la longueur de la cheminée, de la géographie locale, des obstructions proches et d’autres facteurs. Un tirage excessif risque de causer une température trop élevée dans le poêle.
CONDUIT DE FUMÉE 1. Conduit de fumée existant Si vous avez choisi un appareil indépendant, ce poêle est conçu pour se raccorder à un conduit de fumée existant, par exemple un maçonné ou préfabriqué de classe A. Si votre conduit de fumée est maçonné, le revêtement intérieur doit être inspecté soigneusement pour vérifier l'absence de fissures; si votre cheminée n’a pas de revêtement intérieur, nous préconisons l’installation d’une gaine en inox, par vous ou par un installateur.
Suivez toutes les exigences d'installation du fabricant du système de ventilation et de leurs autorisations nécessaires. APPLICATIONS D’INSTALLATION Illustration 1 REMARQUE : 1. La longueur horizontale ne doit pas dépasser 6 pi. 2. La longueur totale du conduit Soutenue par un mur (extérieur) de fumée ne doit pas dépasser 25 pi. 3. Protection du sol requise : Dimension mini : L 39" x H 52.5". 4. Vérifiez toujours les dégagements, installation, etc., dans les codes locaux.
Raccords de cheminée et dégagements par rapport aux murs combustibles pour les appareils de chauffage résidentiels A En brique maçonnées ayant une épaisseur minimale de 3,5 po entièrement encastrée dans le mur avec un cadre et ayant une séparation minimale de 12 po par des briques entre le boisseau en argile et les matériaux combustibles.
Conduits de fumée préfabriqués : Depuis quelques années, les conduits de fumée préfabriqués sont devenus très populaires, parce qu’ils sont très faciles à installer et, quand l’installation est réalisée correctement, ils sont très sûrs. Il existe de nombreux conduits de fumée préfabriqués sur le marché, et il est important d’en choisir un qui soit agréé par U.L. (ou ULC si le Canada), B.O.C.A. ou I.C.B.O.
Installation sur un sol combustible Si l’appareil doit être installé sur un sol combustible ou sur un revêtement de sol combustible, il doit alors obligatoirement être installé sur un protecteur de sol, en carton à l’enrouleuse non combustible de 1 po d’épaisseur ou un équivalent durable, ayant un facteur « R » minimum de 1,5 (unités anglaises) ou équivalent.
3. Écrans thermiques latéraux Écran thermique latéral Cet accessoire est livré avec la quincaillerie (six (6) vis) nécessaire pour l’installer à l’arrière du poêle. Il s’agit d’un écran thermique en deux morceaux, mais il s’installe une partie à la fois.
AC-16 Blower Installation Instruction Guide – for Models with “30” in Model Number Guía de instrucciones de instalación del ventilador AC-16 Guide d'installation du ventilateur AC-16 120 VOLTS, 60Hz, 0.75 AMPS, 2900 RPM DANGER: RISK OF ELECTRIC SHOCK. DISCONNECT POWER BEFORE SERVICING UNIT. 120 VOLTS, 60Hz, 0,75 AMPÈRE, 2900 TR/MIN DANGER : RISQUE DE CHOC ÉLECTRIQUE. DÉBRANCHER L’ALIMENTATION AVANT TOUTE INTERVENTION SUR L’APPAREIL.
SOUFFLANTE EN OPTION - Ecouter AC-30 Blower Installation Instruction Guide Guía de instrucciones de instalación del ventilador AC-30 Guide d'installation du ventilateur AC-30 For our freestanding models with “30” in model number Para nuestros modelos de pie con “30” en el número de modelo Pour nos modèles sur pieds avec un numéro de modèle “30” 1. Remove the four (4) screws (size 5/16”) and the cover plate from the rear heat shield. 1.
POSITIONNEMENT ET INSTALLATION Le premier problème que vous risquez de rencontrer est de rentrer votre poêle chez vous -- tous nos poêles sont bien construits, ce qui les rend assez lourds. Trois à quatre adultes peuvent normalement porter un poêle, mais nous préconisons quand même l’utilisation d’un chariot. Ne jamais essayer de manipuler seul(e) un produit de chauffage !!! La porte et les briques peuvent être retirées temporairement pour alléger le poêle (voir le plan des briques).
CHEMINÉE REPORTEZ‐VOUS AUX INSTRUCTIONS DU FABRICANT DE LA CHEMINÉE ET DU RACCORD DE CHEMINÉE. Avertissement: Installez VENT AU dégagements spécifiés PAR LA VENT DU FABRICANT 3 pi mini à partir de la pénétration dans le toit 2 pi plus haut que le point le plus proche du toit à 10 pi. La longueur totale des ensembles de conduits de fumée à paroi simple ne doit pas dépasser 10 pieds. Illustration 5 Hauteur totale mini par rapport au sol 15 pi.
FONCTIONNEMENT N'utilisez pas de grille ni n’élevez le feu. Allumez le feu de bois directement sur les briques. À la première utilisation du poêle, les solvants de la peinture s’évaporeront au fur et à mesure que le poêle se « fait ». BOIS -Ce poêle est conçu pour ne brûler que du bois naturel. On obtient en général un meilleur rendement et moins d’émissions en brûlant du bois dur ayant bien séché à l’air, par rapport à du bois tendre ou du bois dur vert ou fraîchement coupé. N’utiliser que du bois sec.
ENTRETIEN DU VERRE AVERTISSEMENT : N'UTILISEZ PAS DE MATÉRIAUX DE REMPLACEMENT. SEUL DU ROBAX PYROCERAM D’UNE TAILLE ET D’UNE ÉPAISSEUR ADÉQUATES ET RÉSISTANT À DES TEMPÉRATURES ÉLEVÉES PEUT REMPLACER LE VERRE. Respectez les conseils d’utilisation et de sécurité ci-dessous : 1. Vérifiez régulièrement l’absence de fissures ou de cassures sur le verre.
Suivez les étapes ci-dessous pour remplacer le joint de la porte : 1. Assurez-vous que l'appareil n'est pas en fonctionnement, et qu’il a complètement refroidi. 2. Enlevez le vieux joint de la porte et nettoyez le logement du joint. 3. Appliquez une couche mince de colle à joints haute-température dans le fond du logement. 4.
18 Positionnement des tubes de brûlage en inox pour tous les modèles de poêles 30-NC, 50-SNC30 et 50-TNC30.
CRÉOSOTE Quand du bois brûle lentement, il produit du goudron et d’autres vapeurs organiques. Ceux-ci se combinent avec l’humidité pour former de la créosote. Les vapeurs de créosote se condensent dans le conduit de fumée d’une cheminée à feu lent, où il fait relativement froid – de ce fait, les résidus de créosote s’accumulent sur la gaine du conduit de fumée. Si elle s’enflamme, cette créosote cause un feu extrêmement chaud.
IMPORTANT : CONSEIL ET ASTUCES UTILES 1. Quelle est la bonne manière d'allumer un feu ? Vous aurez besoin de petits morceaux de bois (bois d'allumage) et de papier. N’utilisez que du papier journal ou du papier non glacé, ou sur lequel rien n'a été collé ou appliqué. N’utilisez jamais de papier glacé ou colorié (prospectus publicitaires, entre autres). Ouvrez la porte du poêle. Froissez plusieurs morceaux de papier, et mettez-les au milieu du foyer, directement sur les briques réfractaires du poêle.
7. Est-ce qu’il est normal que la vitre soit couverte de suie au début d’un feu ? Ce poêle est équipé d’un système épurateur d’air qui aide à garder la vitre propre quand le foyer a atteint une bonne température de fonctionnement, et qu’il y a aussi un bon tirage. Ce sont une température froide du foyer et un mauvais tirage qui causent la formation de suie sur la vitre. Une fois que la température du foyer et le tirage augmentent, la suie doit se dissiper. 8.
LISTE DE PIÈCES, D’ACCESSOIRES ET D’OPTIONS (Les options et les garnitures (laiton et nickel, par ex.) peuvent être changées pour le décor. Vous pouvez également commander des portes et des pieds dorés pour remplacer la porte et le piédestal, ou les pieds de série, existants.
INSTRUCTIONS D’INSTALLATION POUR LES PIEDS OU LE PIÉDESTAL : (Le poêle doit obligatoirement avoir refroidi et toutes les cendres avoir été nettoyées) * Enlevez les briques, débranchez le conduit de fumée et mettre le poêle sur l'arrière. * Si vous remplacez des pieds ou un piédestal existants, détachez les pieds ou le piédestal. Pour installer des pieds : 1. Chaque pied rentre dans une fente à chaque angle du dessous du poêle. 2.
24
Gardez ces renseignements à portée de la main si vous téléphonez à l'usine ou à votre concessionnaire à propos de ce produit. À conserver pour vos fichiers : Modèle numéro _______________________ Date d’achat ________________________ Date de fabrication _________________ Numéro de série _____________________ GARANTIE LIMITÉE DE 5 ANS À PARTIR DE LA DATE D'ACHAT EN FAVEUR DU PROPRIÉTAIRE ORIGINAL Le fabricant étend les garanties ci-dessous : Période de cinq ans : 1.
FORMULAIRE D’ENREGISTREMENT DE GARANTIE pour England’s Stove Works Acheté par (nom) ______________________________________________ Adresse _________________________________________________________ Ville ______________________ État/Province ________ Code Postal ______________ Téléphone _______________________________________________________ Adresse de courrier électronique _____________________________________ INFORMATIONS SUR LE CONCESSIONNAIRE Acheté à (concessionnaire) ____________________________________
Respecte les limites d’émission de 2015 établies par l’Environmental Protection Agency des États‐Unis en fonction de tests effectués à l’aide de combustible préassemblé (« crib wood ») pour les poêles à bois vendus après le 15 mai 2015. RENSEIGNEMENTS SUR L’EPA Les ajouts suivants à votre guide d’utilisation vous permettront de réduire au minimum les émissions produites par votre poêle à bois. Des conseils de sécurité importants vous sont également présentés.
• • • • • • • • • indications sur les dégagements qui accompagnent le système de ventilation. Ne raccordez PAS le poêle à bois à un conduit de fumée déjà utilisé pour un autre appareil. N’INSTALLEZ PAS un régulateur de tirage ni aucun autre dispositif de réglage dans le système d’évacuation par ventilation de cet appareil. UTILISEZ un manchon d’emboîtement mural homologué pour traverser un mur et un support de plafond ou un coupe‐feu pour traverser un plafond.
Laissez votre bois sécher à l’extérieur tout l’été pendant au moins six mois avant de le brûler. Un bois correctement séché est plus foncé, présente des fissures sur le fil d’extrémité et sonne creux lorsque vous le cognez contre un autre morceau de bois. Conservez votre bois à l’extérieur, bien empilé sur le sol avec une protection au‐dessus. Ne brûlez que du bois bien sec qui a été correctement fendu.
‐ COMBUSTIBLES À ÉVITER : MISE EN GARDE N’UTILISEZ JAMAIS D’ESSENCE, DE COMBUSTIBLE POUR LAMPE APPARENTÉ À L’ESSENCE, DE KÉROSÈNE, DE LIQUIDE D’ALLUMAGE POUR CHARBON, NI AUCUN LIQUIDE SIMILAIRE POUR ALLUMER OU RAVIVER UN FEU DANS CET APPAREIL DE CHAUFFAGE. CONSERVEZ DE TELS LIQUIDES ÉLOIGNÉS DE L’APPAREIL DE CHAUFFAGE LORSQUE CELUI‐CI FONCTIONNE. DE PLUS, NE DISPOSEZ JAMAIS D’ALLUME‐FEUX SUR UNE SURFACE CHAUDE NI SUR DES TISONS DANS LE POÊLE.
‐ RETRAIT DES CENDRES – Suivez les instructions du guide d’utilisation concernant le retrait et l’élimination des cendres. ‐ REMPLACEMENT des pièces essentielles à un taux d’émission faible – Suivez les instructions du guide d’utilisation concernant le remplacement des joints et des autres pièces essentielles à un taux d’émission faible. Rappel : « Afin d’assurer le bon fonctionnement du poêle à bois, vous devez l’inspecter et le réparer périodiquement.