
Use and Care Manual

16
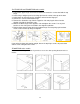
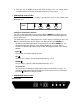
NOTE: All parts removed must be saved to allow the door swing to be reversed
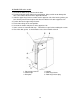
1. Carefully use a sharp tool to pry up the decorative cap on the top of the cabinet and
the cap of the door spindle. (Fig 1)
2. Open the door about 90°, unscrew the screw of the upper door hinge cover and
remove the cover, then unscrew all the screws on the upper door hinge. Be sure to
hold the door firmly after removing the screws, and take off the door. (Fig 2)
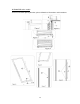
3. Remove the screw of the lower door hinge and the left side screw of the front vent
(Fig 3), then install the lower door hinge at the designated position on the opposite
side.(Fig 4)
4. Remove the screw of the door handle, then remove the bottom screw on the left side
of the door and remove the lower support of the door (Fig 5). Install the lower support
of the door on the opposite side. (Fig 6)
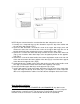
5. Gently pull open the middle section of the door gasket; you will see the handle screw
hole (Fig 7). Remove the handle and install it on the opposite side.(Fig 8)
6. Loosely install the upper door hinge on the opposite side. (Fig 9)
7. Set the door onto the shaft of the lower door hinge (Fig 10), then fit the shaft of the
upper door hinge into the top of the door (Fig 11) and tighten the screws. Adjust the
door so it is aligned with the cabinet. Level the cabinet and tighten all the lock screws.
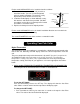
Door Handle Installation:
For model series FF7LBLPUB, FF63BDTPUB and SCR600BLPUB, the door has two
screw holes on each side, allowing you to install a handle (included). To do so, align the
handle with the screw holes on the side you prefer. Fix the handle in place with the
included screws, then cover the screw heads with the handle seal (included).