
Use and Care Manual


6
INSTALLATION INSTRUCTIONS
Before Using Your Appliance
Remove the exterior and interior packing.
Before connecting the appliance to the power source, let it stand upright for approximately 2
hours. This will reduce the possibility of a malfunction in the cooling system from handling
during transportation.
Clean the interior surface with lukewarm water using a soft cloth.
Installation of Your Appliance
This appliance is designed for free standing installation.
Place your appliance on a surface that is strong enough to support it when it is fully loaded. To
level your appliance, adjust the front leveling legs at the bottom.
Locate the appliance away from direct sunlight and sources of heat (stove, heater, radiator,
etc.). Direct sunlight may affect the acrylic coating and heat sources may increase electrical
consumption. Extremely cold ambient temperatures may also cause the unit not to perform
properly.
Avoid locating the unit in moist areas.
Plug the appliance into an exclusive, properly installed and grounded wall outlet. Do not under
any circumstances cut or remove the third (ground) prong from the power cord. Any questions
concerning power and/or grounding should be directed toward a certified and authorized
products service center.
Storage
For Model: STC6
This appliance can load 6 bottles whose diameter is less than 105mm.
For Model: STC12
This appliance can load 12 bottles whose diameter is less than 81mm.
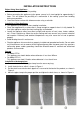
Installation of drainage pipes
1. Remove the drain hose and pipe clamp from the accessory bag.
2. Install the drain hose, which is shown in Figure 1.
3. Set the drain hose onto the drain pipe that is reserved at the back of the product, as shown in
Figure 2.
4. Move the pipe clamp to the proper position and tighten the drain hose, as shown in Figure 3.