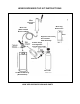
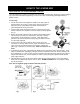
WINE DISPENSER TAP KIT INSTRUCTIONS Wine Dispenser Tower Wine Keg Dimensions Wine Line (NSF-certified Barrier Tubing) 23⅜” High-Pressure Valve Gas Canister Shut Off Safely Double Gauge Gas Regulator Low Pressure Valve Gas Line Gas Tank 1/6 Barrel Wine Keg (Not Included) WINE KEG DISPENSER FLOW AND PARTS 9¼”
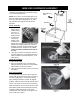
WINE KEG DISPENSER ASSEMBLY Be sure you have a thorough familiarity with the assembly and installation process before turning on your wine keg dispenser. NOTE: Once casters are assembled, place your unit in an upright position and allow it to sit for at least 8-10 hours before plugging into an outlet. This will allow the refrigerant to settle before operation. Caster Assembly 1. Remove everything from the cabinet and lay the unit on a clean, dry and padded surface. 2.
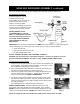
WINE KEG DISPENSER ASSEMBLY, continued Use a gas mixture consisting of 75% nitrogen (N2) and 25% carbon dioxide (CO2). Gas Regulator Installation Proper installation of your gas regulator and a thorough understanding of gas canisters are essential to the safe use of this product. Review and follow instructions for handling gas cylinders and this section in particular to ensure your safety and the safety of others.
WINE KEG DISPENSER ASSEMBLY, continued Gas Regulator & Tap Connection Examples PLEASE NOTE: Your gas hose comes equipped and assembled with coupling connections for the regulator (green coupler) and the tap connection (silver coupler). The photos below show correct connections.
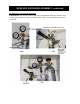
HOW TO TAP A WINE KEG INSTALLING KEG TAP ON SINGLE BARREL TYPE KEG This wine dispenser's coupler is compatible only with a single 1/6 barrel keg, although a second untapped keg can be stored behind the tapped keg to keep it cold. Each 1/6 barrel keg holds approximately 5 gallons of wine. To tap a keg: 1. First be sure that the black dispenser handle of the keg coupler is closed (pushed up, see Fig. 1 below).