TABLE TOP ICE & WATER DISPENSER Models AIWD282 SCIWD282 User’s Manual BEFORE USE, PLEASE READ AND FOLLOW ALL SAFETY RULES AND OPERATING INSTRUCTIONS Write Model and Serial Numbers here: Model No.: Ser. No.: FELIX STORCH, INC.
Table of Contents Important Safeguards ................................................................................................ 2-4 Product Specification ................................................................................................. 5-7 Product Rating… .................................................................................................... 5 Wiring Diagram .......................................................................................................
Your safety and the safety of others are very important. We have provided many important safety messages in this manual and on your appliance. Always read and obey all safety messages. This is the Safety Alert Symbol. This symbol alerts you to potential hazards that can injure or kill you and others. Safety messages will follow the Safety Alert Symbol and either the words "DANGER", "WARNING" OR "CAUTION". DANGER means that failure to heed this safety statement may result in severe personal injury or death.
Before the ice/water dispenser is used, it must be properly positioned and installed as described in this manual, so read the manual carefully. Accucold® by Summit Appliance strongly recommends that you have a professional install your new machine. The warranty may be affected or voided by an incorrect installation.
• • • • • • • • • • • • • • • • • • • • • • • • Make certain that hoses are not pinched, kinked or damaged during installation. Check for leaks after water line is connected. Although the unit has been tested and cleaned at the factory, due to long-term transit and storage, the first batch of cubes must be discarded. Remove the packing materials and clean the dispenser before using. Turn on the water supply tap before switching on the ice maker.
Product Specifications WATER/ICE DISPENSER Model AIWD282/SCIWD282 AC Supply Voltage: Refrigerant: Amount of refrigerant: Design Pressure: High Side 115 V R404A 11.29 oz 360 psig Design Pressure: Low Side Compressor Fan Motor Geared Motor Maximum Fuse Size Max. HACR Breaker (USA Only) Max. HACR Breaker (Canada Only) 190 psig LRA 40 A 115 V, 0.7 A 115V, 1.6A 20 A 20A 20A Min. Circuit Ampacity 5.
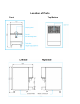
Location of Parts Front Top/Bottom
Unpacking, etc. • After removing the packing materials, check the appearance of the dispenser for possible defects or irregularity. If the product shows any irregularity in its appearance, contact the distributor. • All the packing materials (straps, box, Styrofoam, wood, etc.) should never be left within the reach of children and should be disposed of according to local regulations. • For safety, the product should be installed and used with caution in accordance with the User’s manual.
Requirements for plumbing Plan the arrangement of the water supply pipes. Connect a 1/4" diameter copper cable with the tap water pipe. Install a shutoff valve between the tap water pipe and the product so that the user can operate the valve. Do not install the shutoff valve at the back of the product. Do not use a self-piercing valve. If the tap water has a high level of minerals, a pipeline filter will be required. The pressure of the tap water should be maintained at a level between 20psi (1.
Requirements for power supply 120VAC, 60Hz, 15-amp circuit breaker and electric power are required. A separate circuit is required for grounding. The power cord of the product should be inserted into a suitable 3-prong grounding-type socket. Important Information: A Ground Fault Circuit Interrupter (GFCI) is not recommended because it could cause the operation of the product to stop.
Panel Disassembly Method 1. Upper panel: Open the front door and lift the upper panel, then the back magnets will be separated and disassembled. 2. Front panel: Remove the lower set screws of the drain box, then loosen the set screws on the top of the front panel and pull out the front panel taking both sides. 3. Side panel: Open the door, loosen the screws on the top of the front panel, push the front panel forward, and slide the side panel forward to remove it.
Connection to water supply and drainage [Connection of water and drainage hoses] Division Proper water temperature Water pressure Hose to be used ICE MAKING water supply 50 ~ 90 oF 14.22 ~ 71.12 psi OD ø6.35 PE TUBE ICE MAKING drainage - - ID ø20 hose • If the temperature of the ICE MAKING water supply is too high, the amount of ICE MAKING may be reduced, • If the water pressure is too low, it may not be possible to freeze. In this case, an auxiliary hydraulic pump should be installed.
STARTING THE PRODUCT 1) Water supply hose protection --Do not place heavy objects on the water supply hose leading to the water supply, or keep the hose from treading. 2) Proper water pressure, water temperature, ambient temperature 3) Please connect only the water you can drink. Power connection - connect the dispenser to a dedicated outlet. 4) Water supply - open the faucet and let the water supply.
Function Button Description (FND Display Window) ① SOLENOID Maximum operating time adjustment function. ②3rd, 4thdigits: 20 seconds (5 seconds ~ 30 seconds, Set Unit of one second) ①This function can be entered in "OFF" state of ICE MAKING-OFF-WASH switch. ②Press two buttons (WATER, ICE) simultaneously for 3 seconds and Button part LED lights up. ③ Press the discharge lever for continuous operation of SOLENOID and the motor. Keep 'ON' state.
Three Draining Functions (Forced Draining, Automatic Draining, Water Draining) Forced drainage function Must be implemented to prevent freezing in winter storage. Use this function for cleaning the inside. - Turn on the power switch and press the "DOWN + SET" button simultaneously for 3 seconds with any signal on the FND display. (30 seconds) Automatic drain function (F. 5) Turn on the power switch and turn the ice making switch to "ICE MAKING" to start the operation.
Required Actions to prevent frost (Water Removal in Water Tank and Evaporator) • If the ambient temperature falls below 0°C/32oF, water will freeze inside the machine and machine operation will be impossible. • If you do not use for a long period of time in winter, be sure to completely remove the ice making water inside the body by following the instructions below. If you do not remove the ice making water or if it is insufficient, it will cause serious damage to the product.
Maintenance Schedule ※ The following maintenance schedule is guideline. ※ Maintenance and repair should be done more frequently according to water quality, equipment usage environment and local hygiene regulations. Inspection Area Contents Schedule Daily Chute 1. Clean the ice scoops with a neutral detergent. 2. Rinse thoroughly after cleaning. Weekly Air Filters (air-cooled) 1. Inspect for dust and wash dirt with warm water and neutral detergent. External water filter 1.
Caution when cleaning exterior panel (stainless steel) How to clean the rust state Stain type initial rust Red Rust Since the initial rusted stainless steel surface itself is only slightly affected by the stain, it can be returned to almost the original surface by selecting the neutral detergent or a commercially available cleaning solution. If it is regularly cleaned at a proper frequency, the state of the rust can stop at this stage and you can remove the rust easily and cheaply.
How to Clean and Disinfect The dispenser should be cleaned and disinfected at least twice a year. More frequent cleaning and disinfection may be required. Please observe the following points. Do not use ammonia-type detergents to prevent personal injury or damage to the ice maker. Disinfection and cleaning should be handled according to the instructions provided. Always wear protective eyewear and waterproof gloves to prevent skin or eye contact with water and disinfectant.
Dilute 10 L of warm water and 400 mL of 5.25% sodium hypochlorite solution (bleach). (※ Dilution ratio may vary depending on the solution manufacturer, please refer to the solution manual). If this is the minimum amount to be used, use more washing solution. ※ To ensure safety and maximum effect, please use the washing solution immediately after dilution.
Troubleshooting ① When Error occurs, the front use button (ICE-WATER-ICE & WATER) of the door lights alternately to the left and right. Restart after action. ② When the button is lit alternately to the left and right, open the door and press the bottom setting button of the control buttons, Error display will appear.
Before Requesting Service If the operating condition of the machine is not good, please refer to the table below to identify the issue. If you still require assistance, contact your dealer or service center. For expedited service, it is best to have the following information on hand: model name, serial number, name of dealer, and date of purchase. Operating status 1. Machine does not work Things to check Action 1. Is power supplied? 2.
LIMITED WARRANTY ONE-YEAR LIMITED WARRANTY Within the 48 contiguous United States, for one year from the date of purchase, when this appliance is operated and maintained according to instructions attached to or furnished with the product, warrantor will pay for factory- specified parts and repair labor to correct defects in materials or workmanship. Service must be provided by a designated service company. Outside the 48 states, all parts are warranted for one year from manufacturing defects.