BUILT-IN ALL-REFRIGERATORS RÉFRIGÉRATEURS ENCASTRÉS Models / Modèles: FF6WBI series (ACCUCOLD®) FF7WBI/AL75 series (ACCUCOLD®) SCR600GLBI series (ACCUCOLD®) SCR600BGLBI series (SUMMIT Commercial) CM411L Instruction Manual / Mode d’emploi BEFORE USE, PLEASE READ AND FOLLOW ALL SAFETY RULES AND OPERATING INSTRUCTIONS AVANT L’EMPLOI, LIRE ET SUIVRE LES RÈGLES DE SÉCURITÉ ET INSTRUCTIONS D'UTILISATION Write Model and Serial Numbers here: Écrire numéros de modèle et de série ici: Model/Modèle: _____________
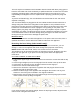
IMPORTANT SAFEGUARDS Your safety and the safety of others are very important. We have provided many important safety messages in this manual and on your appliance. Always read and obey all safety messages. This is the Safety Alert Symbol. This symbol alerts you to potential hazards that can kill or injure you and others. All safety messages will follow the Safety Alert Symbol and either the words ”DANGER” or “WARNING”.
Use two or more people to move and install the refrigerator. Failure to do so can result in back or other injury. To ensure proper ventilation for your appliance, the front of the unit must be completely unobstructed. Choose a well-ventilated area with temperatures above 60°F (16°C) and below 90°F (32°C). This unit must be installed in an area protected from the elements, such as wind, rain, water spray or drips. The appliance should not be located next to ovens, radiators or other sources of high heat.
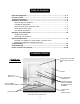
Table of Contents Important Safeguards ............................................................................................. 2 - 3 Location of Parts ..................................................................................................... 4 - 5 Technical Information .................................................................................................. 6 Installation Instructions ..........................................................................................
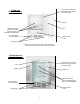
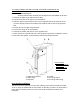
Temperature control dial (thermostat), light switch and interior light FF7WBI and FF7LBLKBI series Handle Adjustable shelves (wire for FF7WBI & FF7LWBI; glass for FF7BKBI & FF7LBLKBI) Door Front ventilation slots (kick plate) Defrost water outlet Leveling legs NOTE: Lock on models FF7LWBI and FF7LBLKBI is located on the front of the door, near the top center.
Technical Information Model Numbers and Descriptions FF6WBI (white with wire shelves and no lock; door storage) FF6LWBI (white with wire shelves and lock; door storage) FF6BKBI (black with glass shelves and no lock; door storage) FF7WBI (white with wire shelves and no lock; flat door liner) FF7LWBI (white with wire shelves and lock; flat door liner) FF7BKBI (black with glass shelves and no lock; flat door liner) FF7LBLKBI (black with glass shelves and lock; flat door liner) SCR600GLBI (white with wire she
Installation Instructions Before Using Your Appliance: Remove the exterior and interior packing. CAUTION: After unpacking you MUST allow this appliance to stand upright for at least 2 hours to allow the lubricant and refrigerant to drain back into the compressor and stabilize. Failure to do so may adversely affect performance and the lifetime of this unit. Remove the shelves and clean them and the interior surfaces of the unit with lukewarm water using a soft cloth.
This unit requires a standard 115-volt AC/60Hz electrical outlet with three-prong ground. Have the wall outlet and circuit checked by a qualified electrician to make sure the outlet is properly grounded. When a standard 2-prong wall outlet is encountered, it is your responsibility and obligation to have it replaced with a properly grounded 3-prong wall outlet. To prevent accidental injury, the cord should be secured behind the unit and not left exposed or dangling.
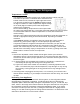
For models FF6WBI, FF6LWBI, FF7LWBI, FF7LBLKBI, SCR600GLBI and SCR600BGLBI: NOTES: See illustration below. All of the parts that are removed must be kept for the reinstallation of the door. 1. Unscrew the lower hinge and take off the door. 2. Push the kick plate to the right in the new position. 3. Undo the upper hinge fastener and fix it to the opposite side of the housing, where you have already removed and replaced the fastener with the hole to the opposite side. 4.
Operating Your Refrigerator Temperature Control: Your appliance’s evaporator system is out of sight behind the interior rear wall. The interior temperature is controlled with a thermostat knob located inside the unit, towards the upper right-hand corner. Turn the knob clockwise from the STOP (0) position toward the higher numbers for colder temperatures. Higher settings on the knob (higher numbers) mean lower temperatures (colder) in the refrigerator.
Care and Maintenance Cleaning Your Appliance: 1. Unplug the appliance, turn the thermostat to STOP (0) and remove all contents, 2. 3. 4. 5. 6. 7. including shelves. Wash the inside surfaces with a solution of lukewarm water and vinegar. Wipe dry with a clean, soft cloth. Wash the shelves, drip tray and crisper (if present) with a mild detergent solution, then rinse and dry thoroughly. Wash the outside cabinet with a solution of warm water and mild liquid detergent.
Troubleshooting When using this appliance, you may come across some problems that in many cases result from improper handling and can easily be eliminated. TROUBLESHOOTING GUIDE The appliance fails to operate after being connected to the power source. Check whether the power supply is active and that the thermostat is not set to the STOP (0) position. The compressor is running continuously. The door was opened frequently or it was left open too long.
Limited Warranty ONE-YEAR LIMITED WARRANTY Within the 48 contiguous United States, for one year from the date of purchase, when this appliance is operated and maintained according to instructions attached to or furnished with the product, warrantor will pay for factory-specified parts and repair labor to correct defects in materials or workmanship. Service must be provided by a designated service company. Outside the 48 states, all parts are warranted for one year from manufacturing defects.
Mesures de sécurité importantes Votre sécurité et celle des autres est très importante pour nous. Nous avons fourni plusieurs messages de sécurité importants dans ce manuel. Toujours lire et suivre les consignes de sécurité. Des blessures graves ou même la mort peuvent survenir si vous ne suivez pas ces instructions. Tous les messages de sécurité vous diront quel est le danger potentiel, comment réduire le risque de blessure et ce qui peut arriver si les instructions ne sont pas suivies.
STOP (0) (Arrêt) coupe le compresseur, mais ne coupe pas l'alimentation des autres composants électriques. Ne débranchez jamais votre appareil en tirant sur le cordon d'alimentation. Tenez toujours la fiche fermement et tirer tout droit sorti de la prise. Veillez à ne pas écraser ou endommager le cordon pour déplacer l'appareil. Ne vous pincer pas, nouer ou plier le cordon d'alimentation de toute manière. Remplacer ou réparer un cordon de service électrique qui a été endommagé ou effiloché.
Table des matières Mesures de sécurité importantes ........................................................... 14 – 15 Emplacement des pièces ........................................................................ 16 – 17 Informations techniques ................................................................................. 18 Instructions d’installation ........................................................................ 19 - 22 Avant d’utiliser votre appareil .......................................
Séries FF7WBI et FF7LBLKBI Cadran de réglage de température (thermostat), interrupteur de lumière, et lumière intérieure Poignée Étagères réglables (fil pour FF7WBI et FF7LWBI; verre pour FF7BKBI et FF7LBLKBI) Porte Fentes d'aération avant (plaque de protection) Pieds de nivellement Sortie de l'eau de dégivrage NOTE: La serrure des modèles FF7LWBI et FF7LBLKBI est située sur la face de la porte, à proximité de la partie centrale supérieure.
Informations techniques Numéros de modèles et descriptions FF6WBI (blanc avec étagères de fil et pas de serrure; stockage à la porte) FF6LWBI (blanc avec étagères de fil et serrure; stockage à la porte) FF6BKBI (noir avec étagères en verre et pas de serrure; stockage à la porte) FF7WBI (blanc avec des étagères de fil et pas de serrure; intérieur de la porte plat) FF7LWBI (blanc avec étagères de fil et serrure; intérieur de la porte plat) FF7BKBI (noir avec étagères en verre et pas de serrure; intérieur de
Instructions d’installation Avant d'utiliser votre appareil : Retirez l'emballage extérieur et l'intérieur. ATTENTION: Après le déballage vous DEVEZ permettre cet appareil de se tenir debout pendant au moins 2 heures pour permettre aux lubrifiant et réfrigérant à écouler dans le compresseur et se stabiliser. Ne pas le faire peut affecter les performances et la durée de vie de cette unité. Retirez les étagères et les nettoyer et les surfaces intérieures de l'appareil avec de l'eau tiède et un chiffon doux.
Cet appareil doit être correctement mis à la terre pour votre sécurité. Le cordon d'alimentation de cet appareil est équipé d'une fiche à trois broches qui s’accouple avec une prise murale standard à trois broches afin de minimiser le risque de choc électrique. Ne pas en aucun cas couper ou enlever la troisième broche de terre du cordon d'alimentation fourni. Pour votre sécurité, cet appareil doit être correctement mis à la terre.
Pour les modèles FF6BKBI, FF7WBI et FF7BKBI : 1. Retirez le couvercle supérieur de la charnière de la porte et enlever les vis qui maintiennent la charnière supérieure. 2. Soulevez la charnière droite pour dégager l’axe de charnière de la prise dans le haut de la porte. 3. Soulevez la porte en haut et loin pour libérer son logement de fond de l’axe de charnière. 4. Retirer les vis de la charnière inférieure. 5.
Pour les modèles FF6WBI, FF6LWBI, FF7LWBI, FF7LBLKBI, SCR600GLBI et SCR600BGLBI : REMARQUES: Voir illustration ci-dessous. Toutes les pièces qui sont démontées doivent être conservées pour la réinstallation de la porte. 1. Dévissez la charnière inférieure et enlever la porte. 2. Poussez la plaque de protection à la droite dans la nouvelle position. 3.
Fonctionnement de votre réfrigérateur Régulation de la température: Le système d'évaporation de votre appareil est hors de vue derrière la paroi arrière intérieure. La température intérieure est contrôlée avec un bouton de thermostat situé à l'intérieur de l'unité, vers le coin supérieur droit. Tournez le bouton dans le sens horaire à partir du STOP (0) (Arrêt) position vers les chiffres plus élevés pour des températures plus froides.
Dégivrage de votre appareil: Cet appareil fonctionne avec un système de dégivrage automatique, de sorte que le réfrigérateur se dégivre. Alors que le compresseur est en marche, la glace s’accumule le long de la paroi froide arrière (la plaque de l'évaporateur est derrière le mur).
Déplacement de votre appareil: 1. 2. 3. 4. 5. Retirez le contenu. Fixez tous les étagères à l'intérieur de votre appareil. Tournez les pieds de nivellement à la base pour éviter tout dommage. Utilisez scotch pour garder la porte fermée. Assurez-vous que l'appareil reste bloqué en position verticale pendant le transport.
Dépannage Lorsque vous utilisez cet appareil, vous pouvez rencontrer certains problèmes qui dans de nombreux cas résultent d'une mauvaise manipulation et peut facilement être éliminés. GUIDE DE DÉPANNAGE L'appareil ne fonctionne pas après avoir été connecté à la source d'alimentation. Vérifiez si l'alimentation est active et que le thermostat n’est pas réglé sur la position STOP (0) (Arrêt). Le compresseur fonctionne en continu.
Notes 27
Garantie limitée UN AN DE GARANTIE LIMITÉE Dans les 48 États américains contigus, pendant un an à partir de la date d'achat, lorsque cet appareil est utilisé et entretenu conformément aux instructions jointes à, ou fournies avec le produit, le garant paiera pour les pièces spécifiées en usine et pour la main-d’œuvre pour corriger les vices de matériaux ou de fabrication. Le service doit être fourni par une compagnie de service désignée.