PRODUCE & PANTRY STORAGE DUAL ZONE REFRIGERATOR Model: ALFD24WBVPANTRY User Manual BEFORE USE, PLEASE READ AND FOLLOW ALL SAFETY RULES AND OPERATING NSTRUCTIONS.
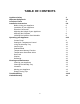
TABLE OF CONTENTS Appliance Safety Important Safeguards Location of Parts Installation Instructions Before Using your Appliance Installation of your Appliance Electrical Connection Adjusting the Height of your Appliance Adjusting the Kickplate Installing the Stainless Steel Handles Operating your Appliance Control Panel Setting the Temperature Control Using the Humidity Tray Interior Light Sabbath Mode Temperature Memory Function Temperature Alarm/Door Alarm Door Lock Shelves Defrosting Cleaning and Mainten
APPLIANCE SAFETY Your safety and the safety of others are very important. We have provided many important safety messages in this manual and on your appliance. Always read and obey all safety messages. This is the Safety Alert Symbol. The symbol alerts you to potential hazards that can kill or injure you and others. All safety messages will follow the Safety Alert Symbol and either the words DANGER or WARNING.
• • • • • • • • • • • • • • • • • The more coolant there is in an appliance, the larger the room it should be installed in. In the event of a leakage, if the appliance is in a small room, there is the danger of combustible gases building up. For every ounce of coolant at least 325 cubic feet of room space is required. The amount of coolant in the appliance is stated on the data plate inside the appliance.
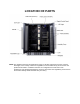
LOCATION OF PARTS NOTE: This appliance features two temperature zones: a 36-43ºF Cold Zone for meats, cheeses, beverages, and a variety of fruits and vegetables, and a 41-68ºF Pantry Zone for wine and produce best stored in conditions warmer than a refrigerator but cooler than room temperature. For detailed specifications on how to store fruits and vegetables, please refer to the Produce Storage Guide included with your Pantry.
INSTALLATION INSTRUCTIONS Before Using your Appliance • Remove the exterior and interior packing. CAUTION: After unpacking you MUST allow this appliance to stand upright for at least 2 hours to allow the lubricant and refrigerant to drain back into the compressor and stabilize. Failure to do so may adversely affect performance and the lifetime of the unit. • Clean the interior surface with lukewarm water using a soft cloth. • Install the handles on the doors. (See page 8.
Electrical Connection This appliance should be properly grounded for your safety. The power cord of this appliance is equipped with a three-prong plug that mates with standard three-prong wall outlets to minimize the possibility of electrical shock. Do not under any circumstances cut or remove the third (ground) prong from the power cord supplied. For personal safety, this appliance must be properly grounded. This appliance requires a standard 115/120 Volt AC60Hz three-prong grounded electrical outlet.
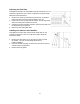
Adjusting the Kick Plate This appliance includes an adjustable kick-plate extender that is not required to operate the unit. In order to adjust the kick-plate height, follow the instructions below: 1. Remove the screws (2) from both the bottom left- and bottom right-hand sides of the kick-plate installed on the unit. 2. Loosen the screws (1) from both the top left- and top right-hand sides of the kick-plate installed on the unit. 3.
OPERATING YOUR APPLIANCE It is recommended you install the appliance in a place where the ambient temperature is between 72º and 78ºF (23º-26ºC). If the ambient temperature is above or below the recommended temperatures, the performance of the unit may be affected. For example, placing your unit in extremely cold or hot conditions may cause interior temperatures to fluctuate. The desired temperature range may not be reached.
Setting the Temperature Control • • • • • • The unit has two separate temperature zones. The temperature of the left compartment (Cold Zone) can be set between 36ºF and 43ºF (2ºC and 6ºC), which is suitable for storing beverages, certain meats, cheeses, and a variety of fruits and vegetables. The right compartment (Pantry Zone) is designed to operate between 41ºF and 68ºF (5ºC and 20ºC), which is better suited for certain types of wine and a various produce.
Interior Light The interior light makes it easy to view your stored items and enhances the display of your stored items. The LIGHT switch allows you to toggle between 2 modes of operation for the internal lights: functional (default) mode and showcase mode. If you are in functional (default) mode (also named Energy Saving Mode), the lights will turn on only when the door is open. If you are in showcase mode, the lights will be on whether or not the door is open.
Door Locks Your unit is provided with a lock and key for on each door. The keys are located inside the plastic bag that contains the User Manual and the Produce Storage Guide. Insert the key into the lock and turn it counter-clockwise to unlock the door. To lock the door, do the reverse operation, making sure the metal pin is engaged completely. Remove the key and put it in a secure place for safekeeping.
CARE AND MAINTENANCE Cleaning your Appliance • • • • • • Turn off the power, unplug the appliance, and remove all items, including shelves. Wash the inside surfaces with a solution of warm water and baking soda (about 2 tablespoons of baking soda to a quart of water). Wash wire shelves with a mild detergent solution. Wipe wooden shelves with a clean, damp cloth. Dry thoroughly. Wring excess water out of the sponge or cloth when cleaning the area where the controls are located, or any electrical parts.
TROUBLESHOOTING You can solve many common appliance problems easily, saving you the cost of a possible service call. Try the suggestions below to see if you can solve the problem before calling the servicer. PROBLEM Appliance does not operate. Appliance is not cold enough. Appliance turns itself on and off frequently. POSSIBLE CAUSE Appliance is not connected to a power supply. The appliance is turned off. Tripped circuit breaker or blown fuse. REMEDY Connect the appliance.
The appliance is not properly leveled. The doors will not close properly. Display “E0”, “E1”. “E2”, “E3”, “E4”, “E5” or “E7”. The alarm sounds and the temperature display flashes. The icon “--” is lit up and flashing in the temperature display. The gaskets are dirty. The shelves are out of position. “E0” indicates a communication error for 3-zone models. “E1” or “E2” indicates that the air temperature sensor has failed. “E3” or “E4” indicates that the defrost sensor in the evaporator has failed.
LIMITED WARRANTY ONE-YEAR LIMITED WARRANTY Within the 48 contiguous United States, for one year from the date of purchase, when this appliance is operated and maintained according to instructions attached to or furnished with the product, warrantor will pay for factory-specified parts and repair labor to correct defects in materials or workmanship. Service must be provided by a designated service company. Outside the 48 states, all parts are warranted for one year from manufacturing defects.