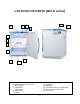
MOMCUBE™ BREAST MILK REFRIGERATOR User Manual Models: MLRS1MC MLRS3MC MLRS6MC/LK MLRS8MC/LK MLRS12MC/LK MLRS15MC/LK ARS1MLMC ARS3MLMC ARS6MLMC/LK ARS8MLMC/LK ARS12MLMC/LK ARS15MLMC/LK BEFORE USE, PLEASE READ AND FOLLOW ALL SAFETY RULED AND OPERATING INSTRUCTIONS Write Model and Serial Numbers here: Model: _____________________ Serial No.: __________________ Accucold Division of Felix Storch, Inc. An ISO 9001:2015 registered company 770 Garrison Avenue Bronx, NY 10474 www.accucold.
ABOUT THE MOMCUBE MOMCUBE™ refrigerators are specially designed to comply with the Centers for Disease Control and Prevention (CDC)'s recommendations for breast milk storage. These units maintain an interior temperature between 33º and 40ºF, which is a colder, tighter range than traditional household or dorm style refrigerators. We recommend only using MOMCUBE™ refrigerators for the storage of breast milk. Units with suffix "MCLK" include individual locking compartments to allow new mothers more privacy.
TABLE OF CONTENTS Equipment Safety Important Safeguards Installation Instructions Before Using Equipment Installation of your Equipment Electrical Connection Extension Cord Reversing the Door Location of Parts (MC Series) Location of Parks (MCLK Series) Combo Locker Instructions (MCLK Series) Operation Quick Setup Guide Adjusting the Temperature High/Low Temperature Alarm Power Failure Alarm Min/Max Room Temperature Recording Reset Min/Max Temperature Recording Changing the Temperature Display Interior Ligh
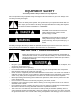
EQUIPMENT SAFETY Your safety and the safety of others are very important. We have provided many important safety messages in this manual and on your unit. Always read and obey all safety messages. This is the Safety Alert Symbol. The symbol alerts you to potential hazards that can kill or injure you and others. All safety messages will follow the Safety Alert Symbol and either the words "DANGER" or "WARNING".
• • • • parts of the cooling system are damaged. leaking coolant can ignite and may damage the eyes. In the event of any damage: o Avoid open flames and anything that creates a spark, o Disconnect from the electrical power line, o Air the room in which the unit isolated for several minutes, and o Contact the Service Department for advice. The more coolant there is in a unit, the larger the room it should be installed in.
INSTALLATION INSTRUCTIONS Before using your equipment Remove the exterior and interior packing. CAUTION: After unpacking you MUST allow this unit to stand upright for at least 2 hours to allow the lubricant and refrigerant to drain back into the compressor and stabilize. Failure to do so may adversely affect performance and the lifetime of this unit. Clean the interior surface with lukewarm water, using a soft cloth.
grounded. When a standard 2-prong wall outlet is encountered, it is your responsibility and obligation to have it replaced with a properly grounded 3-prong wall outlet. To prevent accidental injury, the cord should be secured behind the unit and not left exposed or dangling. The unit should always be plugged into its own individual electrical outlet which has a voltage rating that matches the rating label on the unit.
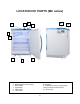
LOCATION OF PARTS (MC series) 2 1 10 3 4 5 6 7 8 1. 2. 3. 4. 5. 6. 9 Keyed lock Microprocessor control panel Reset switch Light switch Internal light Internal fan 7. Leveling legs 8. Kickplate 9. Temperature sensor in glycol bottle 10.Dry contacts (located in rear) 11.
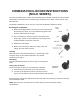
LOCATION OF PARTS (MCLK series) 1 12 3 2 13 4 5 6 7 8 11 9 10 1. 2. 3. 4. 5. 6. 7. Keyed lock Microprocessor control panel Reset switch Light switch Internal light Internal fan Locker 8. Combination lock 9. Leveling legs 10. Kickplate 11. Temperature sensor in glycol bottle 12. Dry contacts (located in rear) 13.
COMBINATION LOCKER INSTRUCTIONS (MCLK SERIES) Several of the MOMCUBE™ models have individual lockers installed for private and secure breast milk storage. The lockers are secured with keyed combination locks, which can be reset for each individual user. The default combination is set at 0-0-0-0. To reset the combination, follow these steps: Resetting the combination 1) Make sure the digital wheels are set at the correct code so that the housing turns freely.
OPERATION QUICK SETUP GUIDE This section explains how to operate your unit. For more detailed instructions on changing the parameters of the control panel, see page 16. Once plugged in, the display will show the product temperature inside the refrigerator and the compressor will start to run (an indicator light on the control panel will turn on at the same time). Note: This product utilizes two sensors: Product Sensor (display sensor) and Air Sensor (control sensor).
Power Failure Alarm After plugging in the equipment, move the “Reset Switch” located at the front of the unit to the down position. When electrical power to the equipment is lost, an alarm will sound, and it will silence when the power is restored. Note the alarm is battery-powered and has a limited time to alarm. Min/Max Temperature Recording Once connected to the power supply, your unit records the maximum high and minimum low temperatures reached inside the cabinet.
STORAGE OF ARTICLES • At maximum loading level, the content should not block the refrigerator’s air flow or be loaded above the load line. • For units with interior lockers (MCLK series), breast milk should only be stored inside the locking compartments. Water bottles or other non-perishable items can be kept on the top and bottom shelves, but these spaces may not maintain the same level of temperature uniformity. • Leave space around the contents to allow a smooth flow of cold air inside the cabinet.
Compressor operates for a long time and no frost on the surface of the evaporator There is frost or ice on the walls of the inner cabinet and internal temperature is too low, the compressor never stops running. The internal temperature is too high, and the compressor never stops operating.
DETAILED TEMPERATURE CONTROLLER GUIDE (For qualified personnel only) Front Panel Operation 1. Set temperature (compressor’s top temperature) adjustment: Press the SET button, the set temperature is displayed, then press the UP or DOWN arrow to store and memorize. Press the SET button to exit the adjustment status and display the product temperature. If no more buttons are pressed within 6 seconds, the refrigerator product temperature will be displayed.
To change any other parameters in the “Factory Settings” enter the Password and then press the “Set” button until the desired Parameter is displayed, then press the up or down arrow until the desired setting is displayed then press the “Set” key again. Wait 6 seconds and it will be set and the unit will go back to normal operation 7.
Table of Parameters and Factory Settings Parameter Function Set Range Default Parameter Function Set Range Default Set Setpoint 38°F 3.3°C/38.0°F C3H Product Temp. High Temp. Alarm -19.9~20.0°C / 3.8~68.0°F 5.0°C / 41.0°F PAS Password 00~99 15 C3L Product Temp. Low Temp. Alarm -19.9~20.0°C / 3.8~68.0°F 0°C / 32.0°F E1 Lowest set point limit -19.9°C / 3.8°F ~ set temp. 2.0°C / C4 Hysteresis Alarm 0.1~20.0°C / 1.8~36.0°F 0.1°C / 0.18°F E2 Higher set point limit 20.0°C / 68.
FUNCTION DETAILS Temperature Control After turning on the unit and reaching the delay time (parameter E40), the compressor starts operating when the cabinet temperature is higher than (set temperature + hysteresis) and will be off when the cabinet temperature is lower than the set point temperature. To protect the compressor, it cannot be re-started unless the time after the compressor stops is longer than the delay time (Parameter E41).
When the electric supply is off, flash and display EEL and alarm. When setting do1 is set at “00”, unit will not alarm when door is open. When setting do1 is set at “0”, once the unit reaches the delay time, it will flash and display dr alarm. Press any random button to cancel. If setting C7 is set to “0”, then the units relay does not alarm when power is off. If setting C8 is set to “0”, then after alarm is canceled, the alarm relay does not close.
LIMITED WARRANTY TWO-YEAR LIMITED WARRANTY Within the 48 contiguous United States, for two years from the date of purchase, when this unit is operated and maintained according to instructions attached to or furnished with the product, warrantor will pay for factory-specified parts and repair labor to correct defects in materials or workmanship. Service must be provided by a designated service company. Outside the 48 states, all parts are warranted for two years from manufacturing defects.