ELECTRIC COOKTOP OWNER'S MANUAL Model No.: CR430SS BEFORE USE, PLEASE READ AND FOLLOW ALL SAFETY RULES AND OPERATING INSTRUCTIONS. Write Serial No. (on bottom of unit) here: Serial No.: ______________________________ FELIX STORCH, INC. An ISO 9001:2015 registered company 770 Garrison Avenue Bronx, NY10474 www.summitappliance.
TABLE OF CONTENTS Appliance Safety 2 Important Safeguards 2-4 Location of Parts 5 Installation Instructions 6 - 10 Before Using Your Appliance 6 Installation of Your Appliance 6-8 Electrical Connection 9 - 10 Operating Your Appliance 10 - 11 Operating Your Cooktop 10 Operating Indicators 10 Cookware Selection 10 - 11 Care and Maintenance 12 - 13 Cleaning Your Appliance 12 Cleaning Surface Units and Reflector Bowls 12 - 13 Troubleshooting 14 Limited Warranty 15 1
APPLIANCE SAFETY Your safety and the safety of others are very important. We have provided many important safety messages in this manual and on your appliance. Always read and obey all safety messages. This is the Safety Alert Symbol. The symbol alerts you to potential hazards that can kill or injure you and others. All safety messages will follow the Safety Alert Symbol and either the words DANGER or WARNING.
FOLLOW WARNING CALLOUTS BELOW ONLY WHEN APPLICABLE TO YOUR MODEL This appliance is only intended for residential cooking. The manufacturer cannot be held responsible for damage or injury caused by improper use or for uses other than those for which this appliance is intended. Do not touch hot surfaces. Use handles or knobs. To protect against electrical shock, do not immerse cord or body of unit in water or other liquid.
extinguisher. Use Only Dry Potholders – Moist or damp potholders on hot surfaces may result in burns from steam. Do not let potholder touch hot heating elements. Do not use a towel or other bulky cloth. Make Sure Reflector Pans or Drip Bowls Are in Place – Absence of these pans or bowls during cooking may subject wiring or components underneath to damage. Protective Liners – Do not use aluminum foil to line surface unit drip bowls or oven bottoms, except as suggested in the manual.
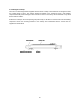
LOCATIONOF PARTS 5
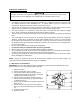
INSTALLATION INSTRUCTIONS BEFORE USING YOUR APPLIANCE Remove the exterior packing. Check if there is any damage to the unit. Clean the unit. A thorough cleaning with a recommended cooktop cleaner will provide a clean, shiny coating on the cooktop surface. INSTALLATION OF YOUR APPLIANCE Follow these directions to prepare the countertop cutout and install your cooktop: 1. Countertop Preparation NOTE: Please read this section prior to making cutout for cooktop.
Adequate ventilation of the space below the countertop must be provided to ensure proper operation of the cooktop. Heat transferred from the cooktop bottom pan during operation will overheat an improperly ventilated area. Allow a 2" minimum clearance between the bottom of the metal pan of the cooktop and any combustible surface located below, i.e.: the upper edge of a drawer installed below the cooktop. Failure to provide proper clearances and ventilation may result in a fire hazard.
2. Installing the Cooktop There are four mounting brackets supplied with the electric cooktop. These brackets are designed to hold the cooktop firmly in place. The cooktop should be bedded to the countertop using a soft bedding compound that will prevent damage if later removal for service is necessary. We recommend a very small bead of silicone sealant. Position the cooktop in the cutout opening and press firmly on all sides to seal the frame into the bedding compound.
ELECTRICAL CONNECTION WARNING Improper connection of the equipment-grounding can result in the risk of electrical shock. If the power cord of the unit is damaged, have it replaced by an authorized service center. The appliance must be properly installed and grounded by a qualified technician in accordance with the National Electrical Code ANSI/NFPA No. 70 (Latest Edition) and local electrical code requirements. Installation should be made by a licensed electrician.
2. 4-Wire Power Cord Installation IMPORTANT: Use the 4-wire cable from power supply where local codes do not permit connecting the frame-ground conductor to the neutral (white) junction box wire. 1. Disconnect power 2. Remove junction box cover if present. 3. Connect the flexible cable conduit (3) from the 1 cooktop to the junction box (4) using a UL listed or CSA approved conduit connector (7). 4. Tighten screws on conduit connector, if present. 5.
Pans with convex bottoms will not cook well. Using a lid while cooking will minimize the loss of heat and decrease the cooking time. Copper bottom and aluminum pans may leave a residue on the cooktop in the form of metallic lines. This is normal. These lines can be removed using a non-abrasive ceramic cooktop cleaner or a shielded scraper blade. Cast iron, glass or stoneware should not be used because they have poor heat transfer and may scratch the surface.
CARE AND MAINTENANCE CLEANING YOUR APPLIANCE Do not use a steam cleaner to clean this appliance. Steam could penetrate electrical components and cause a short circuit. Pressurized steam could cause permanent damage to the surface and to components for which the manufacturer cannot accept responsibility. Do not use any sharp pointed objects which could damage the seal between the ceramic surface, the surrounding frame and the countertop.
terminal into the receptacle. 2. When the terminal is pushed into the receptacle as far as it will go, push down the edge of the surface unit opposite the receptacle. NOTE: Do not immerse burners in water or any other liquids.
TROUBLESHOOTING You can solve many common problems easily, saving you the cost of a possible service call. Try the suggestions below to see if you can solve the problem before calling a service technician. Troubleshooting Guide PROBLEM POSSIBLE CAUSE The appliance does not operate. Not connected to power supply. Circuit breaker has tripped or fuse is blown. The heating element cycles on and off frequently. The power setting is too low.
LIMITED WARRANTY ONE-YEAR LIMITED WARRANTY Within the 48 contiguous United States, for one year from the date of purchase, when this appliance is operated and maintained according to instructions attached to or furnished with the product, warrantor will pay for factory-specified parts and repair labor to correct defects in materials or workmanship. Service must be provided by a designated service company. Outside the 48 states, all parts are warranted for one year from manufacturing defects.