
Installation Sheet


10
Room Ventilation
To ensure proper operation of the appliance, be sure that the room where it is installed has
adequate
ventilation.
The appliance should not be installed with a ventilation system that blows air downward toward the
appliance. It may cause ignition and combustion problems with the gas cooking appliance resulting in
personal injury or unintended operation.
Gas Connection
Connect a manual shut-off valve to the gas supply in an accessible location for turning on or shutting off
gas to the appliance.
•
Leak testing of the appliance shall be conducted by the installer according to the instructions given.
•
Issues arising from a failure to do so will not be covered by warranty.
•
Do not install the pressure regulator backwards as the gas will not flow correctly. Check that the
arrow on the back points in the direction of gas flow.
•
Parts required for connection from gas supply to regulator are the responsibility of the
installer/owner.
•
To reduce the likelihood of gas leaks, apply Teflon tape or a thread compound approved for use
with
Propane or Natural gases to all threaded connections. Apply a non-corrosive leak detection fluid to all
joints and fittings in the gas connection between the supply line shut-off valve and the
cooktop inlet.
•
Check for leaks. Bubbles appearing around fittings and connections will indicate a leak. If a leak
appears, turn off supply line gas shut-off valve, tighten connections, turn on the supply line gas
shutoff valve, and retest for leaks. Never test for gas leaks with an open flame.
WARNING
A qualified service person or gas appliance installer must make the gas supply connection.
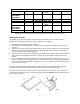
Pressure Test Method
• Remove grate and burner cap
• Remove aluminum gas spreader
• Temporarily remove the injectors
• Connect the pressure Test instrument into injector holder
thread zone (M6x0,75)
• Check if the cooktop has the correct pressure
• Fix the injector removed for testing and replace the parts in the right position.