BUILT-IN BEER DISPENSER SBC635MBI Series Use and Care Guide BEFORE USE, PLEASE READ AND FOLLOW ALL SAFETY RULES AND OPERATING INSTRUCTIONS. Keep proof of original sales date (such as your sales slip) with this manual to establish the warranty period. Write the Serial Number here. You’ll find it on a plate located either on the back of the appliance or on an interior wall. _____________________________________ Felix Storch, Inc. 770 Garrison Avenue Bronx, NY 10474 www.summitappliance.
IMPORTANT SAFEGUARDS WARNING! To reduce the risk of fire, electric shock or injury when using this appliance, follow these basic precautions: 1. Read all instructions before using the appliance. 2. The appliance must be correctly connected to the power supply. 3. Immediately replace worn power cords, loose plugs and faulty power outlets. 4. Do not operate your appliance in the presence of explosive fumes. 5. Disconnect the appliance from the power supply before cleaning or repairing it.
7. The beer dispenser requires an AC power supply of 110~120V/60Hz and pulls a current of over 10A. The fuse or circuit breaker should be rated at 15A. 8. If the leakage of a combustible gas is detected, turn off the gas valve and open the doors and windows. To reduce the risk of fire caused by a spark, do not pull out the plug of the beer dispenser or of any other electrical device.
LOCATION OF PARTS Beer tower assembly Upper cover guardrail Collar Drip tray Top cover Display and control panel Cabinet Evaporator CO2 regulator valve CO2 gas cylinder Ball valve CO2 tank supporter Beer keg Control board device Door Compressor chamber cover Bottom pad Leveling leg BEFORE USING FOR THE FIRST TIME The SBC635MBI is designed for dispensing beer only, and is not recommended for storing perishable foods such as meats or dairy products.
PLACEMENT AND INSTALLATION Choosing the Right Place To ensure that your beer dispenser works at the maximum efficiency it was designed for, install it in a location where there are proper air circulation and electrical connections. Choose a location where the beer dispenser will be away from any heat sources and will not be exposed to direct sunlight. Remove all packing materials before using the beer dispenser. Place the machine on a smooth, flat and sturdy surface.
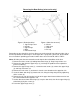
Reversing the Door Swing (select units only) Figure 1 (Default position) Figure 2 (After door reversal) 1. Upper hinge cover 2. Screws 3. Upper hinge 4. Door 5. Lower door hinge 6. Screws 7. Hole cover 8. Cabinet 9. Pin cap Depending on your door finish, the beer dispenser can be opened from either the right side or the left. By default, the door hinge is on the right side.
Installing the Beer Dispenser as a Built-In Unit This beer dispenser is designed to be built in under your counter. Simply follow the steps below for a quick and easy installation. NOTE: Not all models have built-in capability. Only models with letters BI are built-in compatible. We do not advise that other models be built in under your counter. 33-9/16” MIN. 24¾”MIN. 24¼”MIN. The dimensions of your unit are: Make sure the available space is adequate.
Instructions for Building-In Find the mid-point: From left to right the width is about 24¼". From back to front, the dimension is about 25⅜". Therefore the mid-point is located wherever these coordinates cross each other. Use a pencil or marker to note this spot. Note: 12⅛ inches from left to midpoint. 12⅛ inches from right to mid-point 12-11/16 inches from front to mid-point. Drill a round hole: Place a drill bit on the mid-point and make a round hole with a diameter of 1 ⅞".
Installation of Accessories Diagram of overall structure Collar Drip tray Soft red CO2 tube Beer keg handle Beer keg Leveling legs or Universal wheels Installation components Tap handle Draft beer tap CO2 tank bracket and bolt CO2 hose clamp Drip tray assembly Installation steps 1.
wheels will keep the unit from moving if you step on the foot brakes (See Figure 2): 2. Install the beer tower assembly and the mixed ball valve: a) Plug the beer tower assembly into the top cover of the beer dispenser: 3.0” tower: This does not require a tower buckle. Put beer tower directly over the hole at the top of the beer dispenser’s upper surface. Fix the beer tower assembly with screws directly on the upper surface of the beer dispenser. (See Fig. 3). 2.5” tower: This requires the tower buckle.
d) Place the CO2 tank and CO2 regulator valve component into the cabinet and fix the CO2 tank with tank bracket and bolt (See Figure 8). 4. Install the beer keg: Place the beer keg into the cabinet and firmly connect the keg’s opening to the connection port of the mixed ball valve (See Figure 10). Note: To place a keg into the cabinet, use the keg handle to move the keg to the front of the open beer dispenser, then carefully tip the keg so that the raised bottom edge contacts the edge of the cabinet.
OPERATION Control Panel The control panel is located just above the door, and looks like this: DOWN: Lowers UP: Raises temperature temperature Display module Fahrenheit/Celsius switching Rapid cooling Setting the Temperature Adjust the DOWN or UP button on the control panel until the display module shows the desired temperature. The display module shows the set temperature, and the temperature-controlled range varies from 32 to 50°F (0 to 10°C). The display module shows 5°C at the initial power up.
Automatic Defrosting There is usually no need to defrost the beer dispenser because the ice deposited on the inner back wall is automatically defrosted. Ice deposits on the inner back wall during compressor operation. Later on, when the compressor is not operating, the ice defrosts and water drains through the outlet in the inner back wall into the drain pan situated above the compressor where it evaporates. If you see water building up in the rear of the unit, check that the drain trough is not clogged.
5. Hold the glass steady at a 45° angle. When it is 2/3 full, start straightening the glass. Proper foam should be a tight, creamy head and the collar on an average glass should be 3/4" to 1" high. Note: It is normal to see condensation forming on the tap. It is caused by the difference in temperature between the cold beer and the inner surfaces of the tap when beer is flowing through the line. Understanding Beer Temperature The recommended temperature for serving chilled beer is between 38° and 43°F.
MAINTENANCE OF THE BEER DISPENSER Cleaning To optimize cooling and to save energy at the same time, dust the back of the beer dispenser periodically. The interior should be cleaned regularly. Use a soft towel or sponge that has been dampened in a solution of mild detergent. Rinse with clean water and dry with a cloth. Leave the door open for a while to allow the unit to dry thoroughly before turning the power back on.
DISPOSING OF A WORN-OUT APPLIANCE • When your appliance finally wears out, dispose of it. • Before you dispose of an old appliance: Take the door or doors off but leave • • • • any shelves or drawers in place so that children cannot easily climb inside. The refrigerating system of the appliance is filled with refrigerant and insulating substances that should be recycled separately.
DRAFT BEER TROUBLESHOOTING Problem Cause Correction Beer is cloudy: The beer in the glass appears hazy and not clear. Excessively low temperatures may cause hazy or cloudy beer, particularly when the beer lies in the cold coil for long periods of time. Drain a few ounces before drinking. Glasses may not have been cleaned properly. Do not wash beer glasses together with glasses that have contained milk or any other fatty substance.
Beer has off taste: Often bitter and bite-y; sometimes completely lacking flavor and zest. It may also have an oily or foul odor which may carry an unpleasant taste. Improper cleaning of the tap Brush and clean the tap properly. It should be scoured using a detergent, then rinsed clean. Contaminated air line Beer tube should be examined. If contaminated, it should be replaced. Condensation is forming on the tap. It is normal to see condensation forming on the tap.
GENERAL TROUBLESHOOTING If there is a problem with the beer dispenser itself, see if you can find it listed in the chart below. You may be able to save yourself the cost of a service visit. Problem Possible Cause The beer dispenser doesn’t work. Power supply not firmly connected. Supplied voltage is too low. Tripped circuit breaker or blown fuse. The machine switches on and off frequently. Indoor temperature is higher than usual. Machine door is opened frequently. Door is not completely closed.
LIMITED WARRANTY ONE-YEAR LIMITED WARRANTY Within the 48 contiguous United States, for one year from the date of purchase, when this appliance is operated and maintained according to instructions attached to or furnished with the product, warrantor will pay for factory-specified parts and repair labor to correct defects in materials or workmanship. Service must be provided by a designated service company. Outside the 48 states, all parts are warranted for one year from manufacturing defects.