INSTRUCTION MANUAL SPREAD summit BUILTIN REFRIGERATOR & FREEZER DRAWERS ATTENTION For your protection in the event of theft or loss of appliance, fill in spaces provided below. Model and Serial Numbers are indicated on rear wall of appliance. MODEL No. SERIAL No.
UNPACKING THE UNIT = Remove tape, and clean off any residual glue from the appliance surfaces before turning the unit on. Apply some liquid dish detergent over the residue with your fingers, wipe down using warm water and dry. = In order io prevent damage to the surface of your appliance, do not use rubbing alcohol, flammable fluids, abrasive cleaners or sharp tools when removing the packing tape and glue. = Do not remove the protective film on the drawers until the unit is fully installed.
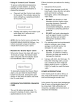
PRODUCT DIMENSIONS + Refer to the below diagrams for product dimensions. When the leveling legs are extended to 144" {8.35 mm), the unit's total height is 34 1/8" (86.7cm} as shown. With the leveling legs fully extended to 17, the unit's height is 34 7/8” {88.6 cm). « The power cord is 80" (152.4 cm) long. free si cc {85.7 em) 1404" {37.8 em} 20 1716" fom {5 GIT} msm 2 | 18 9/16" (47.2 cm} a3 sme {60 omy) 24 2/8" {62 om} 25718" {65.5cm) 1 20 34” {50.
MOVING APPLIANCE TO FINAL LOCATION WARNING: Two ar more people ere required fo move and far install the appliance. Failure lo do so may cause back or other injury. 1. Cover the floor with cardboard or hardboard to avoid floor damage wham moving or smelting down the appliance. 2. Once located by it's desired location, plug the unit into a grounded 3 prong outlet. WARNING: = Always plug into a grounded 3 prong ailed = Dona remove the ground prong. = Do not use an adapter. * Do not use an extension cord.
MAINTAINING AIR-FLOW Cold air circulates from the vents built into the rear of the appliance’s interior (see below) and warm air discharges from the vent near the bottom of the appliance. Do not block any of these airflow vents. FREE Blocking the vents will restrict the air movement and cause temperature and moisture problems. UNIT CONTROLS The control panel for both the top and bottom drawers is located in the upper drawer. To access this panel, pull out the upper drawer.
Using the “Control Lock” Feature To prevent unintentional temperature changes by small children, or during cleaning, the control panel features a Control Lock function. + Press and hold the Control Lock button for 3 seconds. The indicator above the button will light up, signaling activation of the Control Lock. Control Lock ¢ Pressing and holding the Control Lock button again for 3 seconds will deactivate the lock.
TROUBLESHOOTING Many problems can be rescinded without the need for a service call. Try the following list as a reference fo potential solutions of common problems. PROBLEM: The unit is not operating. » Is the power supply cord unplugged? Plug into a grounded 3 prong outlet. = Has a household fuse blown, or a circuit breaker been tripped? Replace the fuse or reset the circuital. PROBLEM: The motor is constantly running, of running too much.
LIMITED WARRANTY ONE-YEAR LIMITED WARRANTY Within the 48 contiguous United States, for one year from the date of purchase, when this appliance Is operated and maintained according to instructions attached to or famished with the product, warrant or will pay for factory-specified parts and repair labor to correct defects in materials or workmanship. Service must be provided by a designated service company. Outside the 48 states, all parts are warranted for one year from manufacturing defects.