! Warning EN - Risk of Fire Clothes dryer installation must be performed by a qualified installer. Install the clothes dryer according to the manufacturer’s instructions and local codes. To reduce the risk of severe injury or death, follow all installation instructions. Save these instructions. Avertissement F - Risque d’incendie Les sécheuses doivent être installé espar un installateur qualifié. Les sécheuses doivent être installées selon les instructions du fabricant et les codes locaux.
Care, Use and Installation booklet TUMBLE DRYER EN English 3 ES Español, 17 F Français, 31 Contents EN Warnings and Safety Instructions, 4 Important safety instructions Grounding instructions Dryer Description, 5 To open door The features Control panel Start and Programs, 6-9 Choosing a program Table of programs The Controls Laundry, 10-11 TCL73X TCL73XS Sorting your laundry Wash care labels Special clothing items Drying times Maintenance and Care, 12 When to switch off the electricity Clean the
Warnings and Safety Instructions EN ! The appliance has been designed and built according to international safety standards. These warnings are given for safety reasons and must be read carefully. ● ● ● Important safety instructions ● WARNING: To reduce the risk of fire, electric shock or injury to persons when using your appliance, follow the basic precautions, including the following: ● ● ● ● ● ● ● ● ● ● ● ● ● ● ● ● ● ● ● ● Read all instructions before using the appliance.
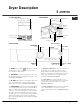
Dryer Description To open the door The features Water container Press and release the front panel in position shown EN Rating plate Model & Serial numbers Condenser unit (Cover open) Condenser cover Condenser cover handle (Pull to open) Control panel PROGRAMS Knob ON/OFF Button The ON/OFF (On/Off) button : If the dryer is running and this button is pressed, the dryer is turned off. Press again, the dryer restarts.
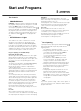
Start and Programs EN Choosing a program During the drying program, you can check on your laundry and take out the items that are dry 1. Plug the dryer into the electrical socket. while others continue drying. When you close 2. Sort your laundry according to fabric type (see the door again, press the Start/Pause button in order to resume drying. Laundry). (When the door is open the Start/Pause light will 3.
Start and Programs Programs EN ! If the On/Off light is not lit; Press the On/Off button and then select program. SENSOR DRY How to set it... Program What it does... Cottons 1. Position the PROGRAMS knob on 1. Dries your clothes on High heat setting, ready 2. Select any Options, if required. 3. Press the Start/Pause button. for putting away. Extra Dry Cottons Light Dry 1. Position the PROGRAMS knob on 2. Dries your clothes on High heat setting, ready 2. Select any Options, if required. 3.
Start and Programs EN Programs ! If the On/Off light is not lit; Press the ON/OFF button and then select program. SPECIALS Program What it does... How to set it... Delicates Low Temp Dries your clothes on Low heat setting ready to be worn. 1. Position the PROGRAMS knob on 12 Options available: Delay Timer 2. Select any Options, if required. Pre Care 3. Press the Start/Pause button. Post Care Wool Dries your Woollen clothes, (see previous page). 1.
Start and Programs The Controls ● PROGRAMS knob ! Warning, if after pressing the Start/Pause button the programs knob position has changed, the new position will NOT change the program selected. To change the program: Press the Start/Pause button to pause the program - the light flashes amber to indicate the program is paused. Select the new program and any options required - the light will flash green. Press the Start/Pause button and the new program will start.
Laundry EN Sorting your laundry ● ● ● ● ● Wash Care Labels Check symbols on clothing labels to make sure that the articles can be tumble dried. Sort laundry by fabric type. Empty pockets and check buttons. Close zippers and hooks and tie loose belts and strings. Wring out each item in order to eliminate as much excess water as possible. Look at the labels on your garments, especially when tumble drying for the first time.
Laundry Special clothing items Times are approximate and can vary depending upon: Blankets and Bedspreads: acrylic items (Acilan, Courtelle, Orion, Dralon) must be dried with special care on LOW heat setting. Avoid drying for a long period of time. ● ● Pleated or creased garments: read the manufacturer’s drying instructions on the garment. Starched articles: do not dry these with non-starched items.
Maintenance and Care EN When to switch off the electricity Cleaning the condenser unit ! Unplug your dryer when not using it, when cleaning it and during maintenance activities. Periodically (every month) remove the condenser unit and clean any build up of fluff from between the plates by rinsing it under the tap with cold water. This should be done with cold water from the rear of the condenser. To remove the condenser: 1. Unplug the dryer and open the door. 2.
Troubleshooting Before you call our Customer Care Department, go through the following troubleshooting suggestions: Problem: Possible causes / Solution: The dryer won’t start. ● ● ● ● ● ● Drying cycle will not begin. ● Its taking a long time to dry. ● ● ● ● ● ● ● The Option lights and the Start/Pause light flash amber. ● ● Programme finishes and clothes are damper than expected. EN The plug is not plugged into the socket, or not making contact. There has been a power outage.
Installation Instructions EN Read these instructions with care. These instructions are provided for use by qualified installers, in addition the installation must comply with: ● In the United States, in accordance with the National Electric Code ANSI/NFPA70 - latest edition and any State, Municipal or local codes. ● In Canada, in accordance with the Canadian Electric Code C22.1 - latest edition and any Provincial, Municipal or local codes. 7. Connect the L1, N and L2 wires.
Installation Instructions Minimum installation clearances: Closet 3/4" (15mm) 1/2" (10mm) 3/4" (15mm) 3/4" (15mm) Sides Top Rear Front Vent Opening distance from top of closet 6" (150mm) EN Closet (alternative) 0 4" (100m) 3/4" (15mm) 3/4" (15mm) Under counter 3/4" (15mm) 1/2" (10mm) 3/4" (15mm) not applicable 2" (50mm) not applicable If installed in a closet it must have the following dimensions and have two ventilation openings each having an area 72 sq.ins. (450 sq.
ARISTON ONE-YEAR LIMITED WARRANTY (USA & CANADA ONLY) EN WHO IS COVERED BY THIS WARRANTY This limited one-year warranty ("Warranty") is given only to the original end-use/retail purchaser (the "First Using Purchaser") of the accompanying Ariston product(s) (the "Ariston Product").
Folleto de cuidados, uso e SECADORA DE TAMBOR instalación EN English 3 ES Español, 17 F Français, 31 Índice ES Advertencias e instrucciones de seguridad, 18 Instrucciones de seguridad importantes Instrucciones para la puesta a tierra Descripción de la secadora, 19 Para abrir la puerta La configuración Panel de control Puesta en marcha y programas, 20-23 Selección de un programa Tabla de programas Los mandos Colada, 24-25 TCL73X TCL73XS Selección de la colada Etiquetas de instrucciones de lavado Pr
Advertencias e instrucciones de seguridad ES ! La secadora ha sido diseñada y fabricada de conformidad con las normas de seguridad internacionales. Estas advertencias se incluyen por motivos de seguridad, y deben leerse detenidamente.
Descripción de la secadora Para abrir la puerta La configuración Contenedor de agua Pulse y suelte el panel frontal en la posición indicada ES Placa de identificación Nº de modelo y serie Unidad del condensador (Tapa abierta) Cubierta del condensador Retén de la cubierta del condensador (Tire para abrir) Panel de control Mando PROGRAMAS ENCENDIDO/APAGADO Botón Botón ENCENDIDO/APAGADO (ON/OFF) : Si la secadora está funcionando y el botón está presionado, la secadora está desactivada.
Puesta en marcha y programas ES Selección de un programa 1. Enchufe la secadora a la toma de corriente eléctrica. 2. Clasifique la colada en función del tipo de tejido (véase Colada). 3. Abra la puerta y asegúrese de que el filtro esté limpio y bien colocado y que el contenedor de agua esté vacío y en su lugar (véase Mantenimiento). 4. Cargue la máquina y asegúrese de que no quede ninguna prenda atrapada en la junta de la puerta. Cierre la puerta. 5.
Puesta en marcha y programas Programas ES ! Si no se enciende el testigo Encendido/Apagado (On/Off): pulse el botón ENCENDIDO/APAGADO (On/Off)) y, a continuación, seleccione un programa. SECADO POR SENSOR (Sensor Dry) Cómo configurarlo... Programa Qué hace... Algodón (Cottons) Seca las prendas con el 1. Sitúe el mando PROGRAMAS en la posición 1 ajuste ALTA TEMPERATURA 2. Si procede, seleccione cualquier otra opcións adicional. y las deja listas para usar. 3.
Puesta en marcha y programas ES Programas ! Si no se enciende el testigo Encendido/Apagado (On/Off): pulse el botón ENCENDIDO/APAGADO (On/Off)) y, a continuación, seleccione un programa. ESPECIALES (Specials) Cómo configurarlo... Programa Qué hace... Delicado Baja Temp (Delicates Low Temp) Seca las prendas con el 1. Sitúe el mando PROGRAMAS en la posición 12 ajuste BAJA TEMPERATURA 2. Si procede, seleccione cualquier otra y las deja listas para usar.
Puesta en marcha y programas Los mandos ● Mando PROGRAMAS ! Advertencia, Si después de pulsar el botón Inicio/ Pausa (Start/Pause) la posición del mando PROGRAMAS ha cambiado, la nueva posición NO cambiará el programa seleccionado. Para cambiar el programa: Presione el bóton Inicio/ Pausa (Start/Pause) para pauser el programa y la luz se encenerá en color amarillo para indicar que el programa está pausado. Cuando seleccione el nuevo programa y cualquier opción requerida, la luz titilará en color verde.
Colada ES Selección de la colada ● ● ● ● ● Etiquetas de instrucciones de lavado Observe los símbolos de las etiquetas de las prendas para asegurarse de que los artículos pueden secarse con esta secadora. Clasifique la colada por tipo de fibra. Vacíe los bolsillos y compruebe los botones. Cierre cremalleras y ganchos, y ate cintas y cinturones. Retuerza cada prenda para eliminar todo el exceso de agua que sea posible.
Colada Prendas especiales Mantas y colchas: los artículos de fibras acrílicas (Acilan, Courtelle, Orion, Dralon) deben secarse con especial cuidado con el ajuste de BAJA temperatura. Evite secarlas durante períodos prolongados. Prendas plisadas o telas arrugadas: lea las instrucciones del fabricante de la prenda. Artículos almidonados: no los seque conjuntamente con prendas no almidonadas.
Mantenimiento y cuidados ES Cuándo desconectar la electricidad Limpieza del condensador Desenchufe la secadora cuando no la esté utilizando, cuando la esté limpiando y durante las actividades de mantenimiento. Periódicamente (todos los meses), extraiga el condensador y limpie la borra o fibras que puedan haberse acumulado entre las placas, lavándolo bajo el grifo. Debe hacerlo con agua fría, desde la parte trasera del condensador. Para extraer el condensador: 1. Desenchufe la secadora y abra la puerta.
Solución de problemas Antes de llamar al Departamento de Atención al cliente, siga estas sugerencias para resolver problemas: Problema: La secadora no se pone en marcha. Posibles causas / Solución: ● ● ● ● ● ● El ciclo de secado no se inicia. El proceso de secado tarda demasiado tiempo. ● ● ● ● ● ● ● ● Se enciende la luz de OPCIÓN y la luz Inicio/Pausa parpadea de color ámbar. ● ● El programa finaliza y las prendas están más húmedas de lo previsto.
Instrucciones de instalación ES Lea detenidamente estas instrucciones. Las instrucciones están previstas para los instaladores cualificados. Asimismo, para la instalación se estará a lo dispuesto por: ● En Estados Unidos, la última edición del Código Eléctrico Nacional ANSI/NFPA70, así como por los reglamentos estatales o locales pertinentes. ● En Canadá, la última edición del Código Eléctrico Canadiense C22.1, así como por los reglamentos provinciales o locales pertinentes.
Instrucciones de instalación Distancias de instalación mínimas: Armario 3/4" (15mm) 1/2" (10mm) 3/4" (15mm) 3/4" (15mm) Laterales Arriba Atrás Adelante Apertura de ventilación - Distancia del Techo 6" (150mm) del armario ES Armario (alternativo) 0 4" (100m) 3/4" (15mm) 3/4" (15mm) Bajo mostrador 3/4" (15mm) 1/2" (10mm) 3/4" (15mm) no procede 2" (50mm) no procede Si se ha instalado en un armario, deberá tener las siguientes dimensiones y dos aberturas de ventilación de 450 cm2 (72 pulg2) cada una, situ
GARANTÍA LIMITADA POR UN AÑO DE ARISTON (SÓLO EE.UU. Y CANADÁ) ES QUIÉN ESTÁ CUBIERTO POR ESTA GARANTÍA Esta garantía limitada por un año ("Garantía") se otorga sólo al usuario/comprador minorista original (el "Primer Usuario Comprador") de los productos Ariston que se acompañan (el "Producto Ariston").
Livret d’entretien, d’utilisation et SÉCHEUSE d’installation EN English, 3 ES Español, 17 F Français, 31 Contenu F Instructions de mise en garde et de sécurité, 32 Importantes instructions de sécurité Instructions de mise à la terre Description de la sécheuse, 33 Pour ouvrir la porte Caractéristiques Le panneau de contrôle Démarrage et programmes, 34-37 Choisir un programme Table des programmes Les commandes Lessive, 38-39 TCL73X TCL73XS Trier votre lessive Laver les vêtements délicats Vêtements s
Instructions de mise en garde et de sécurité F ! Cet appareil a été conçu et fabriqué conformément aux normes internationales de sécurité. Ces mises en garde vous sont données pour des raisons de sécurité et doivent être lues attentivement.
Description de la sécheuse Pour ouvrir la porte Caractéristiques Contenant pour l’eau Plaque signalétique Appuyez et relâchez le panneau avant selon la position illustrée Modèle et numéro de série Unité du condenseur (couvercle ouvert) Grille de la prise d’air Couvercle du condenseur Poignée du couvercle du Filtre condenseur (tirez pour ouvrir) Le panneau de contrôle Bouton PROGRAMMES Bouton et voyant lumineux Marche/Arrêt Indicateur Voyant lumineux Nettoyage du Voyant lumineux condenseur Nettoyage
Démarrage et programmes F Choisir un programme Durant le programme de séchage, vous pouvez vérifier votre lessive et retirer les articles qui sont secs et poursuivre ensuite le séchage des autres articles. 1. Branchez la sécheuse dans la prise électrique. Après avoir refermé la porte, appuyez sur le bouton 2. Triez votre lessive selon le type de tissus (voir Lessive). Démarrer/Pause (Start/Pause) pour reprendre 3. Ouvrez la porte et assurez-vous que le filtre est en le séchage.
Démarrage et programmes Programmes F ! Si le témoin Marche/Arrêt (On/Off) n’est pas allumé, appuyez sur le bouton MARCHE/ARRÊT (On/Off) sélectionnez un programme. puis CAPTEUR DE SÉCHAGE Programme Ce qu’il fait… Cotons (Cottons) Extra Sec 1. Placez le bouton PROGRAMMES sur 1 2. Sélectionnez des options au besoin. à chaleur ÉLEVÉE, ils sont prêts à ranger 3. Appuyez sur le bouton DÉMARRER/PAUSE (Start/Pause).
Démarrage et programmes F Programmes ! Si le témoin Marche/Arrêt (On/Off) n’est pas allumé, appuyez sur le bouton MARCHE/ARRÊT (On/Off) sélectionnez un programme. puis VÊTEMENTS SPÉCIAUX Comment le programmer… Note: Vêtements délicats Sèche vos vêtements Basse température à chaleur BASSE, (Delicates prêts à être portés. Low Temp) 1. Placez le bouton PROGRAMMES sur 12 2. Sélectionnez des options au besoin. 3. Appuyez sur le bouton DÉMARRER/PAUSE (Start/Pause).
Démarrage et programmes Les Commandes ● Bouton PROGRAMMES ! Attention, si après avoir appuyé sur le bouton Démarrer/ Pause (Start/Pause) , la position du bouton des programmes a changé, la nouvelle position NE changera PAS le programme sélectionné. Pour changer de programme: Appuyer sur le bouton Démarrer/ Pause (Start/Pause) pour mettre le programme en mode de pause, le voyant lumineux devient ambre pour indiquer que le programme est en mode de pause.
Lessive F Trier votre lessive ● ● ● ● ● Laver les vêtements délicats Vérifiez les symboles sur les étiquettes de vêtements pour vous assurez que vos articles peuvent être séchés à la machine. Triez votre lessive par type de tissus. Videz les poches et vérifiez les boutons. Fermez les fermetures éclair et les crochets et attachez les ceintures et cordons. Tordez chacun des articles afin d’éliminez le plus d’excédent d’eau possible.
Lessive Vêtements Spéciaux Les temps sont approximatifs et peuvent varier selon: Couvertures et couvre-lits : articles en acrylique (Acilan, Courtelle, Orion, Dralon) doivent être séchés avec une attention particulière au réglage à chaleur basse température (LOW). Évitez de sécher ces vêtements trop longtemps. ● ● Vêtements plissés ou froissés : lisez les instructions du fabricant sur le vêtement. Articles amidonnés : ne séchez pas ces articles avec d'autres vêtements non amidonnés.
Entretien et soins F Quand vous devez déconnecter l’électricité Nettoyage du condenseur Débranchez la sécheuse lorsque vous ne l’utilisez pas, lorsque vous la nettoyez et durant l’entretien. Périodiquement (tous les mois) retirez le condenseur et nettoyez toute accumulation de peluche entre les plaques en le rinçant à l’eau du robinet. Cela doit être fait à l’eau froide à partir de l’arrière du condenseur. Pour retirer le condenseur : 1. Débranchez la sécheuse et ouvrez la porte. 2.
Dépannage Avant de contacter notre service d'assistance à la clientèle, examinez les suggestions de dépannage suivantes Problème: Causes possibles / Solution: La sécheuse ne démarre pas. ● ● ● ● ● ● Le cycle de séchage ne démarre pas. Il sèche très lentement. ● ● ● ● ● ● ● ● Les voyants lumineux d’OPTION et le voyant lumineux Démarrer/Pause clignotent avec la couleur ambre. ● ● Le programme se termine et les vêtements sont plus humides que prévu.
Instructions d’installation F Lisez avec soin ces instructions. Ces instructions vous sont fournies pour être utilisées par un installateur qualifié, et cette installation doit être conforme à: ● Au États-Unis : le National Electric Code ANSI/NFPA70 – dernière édition de même qu'à tout code local, municipal ou d'état. ● Au Canada : le Canadian Electric Code C22.1 – dernière édition de même qu'à tout code local, municipal ou provincial. 7. Branchez les fils L1, N et L2.
Instructions d’installation Dégagements d’installation minimum: Placard 3/4 po (15mm) Côtés 1/2 po (10mm) Haut 3/4 po (15mm) Arrière 3/4 po (15mm) Avant Orifice d’aération Distance du haut du placard 6 po (150mm) Placard (autre option) 0 4 po (100mm) 3/4 po (15mm) 3/4 po (15mm) Sous le comptoir 3/4 po (15mm) 1/2 po (10mm) 3/4 po (15mm) Sans objet 2 po (50mm) Sans objet F Si installée dans un placard, il doit avoir les dimensions suivantes et posséder deux ouvertures de ventilation de 72 po. ca.
GARANTIE LIMITÉE D’UN AN ARISTON (ÉTATS-UNIS ET CANADA SEULEMENT) 195084733.00 06/2010 - SIMLEX . Four Ashes, Wolverhampton F PERSONNES COUVERTES PAR CETTE GARANTIE Cette garantie limitée d’un an (« Garantie ») n'est offerte qu'à l'acheteur au détail final d'origine (le « Premier acheteur-utilisateur ») de ce(s) produit(s) Ariston (le « Produit Ariston »).