
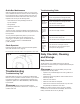
Replacement Part List

11
• Check that the chain is tensioned correctly, sharp and
there are no signs of any damage;
• Check that hand grips and protection devices are
clean and dry, correctly mounted and securely fastened
to the machine;
• Check that the chain brake is working eciently;
• Check that the trigger switch and the safety lock switch
move freely without forcing and return automatically and
rapidly back to their neutral positions;
• Check that the trigger switch remains locked until the
safety lock switch is slided back;
• Make sure the cooling air vents are not clogged with
sawdust or debris;
• Check that the chain’s oil level is not below the bottom
level mark; if necessary, top up the oil to 1 cm from the
rim of the ller.
NOTE: You must ll the chain oil tank with bar and chain
oil before using your chain saw.
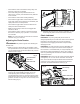
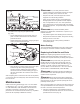
Adjusting the Chain Tension
mWARNING! Use protective gloves when handling the
bar and chain.
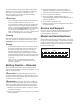
1. Make sure the front hand brake is not engaged. Loosen
the sprocket/chain end cover a little by turn the end cover
nuts counterclockwise with the included hex key wrench/
blade screwdriver (Fig. 4).
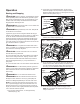
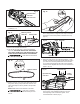
2. Lift up the guide bar tip slightly. Use the other end
of the hex key wrench/blade screwdriver to turn the
chain adjusting screw clockwise to tighten, turn it
counterclockwise to loosen. A cold chain will be correctly
tensioned when there is no slack on the underside of the
guide bar; the chain is snug, but it can be turned by hand
without binding (Fig. 5).
3. Retighten the end cover nuts. Using a screwdriver, run the
chain along the guide to check that it moves smoothly.
Chain Lubricant
IMPORTANT! Only use a good quality bar and chain oil
designed specically for use with chain saws to ensure optimal
lubrication of the cutting parts. Do not use oil containing
impurities to avoid clogging the tank lter and permanently
damaging the oiler.
IMPORTANT! The chain lubricating oil is bio-degradable. The
use of mineral oil or engine oil can have a serious impact on
the environment. It is essential that you use good quality oil to
lubricate the cutting parts eectively. Used or poor quality oil
does not guarantee good lubrication and reduces the lifespan
of the chain and bar.
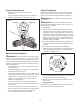
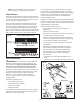
IMPORTANT! Before each use, the oil level should be checked
and topped up to 1 cm from the rim of the ller. To ll the oil
tank, remove the oil tank cap and add the recommended bar
and chain oil. The oil level must not drop below the bottom
level mark, as indicated beside the oil tank (Fig. 6).
Fig. 4
Sprocket/chain
end cover
End cover nuts
Fig. 5
Chain adjusting screw
Fig. 6
Oil tank
Oil tank cap
Bottom level mark