
User Manual


10
IMPORTANT! Never allow the battery pack to become fully
discharged as this will cause irreversible damage to the
battery.
6. When charging is complete, remove the battery from the
charger by pulling the push lock button and sliding the
battery backward to unlock it from the charger.
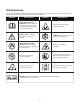
Secrets to a Long Lasting
SharperBlade
™
CONGRATULATIONS! You are about to experience a faster,
easier way of grooming your lawns edge and managing weeds.
First, you will notice that there are obvious dierences between
your SharperBlade
™
and string line, among which are size and
shape. These dierences require you to operate your trimmer +
edger slightly dierent:
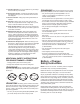
1. Use MINIMAL pressure when edging against concrete,
brick, or stone. Since the SharperBlade
™
is more rigid than
string, you may feel the need to put pressure on the blade
while edging. The more pressure you apply, the FASTER
the blade will wear. In contrast, the less pressure you
apply against hard surfaces, the LONGER the blade will
last! The SECRET is to keep the blade just o the
hard surface.
2. NEVER FORCE your SharperBlade
™
. High speed, along
with an impact against any hard surface, may cause the
blade to buckle near the center hub, and tear.
The SECRET is to allow the SharperBlade
™
to do ALL the
work without extra eort.
Assembly
Before using the SharperBlade
™
cordless grass trimmer +
edger, follow these instructions to assemble.
mWARNING! Do not insert the battery until assembly is
complete. Failure to comply could result in accidental starting
and possible serious personal injury.
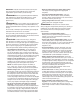
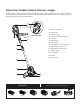
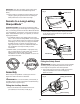
Fitting the Auxiliary Handle
1. Remove the handle knob and bolt that that come
pre-assembled on the auxiliary handle (Fig. 4).
2. Fit the auxiliary handle into position and align the holes.
Fix by the bolt and the handle knob. Tighten the handle
knob to secure (Fig. 5).
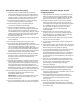
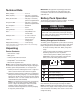
Fitting the Safety Guard
mWARNING! The safety guard must be properly installed.
The safety guard provides partial protection from the risk of
thrown objects to the operator and other bystanders.
1. Use a screw driver to remove the 4 safety guard screws
that pre-assembled on the motor housing (Fig. 6).
Retain the screws.
Pressure =
LONG
LASTING
Fig. 4
Auxiliary handle
Handle knob
Bolt
Auxiliary handle
Handle knob
Bolt
Fig. 5
Fig. 6
Safety guard screws
Motor housing