
Use And Care Manual


14
Maintenance
Please contact an authorized Snow Joe
®
+ Sun Joe
®
dealer
or call the Snow Joe
®
+ Sun Joe
®
customer service center
at 1-866-SNOWJOE (1-866-766-9563) for all maintenance
operations not foreseen in this manual. Any operation
performed in an unauthorized service center or by unqualied
personnel will completely invalidate the warranty.
Maintain the product with the following recommended
procedures. It is recommended to check the general condition
of every part before using. Keep your tool in good condition.
Keep all cutting edges sharp and clean. Properly maintained
cutting tools with sharp cutting edges are less likely to bind
and are easier to control. Keep handles dry, clean, and free
from oil and grease.
Cleaning
We recommend that you clean the device everytime
immediately after using. Clean with a moist cloth and a soft
soap or blow it with compressed air at low pressure.
• Remove the battery each time before cleaning.
• Keep all safety devices, air vents and the motor housing
free of dirt and dust as far as possible.
• Do not use cleaning agents or solvents; these could attack
the plastic parts of the equipment. Ensure that no water
can seep into the device.
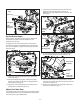
Replacing the Grinding Wheel
Check the grinding wheel before each use to make sure it's
not damaged. Do not use a grinding wheel if it is chipped,
cracked, or worn. You can check if the wheel has minor cracks
by hanging it up by the central hole and tapping it with a non
metal object (ie; screwdriver handle). A grinding wheel in good
condition will produce a metallic sound. A dull sound indicates
a crack or break.
Replace the grinding wheel when it grinds down to a outside
diameter of 3 inches.
mWARNING! This cordless chain saw sharpener uses a
standard 4.25 inch x 1/8 inch grinding wheel with
100 grit. Only use the identical grinding wheels for
replacement. Grinding wheels of other sizes may cause
malfunction or personal injury.
mCAUTION! Wear heavy duty gloves when handling with
the grinding wheel.
1. Before handling the grinding wheel, turn o the machine
and remove the battery. Wait until the grinding wheel
comes to a complete stop.
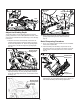
2. Remove the 3 screws used for securing the grinding wheel
guard, then remove the grinding wheel guard and expose
the worn grinding wheel (Fig. 20).
3. To remove the worn grinding wheel, rotate the grinding
wheel retainer counterclockwise (Fig. 21) to unlock,
then take out the retainer and the worn wheel.
Fig. 19
Inspection tool
Depth limiter tooth
Cutting edge
Depth
limiter
tooth
Fig. 20
Screws
Grinding
wheel guard
Grinding wheel