
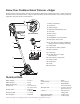
Replacement Part List


10
2. Fit the auxiliary handle into position and align the holes.
Fix by the bolt and the handle knob. Tighten the handle
knob to secure (Fig. 4).
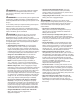
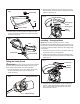
Fitting the Safety Guard
mWARNING! The safety guard must be properly installed.
The safety guard provides partial protection from the risk of
thrown objects to the operator and other bystanders.
1. Use a screw driver to remove the 4 safety guard screws
that pre-assembled on the motor housing (Fig. 5).
Retain the screws.
2. Place the safety guard over the motor housing as shown.
Align the holes. Fix with the original 4 safety guard screws.
Tighten to secure (Fig. 6).
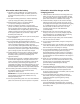
Installing + Changing Blade
NOTE: When you rst purchase your trimmer + edger,
the blade will come separately with the machine. Refer only to
the instructions for tting the SharperBlade
TM
(Step 3). Should
you need to replace the blade in the future, follow all the steps
in this section.
1. Switch o the machine and remove the battery. Wait until
the machine comes to a complete stop.
2. Loosen the screw knob by screwing it counterclockwise.
Remove the screw knob to expose the worn blade and the
washer (Fig. 7).
3. Assemble the new SharperBlade
™
to the cordless grass
trimmer + edger with the washer placed in the middle
(Fig. 4). Fix the whole assembly with the screw knob.
Twist clockwise to secure.
Fig. 3
Auxiliary handle
Handle knob
Bolt
Auxiliary handle
Handle knob
Bolt
Fig. 4
Fig. 5
Safety guard screws
Motor housing
Safety guard
Fig. 6
Safety guard
screws
Motor
housing
Screw knob
Fig. 7
SharperBlade
™
Washer