
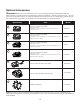
Replacement Part List


11
For safety reasons, it is essential to read the entire instruction
manual before rst use and to observe all the instructions
contained within this manual.
This product is intended for private domestic use only. It is not
intended for any commercial trade use. It must not be used for
any purposes other than those described.
Telescoping Pole Adjustment
mWARNING! Always switch the product o and remove
the battery before making any adjustments.
This product is equipped with a telescoping pole that can be
adjusted. To adjust the pole, follow the instructions below.
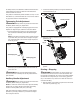
1. Unlock the telescoping pole by turning the telescoping
lock clockwise. Extend the pole to the desired length
(Fig. 7).
NOTE: Push poles toward each other to shorten the pole
or pull them away from each other to lengthen the pole.
Only extend the pole to the minimum length required to
reach the ground.
2. Lock the telescoping pole in position by turning the
telescoping lock counterclockwise, and ensure that the
pole is secured.
mWARNING! Always ensure the telescoping pole is
securely locked. Do not attempt to use the product with the
pole unlocked.
Auxiliary Handle Adjustment
mWARNING! Always switch the product o and remove
the battery before making any adjustments.
NOTE: For maximum comfort and control, adjust the auxiliary
handle to t your height. Shorter users adjust the auxiliary
handle to a lower position (away from your body).
Taller users adjust the auxiliary handle to an upper position
(towards to your body). Make sure your forearm is straight
when using the machine.
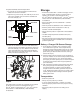
1. Loosen the auxiliary handle by turning the handle knob
counterclockwise (Fig. 8).
2. Adjust the auxiliary handle to a comfortable working
position (Fig. 9).
3. Turn the handle knob back to lock the auxiliary handle in
position.
Starting + Stopping
mWARNING! Rotating blades may cause serious injury.
The blades will continue to turn for a few seconds after the
tool has been switched OFF. Do not touch the rotating blades.
Contact with hot components (i.e. motor housing, gear box,
etc.) on the machine may cause burns. Allow the machine to
cool before handling.
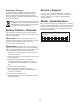
1. Slide the battery in the battery compartment until it clicks
and locks into position (Fig. 10).
Fig. 7
Telescoping lock
Telescoping pole
Fig. 8
Handle knob
Auxiliary handle
Fig. 9
Auxiliary handle