
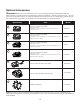
Replacement Part List


12
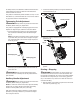
2. To turn the tool ON, push and hold the safety lock switch
while squeezing the ON/OFF trigger. Once the tool is
running, release the safety lock switch (Fig. 11).
3. To switch OFF, release the ON/OFF trigger (Fig. 11).
Operating Tips
• Before each use, check the product, the battery, and any
other accessories for damage. Do not use the product if it is
damaged or shows wear.
• Double check that the accessories and attachments are
properly tted.
• Always hold the product by its handles. Keep the handles
dry to ensure a secure grip.
• Ensure that the air vents are always unobstructed and clear.
Clean them if necessary with a soft brush. Blocked air vents
may lead to overheating and damage the product.
• Switch the product o immediately if you are disturbed
while working by other people entering the working area.
Always let the product come to a complete stop before
averting your attention.
• Do not overwork yourself. Take regular breaks to ensure you
can concentrate on the task at hand and have full control
over the product.
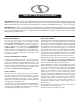
mWARNING! In some municipalities, regulations dene
restrictions for use of such products, including the times and
days when operation is permissible. Ask your community for
detailed information and observe these regulations in order
to preserve a peaceful neighborhood and avoid committing
administrative oenses.
Tilling
• Make sure that the work area is clear of stones, sticks, wire,
or other objects that could damage the product or its motor.
• Do not till very wet soil because wet soil tends to stick to
the working tool, preventing proper blade rotation; it could
also cause you to slip and fall.
• Always maintain a rm grip on the product. For better
guidance, apply light pressure to the handles.
mWARNING! Do not place hands, feet, or any other part
of the body or clothing near the rotating blades or any other
moving part. The blades begin to rotate forward once the
ON/OFF trigger is depressed. The blades continue to rotate
until the ON/OFF trigger is released. Failure to avoid contact
with the rotating blades could cause serious personal injury.
• Do not try to till too deeply or force the product into soil that
is extremely hard or resistant.
• Walk the product through the soil at a normal pace and in
as straight a line as possible.
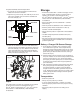
• Till in slightly overlapping rows. To till most eectively,
follow the pattern indicated in Fig. 12. Start by moving the
tiller + cultivator up and down in vertical lines, then work
horizontally from left to right. This will keep the rows even
and ensure that all the ground is tilled without missing any
spots.
• Pay special attention when changing direction.
Apply light pressure to the handle in order to lift the blades
and facilitate the turn. Turn the product around using the
wheels as a guide. Gradually release pressure on the handle
and move the blades back to the ground.
Fig. 10
Battery
compartment
Battery
Fig. 11
Safety lock switch
ON/OFF trigger
Fig. 12