
Replacement Part List
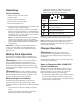

Charging the Batteries
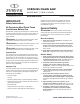
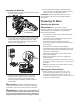
1. Press the push lock buttons on the batteries to pull them
out of the equipment (Fig. 1).
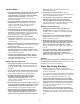
2. Check that the mains voltage is the same as that marked
on the rating plate of the battery charger. Then, plug the
charger adapter into an appropriate AC power outlet.
Connect the charger plug into the charge socket of the
battery to start charging (Fig. 2).
3. Each battery will take approximately 1 hr 20 mins to
charge. The battery indicator LEDs will twinkle and
illuminate one by one during the charging process.
Unplug the charger immediately when the 3 LEDs are
all illuminated.
mCAUTION! FIRE HAZARD. When disconnecting the
charger from the battery, be sure to unplug the charger from
the outlet rst, then disconnect the charger from the battery.
mWARNING! This charger does not automatically turn
o when the battery is fully charged. Please take care not
to leave the battery plugged into the charger. Switch o or
unplug the charger at the mains when charging is complete.
4. Timely recharging of the battery will help prolong the
battery's life. You must recharge the battery packs when
you notice a drop in the equipment's power.
IMPORTANT! Never allow the battery packs to become
fully discharged as this will cause irreversible damage to
the batteries.
Preparing To Work
Checking the Machine
mWARNING! Before performing any checks,
adjustments, repairs or maintenance on the machine, make
sure the batteries are not inserted in the compartments.
Before starting work please:
• Check that all the screws on the machine and the guide
bar are tightly fastened;
• Check that the chain is tensioned correctly, sharp and
there are no signs of any damage;
• Check that hand grips and protection devices are
clean and dry, correctly mounted and securely fastened
to the machine;
• Check that the chain brake is working eciently;
• Check that the trigger switch and the safety button move
freely without forcing and return automatically and rapidly
back to their neutral positions;
• Check that the trigger switch remains locked until the
safety button is pressed;
• Make sure the cooling air vents are not clogged with
sawdust or debris;
• Check that the chain’s oil level is not below the "OIL min"
level mark; if necessary, top up the oil to 1 cm from the rim
of the ller.
NOTE: You must ll the chain oil tank with bar and chain
oil before using your chain saw.
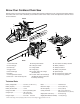
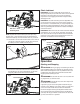
Adjusting the Chain Tension
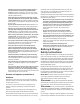
1. Tension the chain by turning the end cover + chain
tensioning knob clockwise (Fig. 3). A cold chain will
be correctly tensioned when there is no slack on the
underside of the guide bar; the chain is snug, but it can be
turned by hand without binding.
Push lock button
(on both sides)
Fig. 1
Fig. 2
Battery
indicators
9