
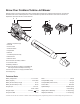
Replacement Part List


9
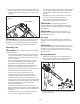
Attaching the Jet Blower Tube
1. Align the slot on the blower tube with the notch on the
cordless jet blower body. Slide the two together
(Fig. 5).
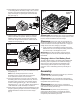
2. Twist the blower tube clockwise until the notch clicks into
the end of the slot (Fig. 6).
3. Then, align the notch on the blower tube with the slot on
the blower nozzle. Slide the pieces together until they click
in place (Fig. 7).
mWARNING! To avoid the risk of injury, it is not
recommended to disassemble the blower tube.
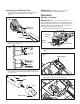
Operation
Starting + Stopping
mCAUTION! Starting, stopping, and restarting a DC
motor repeatedly within a few seconds can generate a great
deal of heat and damage the motor. To protect the life of your
cordless jet blower, always wait at least ve seconds after
stopping before restarting the jet blower.
1. Insert the batteries in the battery compartments (Fig. 8).
2. To start the cordless jet blower, press the ON/OFF button
(Fig. 9).
3. To control the speed, use the dial to adjust between low to
high speed, and reach up to 90 mph (Fig. 10).
Fig. 5
Blower tube
Cordless jet
blower body
Slot
Notch
Fig. 6
Slot
Notch
Locked
position
Fig. 7
Blower nozzle
Blower tube
Slot
Notch
Fig. 8
Battery
packs
Battery
Compartment
Push lock
button
Fig. 9
ON/OFF button
Fig. 10
Speed dial
High
Low