
User Manual


6
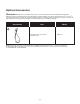
Unpacking
Carton Contents
• Upper pole assembly
• Lower pole assembly
• Middle pole
• Joint-xing knob, washer and bolt (x2)
• Manuals with registration card
1. Carefully remove the electric snow shovel and check to
see that all of the above items are supplied.
2. Inspect the product carefully to make sure no breakage or
damage occurred during shipping. If you nd damaged or
missing parts, DO NOT return the unit to the store. Please
call the Snow Joe
®
+ Sun Joe
®
customer service center at
1-866-SNOWJOE (1-866-766-9563).
NOTE: Do not discard the shipping carton and packaging
material until you are ready to use your new electric snow
shovel. The packaging is made of recyclable materials.
Properly dispose of these materials in accordance with
local regulations.
IMPORTANT! The equipment and packaging material are
not toys. Do not let children play with plastic bags, foils
or small parts. These items can be swallowed and pose a
suocation risk!
Assembly
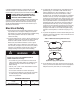
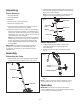
Connecting the Poles
1. Slide the upper pole into the middle pole and the middle
pole into the lower pole. Align the screw holes (Fig. 1).
2. Insert the bolts through the aligned holes in the poles and
secure the other end with the washers and the joint-xing
knobs (Fig. 2). Twist until tight.
NOTE: You may have to carefully move the wiring inside
the tube to one side if it blocks the path of the bolt.
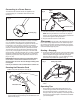
Handle Adjustment
1. To adjust the angle of the auxiliary handle, loosen
the auxiliary handle by turning the handle knob
counterclockwise.
2. Rotate the auxiliary handle to a comfortable position
(Fig. 3).
3. Retighten handle knob securely by turning it clockwise
(Fig. 3).
NOTE: In order to prevent the auxiliary handle from moving
around or sliding on the pole, be sure to tighten securely.
Operation
IMPORTANT: This electric snow shovel is intended for
outdoor, residential use only. Do not use this appliance indoors
or for commercial or industrial purposes.
Fig. 1
Lower pole
Middle pole
Upper pole
Fig. 2
Upper pole
Middle pole
Lower pole
Joint-xing
knob
Washer
Bolt
Fig. 3
Handle knob
Auxiliary
handle