
Use And Care Manual


7
Unpacking
Carton Contents
• Electric silent wood chipper + shredder main body
• Paddle
• Supporting legs (2)
• Wheel axle with hardware
• Wheels (2)
• Wheel caps (2)
• Nuts (4)
• Hex key wrench
• Wrench
• Collection bag
• Manuals with registration card
1. Carefully remove the electric wood chipper + shredder and
check to see that all of the above items are supplied.
2. Inspect the product carefully to make sure no breakage or
damage occurred during shipping. If you nd damaged or
missing parts, DO NOT return the unit to the store. Please
call the Snow Joe
®
+ Sun Joe
®
customer service center at
1-866-SNOWJOE (1-866-766-9563).
NOTE: Do not discard the shipping carton and packaging
material until you are ready to use the electric wood
chipper + shredder. The packaging is made of recyclable
materials. Properly dispose of these materials in
accordance with local regulations or save the packaging
for long-term product storage.
IMPORTANT! The equipment and packaging material are
not toys. Do not let children play with plastic bags, foils,
or small parts. These items can be swallowed and pose a
suocation risk!
Assembly
Wheels Fitting
NOTE: The hardware for the wheels are already assembled on
the wheel axle.
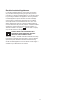
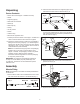
1. Remove all the wheel nuts and shaft sleeves on the wheel
axle, and remove the washers on the wheel axle (Fig. 1).
2. Insert the wheel axle into the two supporting legs, and re-
assemble the washers and the shaft sleeves (Fig. 2).
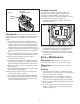
3. Put the wheel onto the wheel axle, secure with the wheel
nut. Using the supplied hex key wrench to x the wheel
axle, at the same time use the wrench provided to rmly
lock the wheel nut (Fig. 3).
4. Place the wheel cover in the center of the wheel, rmly
press to secure (Fig. 4).
5. Repeat the above steps 3 – 4 to assemble the other wheel.
Fig. 1
Shaft sleeve
Washer Wheel nut
Wheel axle
Fig. 2
Shaft sleeve
Wheel axle
Washer
Supporting legs
Fig. 3
Wheel
Wheel axle
Hex wrench
Wrench
Wheel
nut
Fig. 4
Wheel
Wheel cap