
Full Product Manual


17
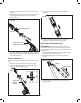
mWARNING! The buckle is provided with a means of
quick release which can be accomplished by simply squeezing
the sides of the buckle (Fig. 30).
Operation
Connecting to Power Supply
1. Only connect the electric grass trimmer to a working
120 V outlet using a heavy-duty outdoor extension power
cord.
2. Make a loop in the extension cord and push it up through
the hole in the handle and around the cord restraint hook,
then connect the extension cord to the appliance cord
(Fig. 31).
Starting the Grass Trimmer
Before you start the grass trimmer, make sure the trimmer is
not contacting any object.
1. To turn the grass trimmer ON, press and hold the safety
lock button with your thumb, then squeeze the ON/OFF
trigger switch with your ngers. Once the machine powers
on, you can release the safety button and proceed with
operation (Fig. 32).
Trimming
• Wear non-slip gloves for maximum grip and protection.
• For the best cutting action against walls, fences, and in high
grass, move the grass trimmer slowly so grass is cut with
the tip of the high speed nylon line.
• Avoid dragging the grass trimmer and string spool hub in
contact with the ground.
• Trim only when grass and weeds are dry.
NOTE: As the weather becomes cooler, the tendency for the
nylon line to break becomes greater. DO NOT USE WHEN
TEMPERATURE IS BELOW 50ºF (10ºC).
• Cut tall grass from top down. This will prevent grass from
wrapping around the shaft housing and string head which
may cause damage from overheating.
• If grass becomes wrapped around the string head:
– Stop the grass trimmer.
– Unplug the grass trimmer.
– Remove the grass.
• Hold the grass trimmer with your right hand on the rear
handle and your left hand on the front auxiliary handle. The
grass trimmer should be held at a comfortable position with
the rear handle about hip height.
mWARNING! Always hold the trimmer away from
body. Any contact with the grass trimmer cutting head while
operating can result in serious personal injury.
• The life of your nylon line is dependent upon following
instructions for proper use, as well as what is being cut, and
where the cutting is being done.
Fig. 30
Quick release
buckle
Fig. 31
Appliance cord
Cord restraint hook
Extension cord
Fig. 32
Trigger switch
Safety lock
button
Rear handle