
User Manual


25
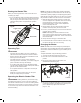
Starting the Garden Tiller
Before you start the garden tiller, make sure the tiller is not
contacting any object.
1. To turn the tiller ON, press and hold the safety lock button
with your thumb, then squeeze the ON/OFF trigger switch
with your ngers. Once the machine powers on, you can
release the safety button and proceed with operation
(Fig. 59).
2. Release the trigger switch to stop the tiller.
Operating Tips
mCAUTION!
• Check the area to be tilled. Look for any hazards and
obstructions that could contribute to unsafe conditions.
• Remove all rocks, debris, and other materials that could
become jammed in the blades.
• If the tiller stops due to a rock or other obstruction
becoming jammed in the blades, you must rst unplug the
power cord before removing the blockage.
• Do not till in areas where there may be hidden hazards,
such as sprinkler heads and pipes, buried power cables or
gas lines or other similar hazards.
• Do not operate the tiller on a slope that is too steep for
safe operation.
• Make sure your footing is rm. Keep your feet apart.
Divide your weight evenly on both feet.
Operating the Electric Garden Tiller
mWARNING! Rotating blades may cause serious injury.
The blades will continue to turn for a few seconds after the
tool has been switched OFF. Do not touch the rotating blades.
Contact with hot components (i.e. motor housing or gear box)
on the machine may cause burns. Allow the machine to cool
o before handling.
NOTE: Use the tiller for breaking sod, preparing seed beds,
and for tilling gardens and ower beds. The unit can also dig
small holes for planting sapling or transplanting potted plants.
Guide the tiller using light pressure. Do not force tool. It will do
the job better and safer at the rate for which it was intended.
1. Walk the electric tiller through the soil at a normal pace
and in as straight a line as possible. Move the unit slowly
forward and back in a rocking motion, rst pulling it
backward then letting it "crawl" forward. Repeat this
motion to till deeper into soil.
2. Always till away from the electrical outlet. Ensure the
extension cord is kept away from the work area.
3. Do not try to till too deeply or force the unit into soil that is
extremely hard or resistant.
NOTE: Overloading the machine will cause it to shut
down. If this occurs the machine will not operate until the
motor has completely cooled down. This is normal and the
tiller will reset itself.
4. Always maintain a rm grip on the electric tiller.
5. Lift the electric tiller over hard surfaces. Never lift or drag
the electric tiller when the motor is running.
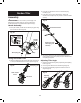
Changing the Blades
NOTE: The blades in the motor housing are provided by the
manufacturer. Only use blades that have been supplied by the
manufacturer. Ensure the blades are in good condition prior to
operation.
To replace the blades, using the following procedure:
1. Turn OFF the tiller and unplug the power cord.
2. Place the unit on a at surface and stand in a safe
position.
3. Remove the locknut with a socket wrench and
disassemble the blades (Fig. 60).
4. Remove the old blades while taking note of the sequence
of assembly. Install the new blades in the order they were
prior to disassembly. Tighten with the locknut.
(Figs. 61 – 66).
Fig. 59
Trigger switch
Safety lock
button
Rear handle
Fig. 60
Blade Locknut