
Replacement Part List


mCAUTION! Always wear eye protection.
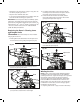
1. Hold the trimmer at an angle of approximately 10 – 30
degrees to the work area (Fig. 48).
2. Slowly swing the trimmer from side to side (Fig. 49).
3. Do not overload your trimmer; instead, take small “bites”
of grass, working from the top to the bottom. This will
keep the machine operating at high speed and will greatly
improve its cutting eciency (Fig. 50).
4. When using as a edger, using the edging wheel for
supporting and guidance (Fig. 51).
Advancing Lines
NOTE: Your trimmer uses 0.055 in. (1.4 mm) diameter nylon
line to cut grass and weed quickly and easily. In time, the
tip of the nylon line will become worn and the auto-feed
mechanism will automatically feed and trim a fresh length of
line. The cutting line will wear faster if the cutting is done along
sidewalks or other abrasive surfaces or heavier weeds are
being cut.
The grass trimmer + edger is equipped with an auto-feed
head. Bumping the head to try to advance the line will damage
trimmer.
1. With the unit running, release the ON/OFF switch trigger.
2. Wait two seconds, and press the ON/OFF switch trigger.
NOTE: The lines will extend approximately 1/4 in. with each
stop and start of the switch trigger until the lines reach the
length of the safety guard.
3. Resume the trimming + edging.
mWARNING! Do not operate the grass trimmer + edger
in a tree, on a ladder, or on a scaold; this is extremely
dangerous.
mWARNING! Do not bump the unit on ground in attempt
to feed line or for any other purpose.
Maintenance + Care
mWARNING! Make sure to remove the battery before
inspecting its parts.
mWARNING! Always wear protective gloves during
maintenance tasks. Do not carry out maintenance when the
motor is running or hot.
• Never use water or chemical cleaners to clean your grass
trimmer + edger. Wipe it clean with a dry cloth.
• Plastic parts may be cleaned by using mild soap and a
damp rag.
Fig. 48
10º – 30º
Fig. 49
Fig. 50
Fig. 51
Edging wheel
24