
Use and Care Manual


9
Operation
IMPORTANT! The product is intended for light-duty trimming
of shrubs and lawn edges for residential properties.
NOTE: Charge the battery for 3 to 5 hours then use it until it
runs down (i.e. the tool will only slowly operate). Recharge for
3 to 5 hours again before resuming operation.
mWARNING! The blades continue to move for a few
seconds after the tool is switched OFF. Turn OFF the tool and
wait until the blades come to a complete stop before adjusting
or cleaning.
mCAUTION! Never touch the blade rail while the tool is
in operation and be aware of the sharp edges even when the
grass shear + hedge trimmer is not in use.
NOTE: Do not touch the rotating blades.
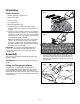
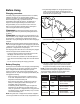
1. To power ON, push and hold the safety lock-o button
with your thumb, while depressing the ON/OFF trigger
switch with your forenger. Once the trigger switch
engages, you can release the safety lock-o button and
proceed with operation (Fig. 11).
NOTE: The safety lock-o button reduces the risk of accidental
starting.
2. To power OFF, simply release the ON/OFF trigger switch
(Fig. 11).
mCAUTION! Do not force the blades through dense
growth. If the blades slow down, then reduce your cutting
pace. Should the blades jam, release the trigger immediately.
Do not use your ngers to free up jammed blades. Jammed
blades can release suddenly causing serious injury.
mCAUTION! Always ensure proper footing and balance in
a clean and clear work environment before switching on the
grass shear + hedge trimmer.
NOTE: The yellow charge indicator LED light will illuminate
when the battery is running low and requires charging.
Cutting Tips
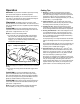
1. Shaping – A hedge should be trimmed to achieve a
trapezoidal form; it should widen toward the bottom on
both sides. Shaping a hedge in this manner improves the
penetration of light to the lower extremities. A general
guideline is to slant the hedge approximately 4 in. (10 cm)
for each 39 in. (1 m) of hedge height.
2. Cutting Sequence – First cut both sides; start at the
bottom and work towards the top. This prevents cuttings
from falling into the area that you have yet to trim.
3. Trimming the Top – Where the branches have grown
extremely long, cut back the hedge in several stages. The
shorter cuttings obtained are best suited for composting.
4. Pruning Thick Branches – When older hedges are to be
cut a substantial amount, use pruning shears or some
other device to trim thicker branches (greater than 0.3 in.
[8 mm] in diameter) to the desired length before starting
work with the hedge trimmer.
To shape precisely, run a taught line between the extreme
edges of the hedge and then trim along the length of the
line.
Ensure that the blade does not come into contact with any
object made of hard material that could damage it, such
as fencing wire or metallic plant supports.
5. Our Environment – We at Snow Joe
®
+ Sun Joe
®
care
about the environment and consider what we may do to
protect it. If you share this concern, you may already be
aware of the suggestions below; if not, please consider
them as a small step in protecting our future.
Don’t throw your clippings into a rubbish bin where it will
be disposed of in landll. You can dispose of the clippings
into your compost heap, alternating them with other
garden material. Alternatively, many communities provide
a public collection point where you can dispose of your
garden waste in an environmentally friendly manner.
Fig. 11
Safety lock-o button
ON/OFF trigger switch