
Replacement Part List

9
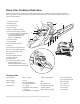
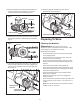
3. Mount the guide bar by inserting the stud bolt into the
bar’s hole using the tension adjuster; move the bar
towards the back of the machine body (Fig. 3).
4. Wind the chain around the sprocket and push the guide
bar forward to achieve an initial tensioning of the chain
(Fig. 4).
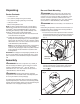
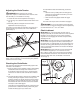
5. Fit the chain/sprocket end cover back on by screwing on
the chain tension adjustment knob without tightening it.
Turn the ring nut clockwise until you nd the right chain
tension (Fig. 5).
6. Raise the guide bar and tighten the chain tension
adjustment knob securely (Fig. 6).
Preparing To Work
Checking the Machine
mWARNING! Before performing any checks,
adjustments, repairs or maintenance on the machine, make
sure the battery is not inserted in its housing.
Before starting work please:
• Check that all the screws on the machine and the guide
bar are tightly fastened;
• Check that the chain is tensioned correctly, sharp and
there are no signs of any damage;
• Check that hand grips and protection devices are clean
and dry, correctly mounted and securely fastened to the
machine;
• Check that the chain brake is working eciently;
• Check that the trigger switch and the safety button move
freely without forcing and return automatically and rapidly
back to their neutral positions;
• Check that the trigger switch remains locked until the
safety button is pressed;
• Make sure the cooling air vents are not clogged with
sawdust or debris;
• Check that the chain’s oil level is not below the "MIN" level
mark; if necessary, top up the oil to 1 cm from the rim of
the ller.
NOTE: You must ll the chain oil tank with bar and chain
oil before using your chain saw.
Fig. 3
Guide bar
Stud bolt
Tension adjuster
Fig. 4
Guide bar
Chain
Sprocket
Fig. 5
Chain tension
adjustment knob
Chain/sprocket
end cover
Ring nut
Fig. 6
Chain tension adjustment knob
Ring
Guide bar