
User Manual


17
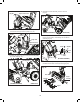
Proper Care for Battery + Charger
mWARNING! To reduce the risk of injury, always unplug
the charger and remove the battery pack from the charger
before performing any maintenance task. Never disassemble
the battery pack or charger. Contact your Snow Joe
®
+
Sun Joe
®
dealer or the Snow Joe
®
+ Sun Joe
®
customer
service center for ALL repairs.
1. To reduce the risk of injury and damage, never immerse
your battery packs or charger in liquid or allow any liquid
to ow inside these components.
2. Clean out dust and debris from charger vents and
electrical contacts by blowing with compressed air.
3. Use only mild soap on a damp cloth to clean the battery
pack and charger, keeping away from all electrical
contacts. Certain cleaning agents and solvents are
harmful to plastics and other insulated parts. Some of
these include gasoline, turpentine, lacquer thinner, paint
thinner, chlorinated cleaning solvents, ammonia and
household detergents containing ammonia. Never use
ammable or combustible solvents around battery packs,
battery chargers or tools.
4. The EcoSharp
®
iCHRG40-DPC lithium-ion dual port
battery charger has no serviceable parts.
Check Tire Pressure
mWARNING! Under any circumstance do not exceed
manufacturer’s recommended PSI. Equal tire pressure
should be maintained at all times for performance purposes.
Excessive pressure may cause tire/rim assembly to burst with
force sucient to cause serious injury. Refer to sidewall of tire
for recommended pressure.
The tires are over-inated for shipping purposes. Check the
tire pressure before operating the snow blower. Refer to the
tire side wall for tire’s manufacturer’s recommended psi and
deate (or inate) the tires as necessary.
mCAUTION! Avoid injury. Explosive separation of tire and
rim parts is possible when they are serviced incorrectly:
• Do not attempt to mount a tire without proper equipment
and experience to perform the job.
• Do not inate the tires above the recommended pressure.
• Do not weld or heat a wheel and tire assembly. Heat can
cause an increase in air pressure resulting in an explosion.
Welding can structurally weaken or deform the wheel.
• Do not stand in front or over the tire assembly when
inating. Use a clip-on chuck and extension hose long
enough to allow you to stand to one side.
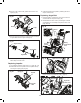
Replacing Skid Shoes
The skid shoes on the bottom of the snow blower are subject
to wear. They should be checked periodically and replaced
when necessary.
To replace skid shoes:
1. Position unit on a hard, at, smooth level surface.
2. Remove the 4 hex nuts (2 on each side) and carriage bolts
which secure them to the snow blower (Fig. 26).
3. Install the new skid shoes by tightening the 4 sets of hex
nuts and carriage bolts on both sides, but leave the skid
shoes free to move for height adjustment.
4. Slide skid shoe to at surface. Allow 1/8 in. (3 mm)
between scraper blade and hard smooth surface. Allow
1-1/4 in. (30 mm) between scraper blade and uneven or
gravel surfaces.
NOTE: Keep housing level by adjusting skid shoes
equally.
5. Retighten the 4 sets of hex nuts and carriage bolts on
both sides.
Manufacturer's
Recommended
Tire Pressure
20 PSI
Fig. 26
Skid shoe
Hex nuts
Carriage bolts