
User Manual


18
Replacing Scraper Blade
IMPORTANT! Damage to auger/impeller housing will result if
the scraper blade wears down too far.
To replace scraper blade:
1. Position unit on a hard, at, smooth level surface.
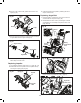
2. Uninstall the skid shoes by removing the 4 hex nuts (2 on
each side) and carriage bolts which secure them to the
snow blower (Fig. 27).
3. Detach the worn scraper blade from the snow blower by
removing the 2 hex nuts and carriage bolts that hold it in
place (Fig. 27).
4. Install the new scraper blade and fasten it securely to the
snow blower with 2 hex nuts and bolts.
5. Reinstall the skid shoes by tightening the 4 sets of hex
nuts and carriage bolts on both sides.
Replacing Shear Bolts
The auger is secured to the auger shaft with shear bolts and
nuts. If the auger should strike a foreign object or ice jam, the
snow blower is designed so that the bolts may shear. If the
auger will not turn, check to see if the bolts have sheared.
mCAUTION! Use only manufacturer's recommended
shear bolts for replacement. Use of any other type of shear
bolts may result in severe damage to unit and may void the
warranty. Call the Snow Joe
®
+ Sun Joe
®
customer service
center at 1-866-SNOWJOE (1-866-766-9563) for assistance.
Occasionally a foreign object may enter the auger/impeller
housing and jam the auger, breaking the shear bolts which
secure the auger to the shaft. This allows the auger to turn
freely on the shaft which may help prevent damage to the
gearcase and its components.
mWARNING! Always turn o the snow blower’s motor
and remove the key and batteries prior to replacing shear
bolts.
1. Align shear bolt holes in auger with shear bolt holes in the
shaft (Fig. 28).
2. Drive shear bolt through hole. If shear bolt was broken this
will drive remaining part from shaft (Fig. 28).
3. Secure shear bolt with gasket and nut (Fig. 28).
Replacing Auger Blades
1. Open the battery compartment cover and remove the 2
screws inside the compartment (Fig. 29).
2. Disassemble the motor cover by removing the 4 screws
and washers (2 on each side) and open the motor cover
(Figs. 29 & 30).
Fig. 27
Skid shoe
Hex nut
Carriage bolt
Scraper blade
Fig. 28
Nut
Gasket
Shear bolt
Fig. 29
Screw
Battery
compartment
cover
Screw +
washer