
Use and Care Manual


10
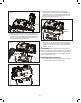
3. Make sure the air tank drain valve is closed. Turn the air
pressure regulator knob counter-clockwise all the way to
the end, and press the I(ON) end of the On/O switch to
allow the tank pressure to build. Check tank pressure at
the tank pressure gauge (Figs. 9 – 10).
4. Stop the pressure-building process by pressing the
O(OFF) end of the On/O switch when the desired tank
pressure is reached. If the air pressure exceed what you
need, pull out the safety valve to release some air until it
reaches the desired pressure (Fig, 11).
NOTE: It's recommended to build the tank air between
85 PSI and 115 PSI. The unit cannot work properly with
the tank pressure lower than 85 PSI. If the tank pressure
is higher than 130 PSI, the safety valve will automatically
trigger to release air.
mWARNING! High temperatures are generated by the
electric motor and the pump. To prevent burns or other injuries,
DO NOT touch the air compressor while it is running. Allow it
to cool before handling or servicing. Keep children away from
the air compressor at all times.
Attaching the Accessories
1. The unit is equipped with an accessory pack. The usage
of each accessory is listed in the below form.
Fig. 8
Battery
Fig. 9
Pressure
regulator
knob
Tank pressure
gauge
Fig. 10
On/O switch
ON (I)
OFF (O)
Fig. 11
Safety valve
Pull out to
release air