
Use and Care Manual


8
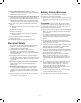
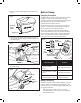
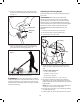
2. Place the protective plastic straps onto the support rod
(Fig. 4).
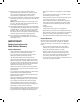
3. Lift the ejector ap with one hand. With the other hand,
hold the grass collection bag by the handle and hook it in
from above (Fig. 5).
Fig. 5
Ejector ap
Grass collection bag
4. Release the ejector ap to secure the grass collection bag
in position (Fig. 6).
Before Using
Charging Procedure
The battery charger supplied matches the lithium-ion battery
installed in the tool. Do not use other battery chargers.
The lithium-ion battery is protected against deep discharging.
When the battery is empty, a protective circuit will
automatically switch OFF the machine.
Charge the battery for up to 5 hours then use it until it runs
down (i.e. the tools starts to operate slowly). Recharge for
up to 5 hours again before resuming operation.
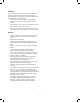
The mower is equipped with a battery capacity indicator
system under the battery gauge cover. To check the battery
capacity, lift up the battery gauge cover and push the button
(Fig. 7). The charge indicator system indicates the battery
status of the lawn mower as the table shows below.
Battery Charging
The battery in this lawn mower has been designed to provide
maximum trouble-free life. However, like all batteries, it will
eventually wear out. To obtain the longest possible battery life,
we suggest the following:
• Store and charge your lawn mower in a cool area.
Temperatures above or below normal room temperature
will shorten battery life.
R
Fig. 4
Support rod
Protective
plastic
straps
R
Fig. 6
Ejector ap
Grass
collection
bag
PUSH
Fig. 7
Battery capacity
indicator system
Battery
gauge cover
Push
the
button
3
2
1
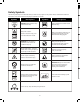
Condition
LED's Illuminated
1- Green, 2- Yellow,
3- Red
1- Not illuminated, 2- Yellow,
3- Red
1- Not illuminated,
2- Not illuminated, 3- Red
More than 60% charged
More than 30% charged
Less than 30% charged.
Need to be charged