
Replacement Part List


Assembly
When assembling this machine, please follow the instructions
below.
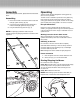
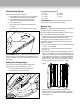
Assembling
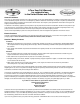
1. Fit the lower handle on the machine with 2 knobs and
bolts (A), tighten securely. (Fig. 3A)
2. Connect the upper handle and lower handle with 2
knobs and bolts (B), tighten securely. (Fig. 3B)
3. Hang the collection bag as shown. (Fig. 4.)
NOTE: The packaging material is made of recycle
materials. Dispose of packaging materials in accordance with
regulations.
Operating
This lawn mower has been designed for cutting grass. Any
other use is not permitted.
The lawn mower is suitable for private use in the garden only,
lawn mowers for private use are those which are used for
cutting grass and lawns in the garden, however not for cutting
grass in public parks, playing elds or on farms or in forests.
Non-permitted users:
Persons who are not familiar with the operating manual,
children, young people under the age of 16 as well as persons
under the inuence of alcohol, drugs or medication must not
operate the unit.
Working hours for electric lawn mower
While it is permitted to use a lawn mower at any time,
operators should always show due consideration to others
living nearby.
Switching on the unit
Do not switch on the unit until it has been completely
assembled. Before switching on the unit, always check the
connection cable for signs of damage; only a undamaged
connection cable may be used.
Note: Damaged connection cables are highly dangerous!
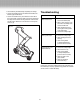
Power connection
1. Insert the power cord into a outdoor extension cord.
2. Secure as in (Fig. 1) or use the cord holder.
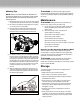
Starting/Stopping the Mower
Do not start the motor in tall grass.
Switch ON: Press the button (1) on the combined switch/plug
rst and keep it down until you pull the switch bar back.
You can now release the button while continuing to hold
the switch bar.
Switch OFF: Release the switch bar.
NOTE: While mowing, lay the connection cable safely on
footpaths and on areas which have already been mown.
5
Fig. 5
1
Fig. 4
Fig. 3
A
B